IKA RET control-visc User Manual
Page 28
28
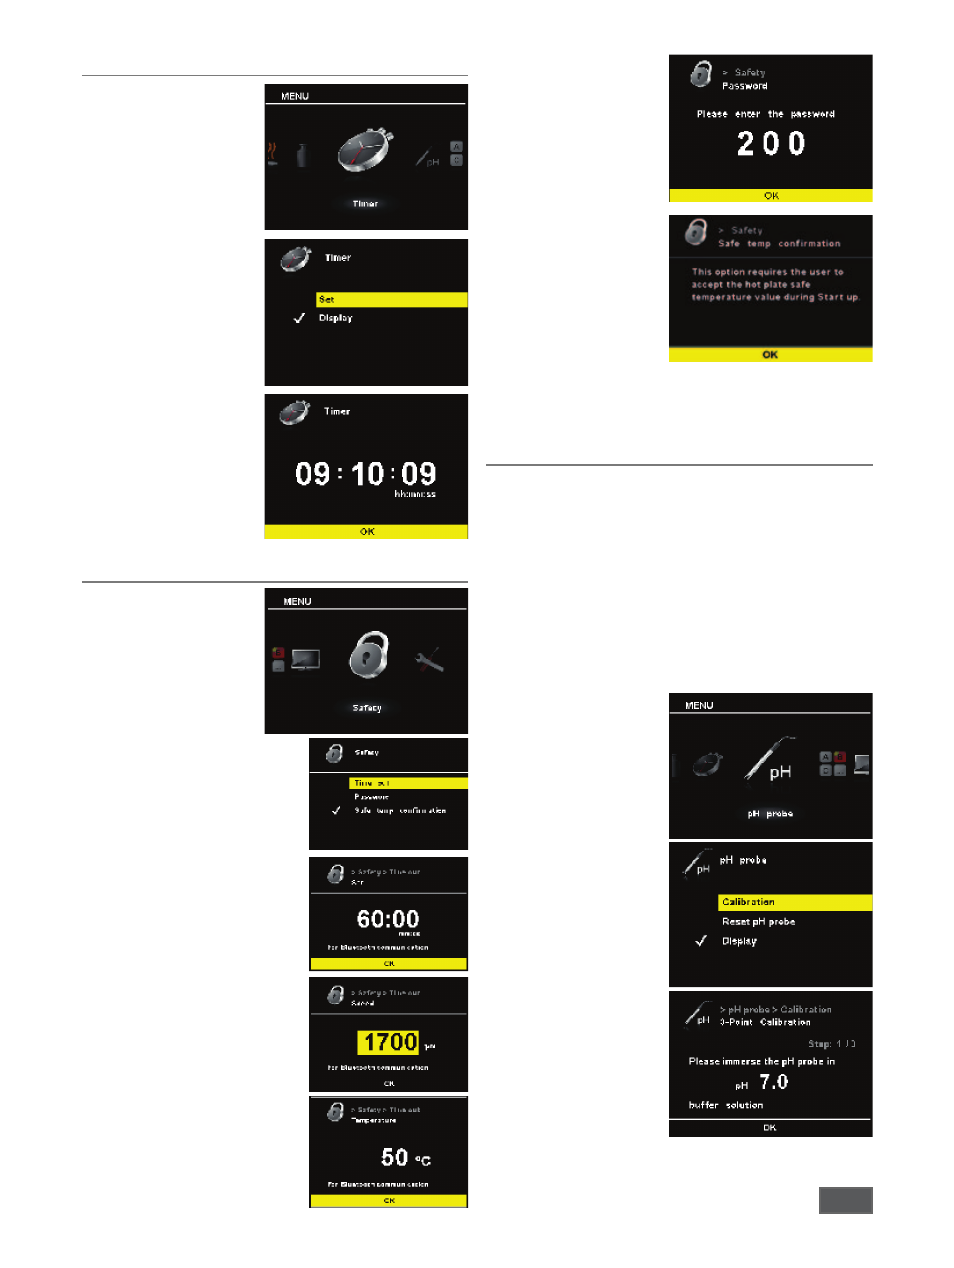
Setting of the timer
• To start the timer function,
press the (H) button on
the front membrane or
alternatively select “Timer”
from the submenu.
The timer settings are
opened by clicking on
“Set”. The timer can be set
by turning the rotary knob
(D).
• Set the hours and press the
rotary knob (D)
• Set the minutes and press
the rotary knob (D)
• Set the seconds and press
the rotary knob (D)
The selected timer (count-
down) time is shown on
the display.
Safety settings
The user has several options
in the safety settings menu,
and the device functions can
be set according to the user’s
individual requirements.
• To start, select “Safety” in
the submenu and confirm
by pressing the rotary knob
(D).
The “Timer” function is used to
define how long an interruption
in communications between the
magnetic stirrer and the wireless
controller box can be before there
is a reaction in the magnetic stirrer.
If the set time limit is exceeded,
the pre-selected temperature and
speed values become active.
Please refer to the separate in-
struction manual for the wireless
controller box for more details.
In the other menu items, the
user can enter limit values for the
temperature and speed.
• Select “Password” from the
submenu and confirm by
pressing the rotary knob
(D).
Enter a combination of
digits as your password and
confirm by pressing the
rotary knob (D).
This information screen
informs the user that they
must confirm the hot
plate safe temperature
value when starting up the
device.
• Safety circuit confirmation
at device start-up: the hot
plate safe temperature
value must be confirmed by pressing the rotary knob (D).
pH measurement
The device has an integrated pH measuring feature for
determining the pH of different liquids.
The pH sensor must be calibrated before being used to attempt a
pH measurement.
The calibration is used to adjust the pH probe and the device
so that they work together correctly. As part of the process,
the neutral and pH gradient are specified for the measurement
chain. To complete the calibration, use pH4, pH5 and pH7 buffer
solutions in accordance with DIN 19266.
Note:
a pH calibration can only be carried out with an inserted
temperature sensor.
• Scroll down to the “pH
probe” icon in the menu
• Open the submenu by
pressing the rotary knob (D)
• Open the “Calibration”
submenu and confirm by
pressing the rotary knob (D)
• Place the pH probe and
temperature sensor in the
required buffer solution.
• Once the value is stable,
confirm it by pressing the
rotary knob (D).
• Follow the instructions on
the display and place the
pH probe and temperature
sensor in the next buffer
solution.