Plumbing requirements, Initial set-up, Page 6 – Bunn Axiom Series User Manual
Page 6: For more than 25 feet from the
Page 6
-1000
213.8
101.0
200
93.3
-500
212.9
100.5
200
93.3
0
212.0
100.0
200
93.3
500
211.1
99.5
200
93.3
1000
210.2
99.0
200
93.3
1500
209.3
98.5
200
93.3
2000
208.4
98.0
200
93.3
2500
207.4
97.4
200
93.3
3000
206.5
96.9
199
92.8
3500
205.6
96.4
198
92.2
4000
204.7
95.9
197
91.7
4500
203.8
95.4
196
91.1
5000
202.9
94.9
195
90.6
5500
201.9
94.4
195
90.6
6000
201.0
93.9
194
90.0
6500
200.1
93.4
193
89.4
7000
199.2
92.9
192
88.9
7500
198.3
92.4
191
88.3
8000
197.4
91.9
190
87.8
8500
196.5
91.4
189
87.2
9000
195.5
90.8
188
86.7
9500
194.6
90.3
187
86.1
10000
193.7
89.8
186
85.6
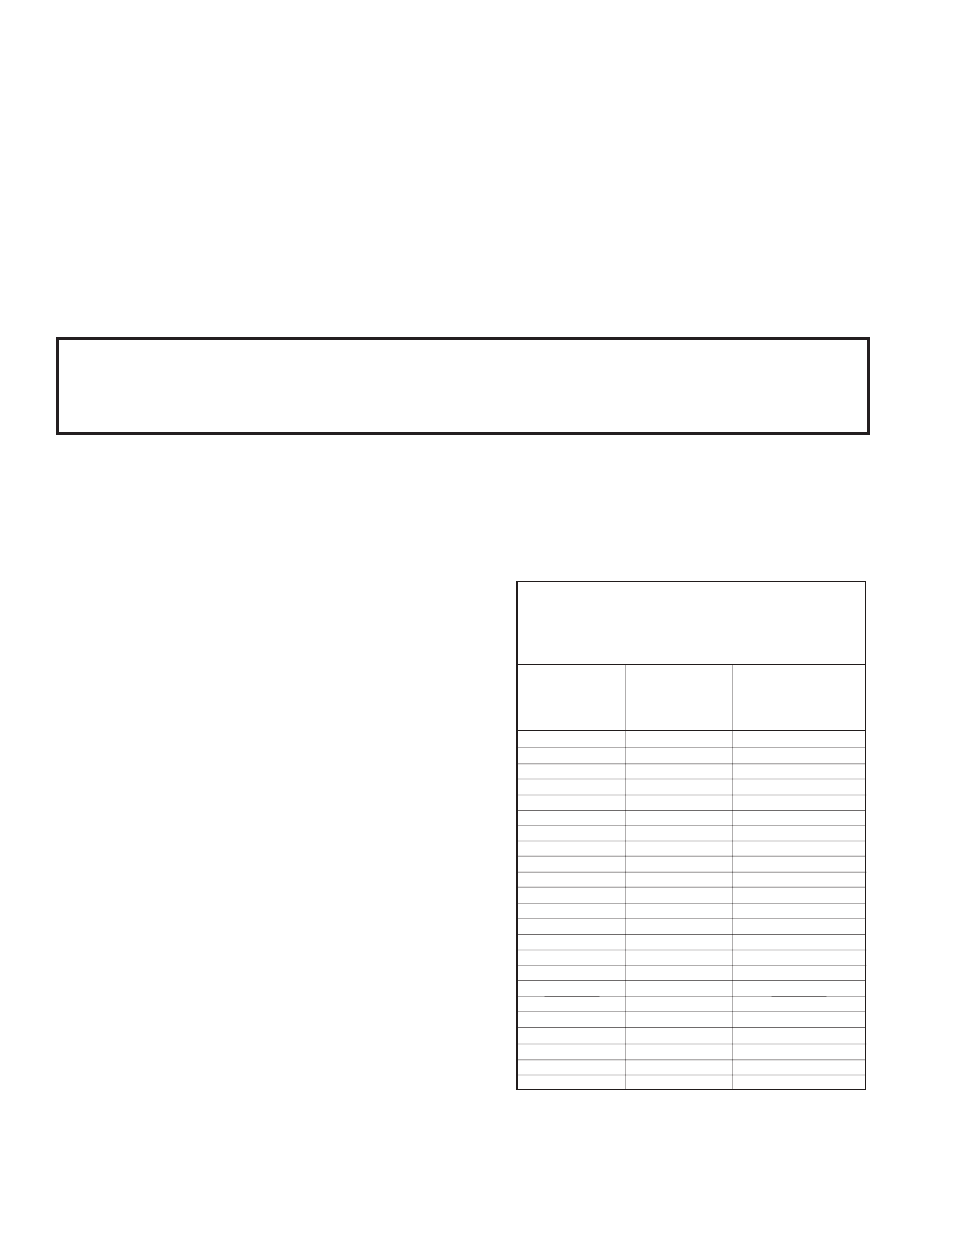
Brew water temperature is factory set at 200
o F (93.3o C)
Areas of high altitude will require lowering this tempera-
ture to prevent boiling. This chart should be used as a
guide when readjusting the brew water temperature.
Altitude
(Feet)
Boiling point
of water
o F
o C
Recommended
water temperature
o F
o C
1. Flush the water line and securely attach it to the inlet fi tting at the left rear of the brewer.
2. Turn on the water supply.
PLUMBING REQUIREMENTS
These brewers must be connected to a cold water system with operating pressure between 20
and 90 psi (138 and 620 kPa) from a
1
⁄
2
" or larger supply line. A shut-off valve should be installed in
the line before the brewer. Install a regulator in the line when pressure is greater than 90 psi (620
kPa) to reduce it to 50 psi (345 kPa). The water inlet fi tting is
1
⁄
4
" fl are.
NOTE - Bunn-O-Matic recommends
1
⁄
4
" copper tubing for installations of less than 25 feet and
3
⁄
8
" for
more than 25 feet from the
1
⁄
2
" water supply line. A tight coil of copper tubing in the water line will
facilitate moving the brewer to clean the counter top. Bunn-O-Matic does not recommend the use of
a saddle valve to install the brewer. The size and shape of the hole made in the supply line by this
type of device may restrict water fl ow.
39130 060206
1. Insert an empty funnel into the funnel rails.
2. Place an empty server under the funnel.
3. Connect the brewer to the power source.
4. Press and release the "ENABLE BREW ON/OFF"
switch. (Indicator must be lit!). Water will fl ow into
the tank and stop when the tank is fi lled to its ca-
pacity. Display will show "
PLEASE WAIT...TANK
FILLING" until tank is fi lled with water.
5. Wait approximately twenty minutes for the water
in the tank to heat to the proper temperature.
Display will show "
READY TO BREW...WATER
TEMP: 200°" when tank is at operating tempera-
ture. Some water will drip from the funnel during
this time; this is due to expansion and should not
occur thereafter.
6. Place a small container beneath the faucet and
open the faucet handle. Release it when you hear
the tank refi lling.
7. Water volumes and fl ow settings have been preset
at the factory. Refer to adjustments for the Set
Brew Volumes section of this manual should the
volume need to be increased or decreased.
8. The brewer is now ready for use in accordance
with the instructions for Coffee Brewing.
INITIAL SET-UP
This equipment must be installed to comply with the Basic Plumbing Code of the Building Offi cials
and Code Administrators International, Inc. (BOCA) and the Food Service Sanitation Manual of
the Food and Drug Administration (FDA). For models installed outside the U.S.A., comply with the
applicable Plumbing /Sanitation Code.