Steele Products SP-PB140 User Manual
Page 9
17
Operation
p fence, miter gauge and upper blade guide as
i
r
,
e
l
g
n
a
l
e
v
e
b
e
h
t
t
s
u
j
d
A
.
1
required.
t is in place and flush with the table.
r
e
s
n
i
e
l
b
a
t
e
h
t
t
a
h
t
e
r
u
s
n
E
.
2
/
n/off switch to the ‘ON’ position.
o
e
h
t
h
s
u
p
w
a
s
e
h
t
t
r
a
t
s
o
T
.
3
e wood into the moving saw blade.
h
t
e
d
i
u
g
t
u
c
e
h
t
n
i
g
e
b
o
T
.
4
o keep the saw cutting. Do not force the
t
e
r
u
s
s
e
r
p
h
g
u
o
n
e
y
l
n
o
e
s
U
.
5
cutting, allow the blade and the saw to do the work.
e ensure that the rip fence is located on the
l
g
n
a
l
e
v
e
b
a
n
o
g
n
it
t
u
c
n
e
h
W
.
6
right hand side of the blade.
When cutting rod,use a jig or fixture to prevent the workpiece from turning
.
7
,use a suitable push block to feed the
y
ll
a
c
it
r
e
v
s
d
r
a
o
b
g
n
it
t
u
c
n
e
h
W
.
8
workpiece into the saw.
to the ‘OFF’
h
c
ti
w
s
f
f
o
/
n
o
e
h
t
g
n
i
h
s
u
p
y
b
l
o
o
t
e
h
t
f
f
o
n
r
u
t
d
e
h
s
i
n
if
e
c
n
O
.
9
position and unplug the tool from the power point to prevent
unauthorized use.
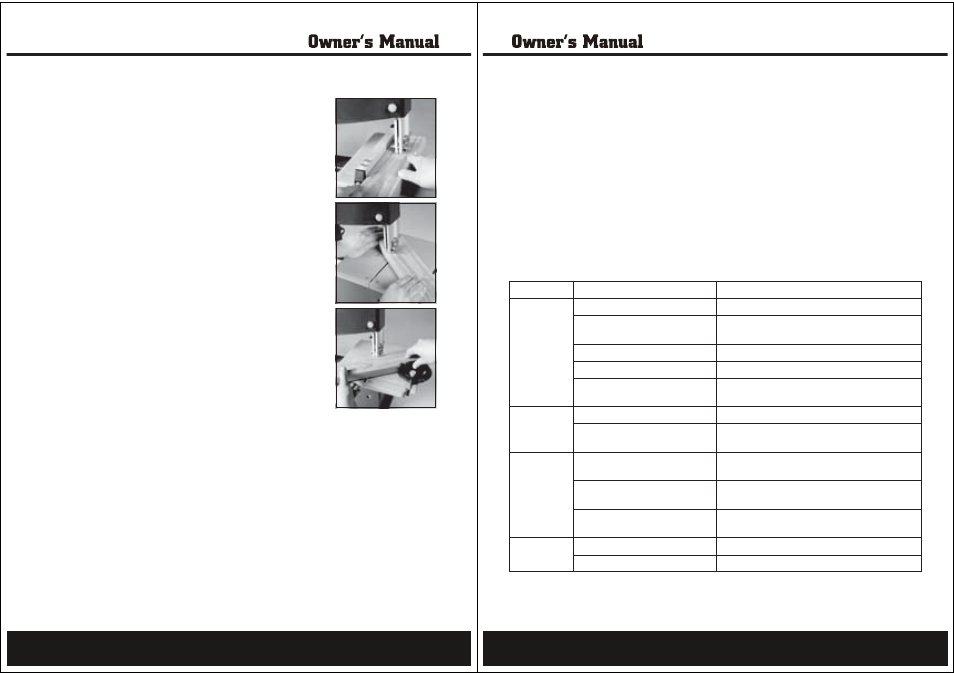
Using the REDEYE laser line generator
WARNING.
Do not stare directly at the laser beam. Never aim the beam at
any person or an object other than the workpiece.Do not deliberately aim
the beam at personnel and ensure that it is not directed towards the eye
of a person.Always ensure the laser beam is aimed at a sturdy workpiece
without reflective surfaces. i.e. wood or rough coated surfaces are
acceptable. Bright shiny reflective sheet steel or the like is not suitable for
laser use as the reflective surface could direct the beam back at the operator.
Only turn the laser beam on when the work piece is on the tool.
1. Mark the line of cut on the work piece.
blade guide as required.
r
e
p
p
u
d
n
a
e
g
u
a
g
r
e
ti
m
,
e
c
n
e
f
p
i
r
,
e
l
g
n
a
l
e
v
e
b
e
h
t
t
s
u
j
d
A
.
2
3. Switch on the laser beam using the laser light on/off switch.
4. Align the laser beam with the line on the work piece.
by adjusting the laser line. Loosen the laser
e
d
a
l
b
e
h
t
h
ti
w
l
e
ll
a
r
a
p
e
b
o
t
d
e
n
g
il
a
e
b
n
a
c
m
a
e
b
r
e
s
a
l
e
h
T
.
5
adjustment knob and move the laser beam until it is in line with the blade. Tighten the laser adjustment
knob.
6. To start the saw push the on/off switch to the ‘ON’ position.
7. To begin the cut guide the wood into the moving saw blade.
force the cutting, allow the blade and the saw
t
o
n
o
D
.
g
n
it
t
u
c
w
a
s
e
h
t
p
e
e
k
o
t
e
r
u
s
s
e
r
p
h
g
u
o
n
e
y
l
n
o
e
s
U
.
8
to do the work.
located on the right hand side of the blade.
s
i
e
c
n
e
f
p
i
r
e
h
t
t
a
h
t
e
r
u
s
n
e
e
l
g
n
a
l
e
v
e
b
a
n
o
g
n
it
t
u
c
n
e
h
W
.
9
e workpiece from turning.
h
t
t
n
e
v
e
r
p
o
t
e
r
u
t
x
if
r
o
g
ij
a
e
s
u
,
d
o
r
g
n
it
t
u
c
n
e
h
W
.
0
1
to feed the workpiece into the saw.
k
c
o
l
b
h
s
u
p
e
l
b
a
ti
u
s
a
e
s
u
,
y
ll
a
c
it
r
e
v
s
d
r
a
o
b
g
n
it
t
u
c
n
e
h
W
.
1
1
pressing the red ‘OFF’ button and unplug the
y
b
l
o
o
t
e
h
t
f
f
o
n
r
u
t
,
t
h
g
il
r
e
s
a
l
e
h
t
f
f
o
n
r
u
t
d
e
h
s
i
n
if
e
c
n
O
.
2
1
tool from the power point to prevent unauthorised use.
Maintenance
All the bearings are sealed ball bearings, lubricated
for life, and require no maintenance.
Cleaning
1. Keep the tool’s air vents unclogged and clean at
all times.
st
e
b
s
i
g
n
i
n
a
e
l
C
.
y
l
r
a
l
u
g
e
r
t
r
i
d
d
n
a
t
s
u
d
e
v
o
m
e
R
.
2
done with a soft brush or a rag.
3. Re-lubricate all moving parts at regular intervals.
4. Never use caustic agents to clean plastic parts.
CAUTION.
Do not use cleaning agents to clean the
plastic parts of the tool. A mild detergent on a damp
cloth is recommended.
General inspection
Regularly check that all the fixing screws are tight.
They may vibrate loose over time.
Repairs
Only an authorized service center should replace the
cordset or carry out other repairs. If the cordset is
damaged or worn, have it repaired or replaced by an
authorized service center.
Troubleshooting
Warning!
Turn the on/off switch to the off position and unplug the tool from the power supply before performing
trouble shooting procedures.
Trouble
Problem
Suggested remedy
Band saw will
not start
Power cord not plugged in
Ensure that the cord is connected to the power supply
Power fault, fuse or circuit breaker
tripped
Check the power supply
Cord damaged
Use authorized service center to repair or replace
Burned out switch
Use authorized service center to repair or replace
Faulty motor
Use authorized service center to repair or replace the
motor
Blade does not
reach full speed
Extension cord too long or undersized
Use extension cord heavy enough to carry the current
Tool is overheating
Turn off the tool and let it cool down to room
temperature. Inspect and clean the ventilation slots
Blade not
running straight
Loose blade
Check to see that the blade is tightened on the wheels,
adjust the blade tension if necessary
Blade tracking not adjusted
Ensure that the blade is centered on the wheels by
adjusting the blade tracking
Thrust bearings and guide pins not
adjusted
Adjust all thrust bearings and guide pins as
recommended
Vibration or
abnormal noise
Loose parts
Check to see that all screws
Moving parts excessively worn
Use authorized service center to repair or replace
18