3 recording situation, Presets of the bass v-amp/ bass v-amp pro, 1 recalling presets – Behringer LX1B PRO User Manual
Page 9: 2 editing presets, External bass amplifier, Presets of the bass v-amp/bass v-amp pro, 1 recalling presets 4.2 editing presets
9
BASS V-AMP LX1B/BASS V-AMP PRO LX1B PRO User Manual
Operation
mode
BASS V-AMP
BASS V-AMP PRO
OUTPUTS L
OUTPUTS R
OUTPUTS L
OUTPUTS R
Studio 1 (S1) Stereo operation with the selected
effects and speaker simulations
Stereo operation with the selected
effects and speaker simulations
Studio 2 (S2)
Amp w/out
FX + Cab Sim
Amp,
Cab Sim + FX
Amp w/out
FX + Cab Sim
Amp,
Cab Sim + FX
Studio 3 (S3)
Amp,
Cab Sim + FX
DI Out
(unprocessed
direct signal)
XLR/Phones: ULTRA-G active
(digital Cab Sim out)
Amp w/out FX
Amp + FX
Live 1 (L1)
Stereo operation:
Live EQ, Amp, Cab Sim and FX
Stereo operation:
Live EQ, Amp, Cab Sim and FX
Live 2 (L2)
Bi-Amping mode w/out
Cabinet Simulation
Bi-Amping mode w/out Cabinet
Simulation XLR/PHONES:
ULTRA-G active
HP: Live EQ,
Amp, FX
LP: without
effects
HP: Live EQ,
Amp, FX
LP: w/out effect
section
Live 3 (L3)
For Amp with
Live EQ w/out
Cab Sim
For Amp w/out
Live EQ with
Cab Sim
XLR/Phones: ULTRA-G active
(digital Cab Sim out)
Stereo: Amp, FX + Live EQ
Tab. 3.1: Operating modes of the BASS V-AMP/BASS V-AMP PRO with application examples
3.3 Recording situation
Depending on the recording situation and the desired effect, all studio
modes come into play (S1, S2 und S3). While S1 carries the complete signal
(including all amps, speakers and effects simulations) in stereo, S2 produces
two mono signals, whereby the right output contains the signals with all the
simulations, while the left output without the effects. A typical home recording
setup is shown in fig. 1.3.
S3 serves the purpose of recording a fully unprocessed signal (right output)
and still hear it with all the effects applied (left output). Since the
BASS V-AMP PRO has an additional PRE DSP INSERT, this operating mode
(known as “Re-Amping”) is possible in every output mode (see fig. 2.5 and 2.6).
Figure 2.6 describes the possibility of recording the direct signal via an analog
sound card input and simultaneously recording the completely processed signal.
Should the sound of your mix require reworking, you don’t have to bring the
signal in again, since the direct signal is still available.
In the case of the BASS V-AMP PRO, you can directly feed a digital mixing
console (our BEHRINGER DDX3216 in this illustration). The unit can be externally
synchronized via worldclock (fig. 2.5).
3.4 Live setup with a connection to an external
bass amplifier
The BASS V-AMP/BASS V-AMP PRO is naturally in top form when it is used
as a preamp in connection with an external bass amplifer. In the case of the
BASS V-AMP, it is advisable to connect your bass amp via the L/AMP OUT output,
while the R/DI OUT output is used to connect to the mixing console or the stage
box (fig. 1.6 and 2.3). Connecting the BASS V-AMP PRO to a mixing console should
be done via the ULTRA-G DI OUT output.
The advantage of this application: You are ultra-flexible, since you can set up the
necessary monitor volume/tone needed for the stage directly on the external
bass amplifier, and at the same time utilize the various sound options of the
BASS V-AMP/BASS V-AMP PRO. When you use the R/DI output of the BASS V-AMP
to control your mixing console, the front mix benefits from the unique sound
achieved by the BASS V-AMP, which is optimized for P.A. applications by virtue of
utilizing the equalizer in the channel strip of the mixing console.
◊
In the case of the BASS V-AMP, selecting studio 3 (S3) and connecting
Line Out R with Aux In L lets you bring the direct signal in addition to
the output signal by using the aux control.
◊
When you connect line out L with aux in R (plug plugged in half-way)
in S3 mode, you can add the direct signal to the effect signal.
◊
Avoid connecting line out L to aux in L as well as line out R and aux in R,
as feedback may occur.
4. Presets of the BASS V-AMP/
BASS V-AMP PRO
The BASS V-AMP/BASS V-AMP PRO features 125 rewritable presets, divided into
25 banks. Therefore, there are five presets per preset bank. Each preset consists
of a maximum of five “ingredients”:
•
the simulation of an amplifier (incl. GAIN, EQ and VOLUME settings),
•
the loudspeaker simulation,
•
a “pre-amp” effect (e.g. Denoiser, Auto Wah, Wah Wah),
•
a “post-amp” multi effect (e.g. stereo delay, modulation effect or a
combination of both) and
•
the compressor setting.
An overview of all presets of your BASS V-AMP/BASS V-AMP PRO is included with
this user’s manual.
4.1 Recalling presets
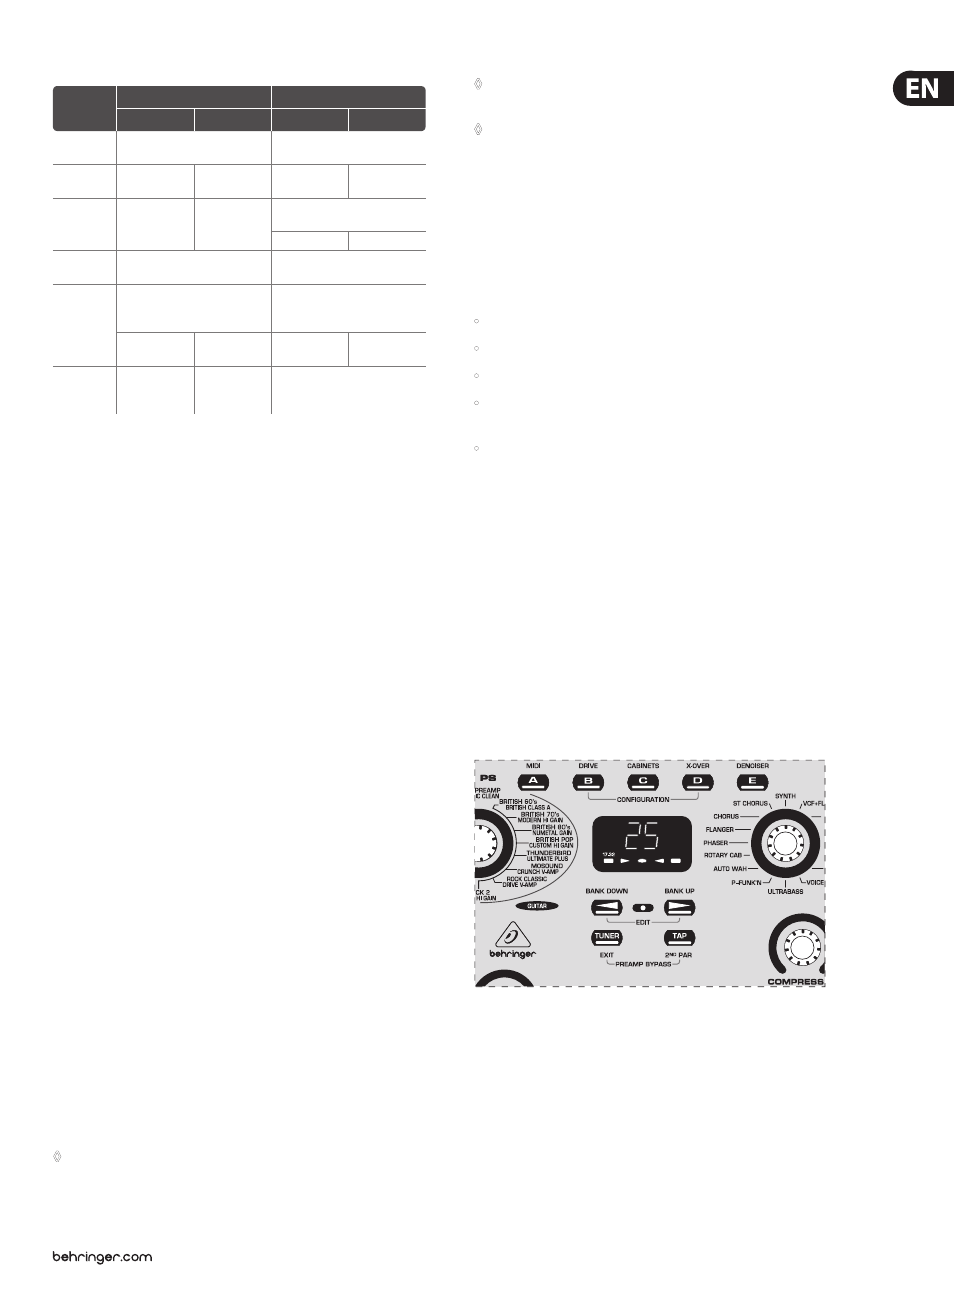
The most recently used preset is automatically recalled each time you power the
unit on. The following example in fig. 4.1 shows the BASS V-AMP: preset D in the
25th bank was selected.
In this case you can press the keys A, B, C or E to recall a different preset of the
same preset bank. You can select a different preset bank by pressing either one of
the two arrow keys.
The display of the BASS V-AMP/BASS V-AMP PRO always shows which preset bank
is selected. To recall a preset after selecting a different preset bank, press one of
the A - E keys. Which preset from the respective bank is currectly active is always
displayed in the key LED.
Fig. 4.1: Recalling presets
4.2 Editing presets
Editing presets on your BASS V-AMP/BASS V-AMP PRO is simple and quick to do.
You can for example recall a preset in order to modify it. To do so, select a desired
amp model by turning the AMPS control to the desired amp model. The preset
key LED flashes (for example, D) and signals that you have edited a preset.
Now, modify the settings of the VOLUME, BASS, MID, TREBLE and GAIN controls.
After having selected the desired effect by using the EFFECTS control, you can
modify its part of the entire sound by using the EFFECTS MIX control.