Installation instructions, Warning, Power steering conversion kit – Briggs & Stratton 1687286 User Manual
Page 21: Tilt & steering wheel installation
2-11
Power Steering Conversion Kit
Installation Instructions
Tilt & Steering Wheel Installation
Battery, Dash, Seat Deck, Seat, and Hood
Assembly Installation
1. Install battery, but DO NOT connect.
2. Install seat deck and seat. See the SERVICE
MANUAL, Section 16 - Seat Deck & Fuel Tank
Service.
3. Install dash assembly, and hood assembly. See the
SERVICE MANUAL, Section 15 - Hood &
Dashboard Service.
4. Install front tires. See the SERVICE MANUAL,
Section 8 - Steering & Front Wheel Repair.
Base, Tilt, Boot, and Steering Wheel
Installation
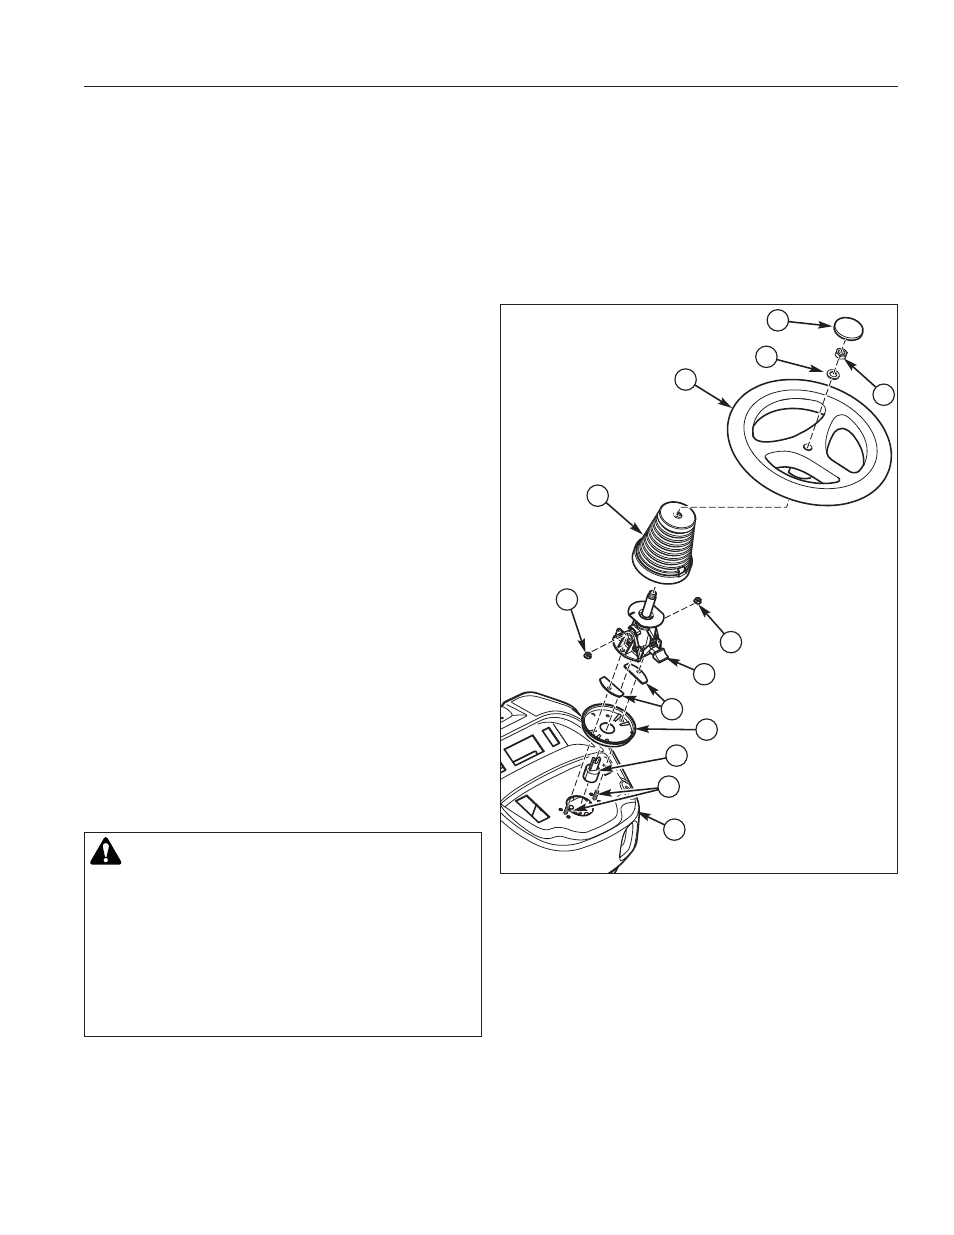
1. Attach tilt adapter (C, Figure 21) to tilt assembly (F),
and secure in place with included fastener.
2. Attach mounting plate (D), spacers (E), tilt
assembly (F) to dash (A) using installed carriage
bolts (B), and two 5/16-18 KEPS nuts (G) as shown.
Tighten nuts to 23 ft. lbs (31 Nm).
3. Install boot (H) over tilt assembly (F) so that tilt lever
extends out of boot.
NOTE: Make sure that base of boot (H) is secured to
mounting plate (D) - boot over lip edge of base.
4. Install steering wheel (I) onto tilt assembly (F).
Secure using a 5/8 washer (J), and a 5/8-18 nut (K).
Tighten nut to 180-240 in. lbs (20.3-27.1 Nm).
5. Attach steering wheel cap (L) to steering wheel (I).
Tabs on cap snaps into slots on steering wheel.
Figure 21 Base, Tilt, Boot and Steering Wheel
Installation
A. Dash
B. Carriage Bolts
C. Tilt Adapter
D. Mounting Plate
E. Spacers
F. Tilt Assembly
G. KEPS Nuts, 5/16-18
H. Boot
I.
Steering Wheel
J. Washer, 5/8
K. Nut, 5/8-18
L. Steering Wheel Cap
A
B
C
D
E
F
G
G
H
I
K
J
L
6. Check and verify that all parts removed have been
reinstalled, and tightened correctly.
7. Connect battery. See the OPERATOR’S MANUAL -
Battery Maintenance.
8. Install mower deck. See the OPERATOR’S
MANUAL.
9. Start tractor and verify all hose connections are tight
and do not leak.
10. Check fluid level of transmission and add fluid as
necessary. See the SERVICE MANUAL, Section 3
- Maintenance Procedures for fluid requirement and
levels.
WARNING
Be careful when handling the battery. Avoid
spilling electrolyte. Keep flames and sparks away
from the battery.
When removing or installing battery cables,
disconnect the negative cable FIRST and reconnect
it LAST. If not done in this order, the positive
terminal can be shorted to the frame by a tool.