2setting the temperature, 3supercool, 4fan – Liebherr ICP 3314 Comfort User Manual
Page 6: 5shelves, 6using the sectioned shelf, Control
u
Foods which give off a large amount of ethylene gas and
delicate foods, such as fruit, vegetables, salad, should
always be stored separately or wrapped so as not to reduce
the storage life; e.g. do not store tomatoes together with
kiwis or cabbage.
u
Use the front area of the refrigerator compartment floor only
for briefly putting down cooled products, e.g. when rear-
ranging and sorting. However do not leave cooled products
there otherwise they may be pushed back or tipped over
when the door is closed.
u
Do not store food too close together to enable good air
circulation.
5.3.2 Setting the temperature
The temperature depends on the following factors:
-
the frequency of opening the door
-
the room temperature of the installation location
-
the type, temperature and quantity of the food
Recommended temperature setting: 5 °C
The temperature can be adjusted continually. Once the 1 °C
setting is reached, the sequence starts again at 9 °C .
u
Call up the temperature function: press the
refrigerator
compartment
setting
button
Fig. 2 (3)
.
w
The previously-set value will flash in the temper-
ature display.
u
Change the temperature in 1 °C steps: Press the
refrigerator
compartment
setting
button
Fig. 2 (3)
until the required temperature is indi-
cated in the temperature display.
u
Change temperature continually: hold down
setting button.
w
During adjustment the value flashes on the
display.
w
The new setting is adopted approx. 5 seconds after the last
time the button was pressed and the set temperature
displayed again. The temperature in the interior gradually
adjusts to the new value.
5.3.3 SuperCool*
With SuperCool you switch to the highest cooling
performance to reach lower cooling temperatures.
Use SuperCool, to rapidly cool large amounts of
food.
When SuperCool is activated, the fan* may run. The appliance
operates with maximum cooling performance, which means
that the noise of the refrigeration unit may be temporarily
louder.
The SuperCool function uses slightly more energy.
Cooling with SuperCool*
u
Briefly press SuperCool button
Fig. 2 (6)
.
w
The SuperCool symbol
Fig. 2 (7)
lights up in the display.
w
The cooling temperature drops to the coldest value.
SuperCool is activated.
w
SuperCool is automatically deactivated after 12 hours. The
appliance continues to operate in the energy-saving, normal
mode.
To prematurely deactivate SuperCool*
u
Briefly press SuperCool button
Fig. 2 (6)
.
w
The SuperCool symbol
Fig. 2 (7)
goes out in the display.
w
SuperCool is deactivated.
5.3.4 Fan*
With the fan you can rapidly cool large quantities of
fresh food or achieve a relatively even distribution of
temperature across all the storage levels.
The forced-air cooling is to be recommended:
-
at high room temperature (above33 °C )
-
at high humidity
The forced-air cooling uses slightly more energy. To save
energy, the fan switches off automatically when the door is
open.
Switching on the fan*
u
Briefly press the fan button
Fig. 2 (4)
.
w
The fan symbol
Fig. 2 (5)
shines.
w
The fan is active. In some appliances, the fan is only acti-
vated when the compressor is running.
To switch off the fan*
u
Briefly press the fan button
Fig. 2 (4)
.
w
The fan symbol
Fig. 2 (5)
goes out.
w
The fan is switched off.
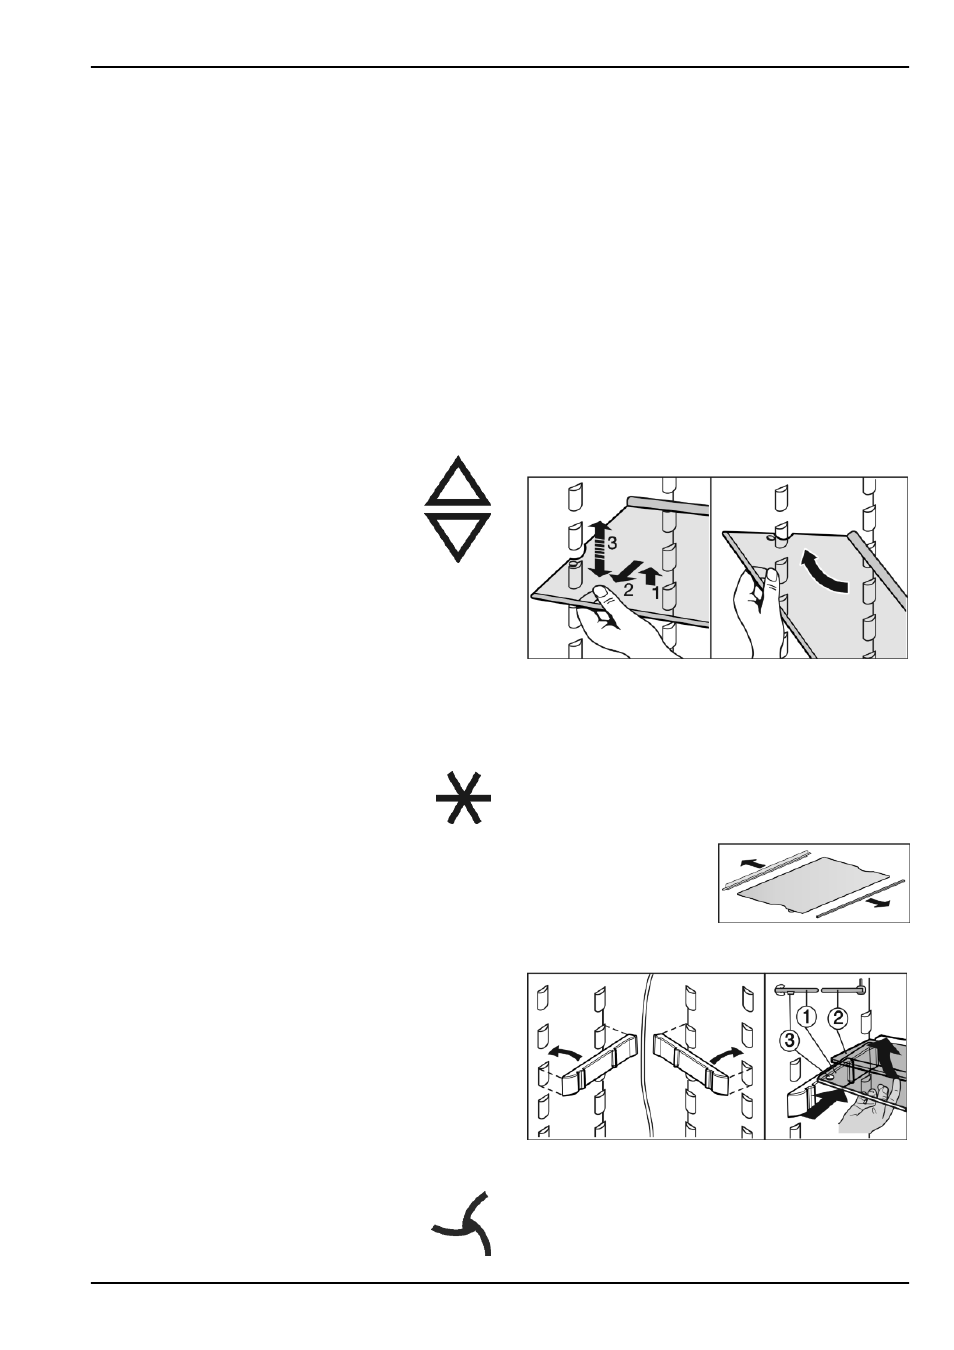
5.3.5 Shelves
Moving or removing shelves
The shelves have stops preventing them from being uninten-
tionally pulled out.
Fig. 3
u
Lift the shelf slightly and pull forward a little.
u
Adjust the height of the shelf. To do so, push the cut-outs
along the supports.
u
In order to remove the shelf fully, place it at a slant and pull
out towards the front.
u
Insert shelf with the raised edge pointing upwards at the
back.
w
The food does not freeze onto the rear wall.
Dismantling shelves
u
The shelves can be disman-
tled for cleaning.
5.3.6 Using the sectioned shelf*
Fig. 4
u
The glass shelf with stop face (2) has to be at the back.
u
The glass plate (1) with pull-out stops must be at the front so
that the stops (3) face downwards.
Control
6
* Depending on model and options