Pro mixer dx626 – Behringer DX626 User Manual
Page 6
6
PRO MIXER DX626
2. CONTROL ELEMENTS
Adjust the channel volume with the CHANNEL fader.
The PRO MIXER has a talkover function. This feature is
actually quite simple: by pushing the TALK button, the
signal of the other input channels is lowered (TALK LED
lights up), enabling your voice to be heard more clearly
over the microphone.
The MASTER control determines the output volume at the
MASTER output (see
).
A BALANCE control for the MASTER output is for shaping
the stereo image.
The BOOTH control determines the output volume at the
BOOTH output (see
).
The CUE control determines the volume of the headphones
signal (PFL signal).
+
The PFL signal is your headphones signal. It
enables you to preview music without affecting
the MASTER signal
. The headphone channel signal
is taken pre- fader (PFL=Pre-Fader Listening).
With the three buttons CH-1, CH-2 and CH-3, you determine
the signal source for the headphones signal. You can
preview the channels individually or listen to all three
simultaneously.
The MASTER/CUE fader allows you to control the volume
ratio between the input channels signal and the MASTER
signal on your headphones.
Here you can read the volume level of the PFL and MASTER
signals from three, 10-character LED displays. The lower
LED chain displays the PFL signal and the two upper
LEDs display the right and left MASTER signals.
The PRO MIXER DX626 BPM counter is an extremely useful
feature. It ensures smooth transition from one track to the
next, making your session an absolute success. It can
calculate the various tempi of tracks in bpm (beats per
minute). The left display indicates the tempo on channel 2
and the right display shows the tempo on channel 3.
The CROSSFADER is for crossfading between channels
2 and 3.
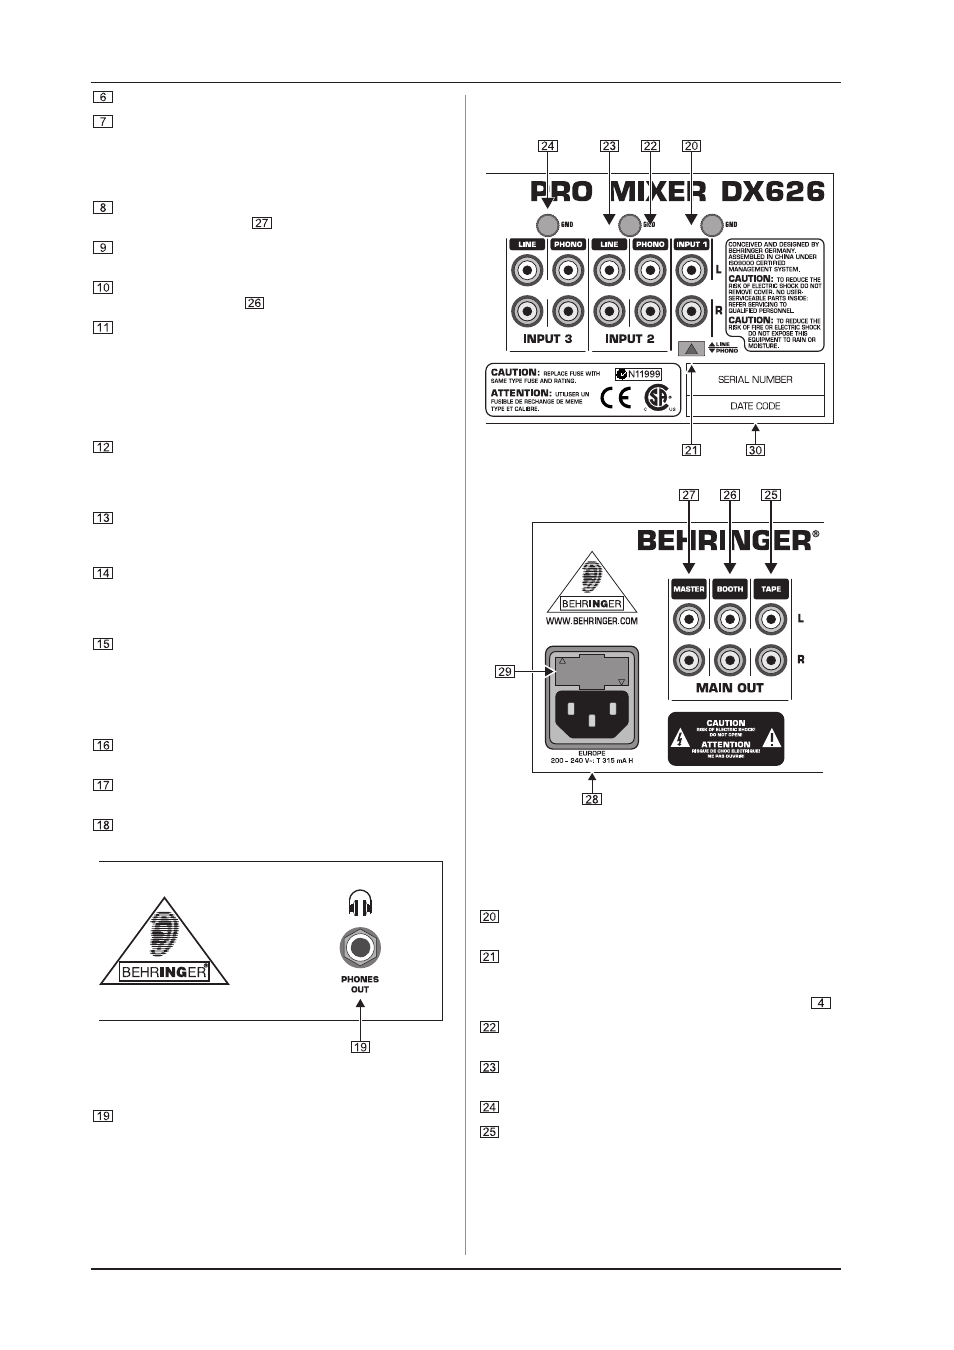
This is the connector for a commercially available 12-volt
BNC lamp.
Turn on the DX626 with the POWER button.
Fig. 2.2: Headphones connector
The HEADPHONES connector enables you to preview
pieces of music (PFL signal) on your headphones. Your
headphones should have a minimum impedance of
32 ohms.
2.2 Rear panel
Fig. 2.3: The DX626 rear connectors
With the exception of the microphone and headphone
connectors, the PRO MIXER DX626 only has cinch jacks, which
can be found on the rear panel of the console.
This is the INPUT 1 input for channel 1. It can be switched
to phono or line input sensitivity.
With the PHONO/LINE switch at the channel 1 input you
can choose between LINE and PHONO input. However,
in order to do that, the MIC/LINEPHONO switch on the
front panel must be switched to LINEPHONO (see
).
The PHONO inputs from channels 2 and 3 are also for
connecting turntables.
These are the LINE inputs from channels 2 and 3 for
connecting tape decks, CD or MD players etc.
The GND connectors ground the turntables.
Using the TAPE output you can record your music by
connecting devices such as tape decks, DAT recorders
etc. Unlike the MASTER and BOOTH outputs, the output
volume is fixed, making it necessary for you to adjust the
input level on the recording device.