BenQ PE8700 User Manual
Benq pe8700 video projector user’s manual, Warning
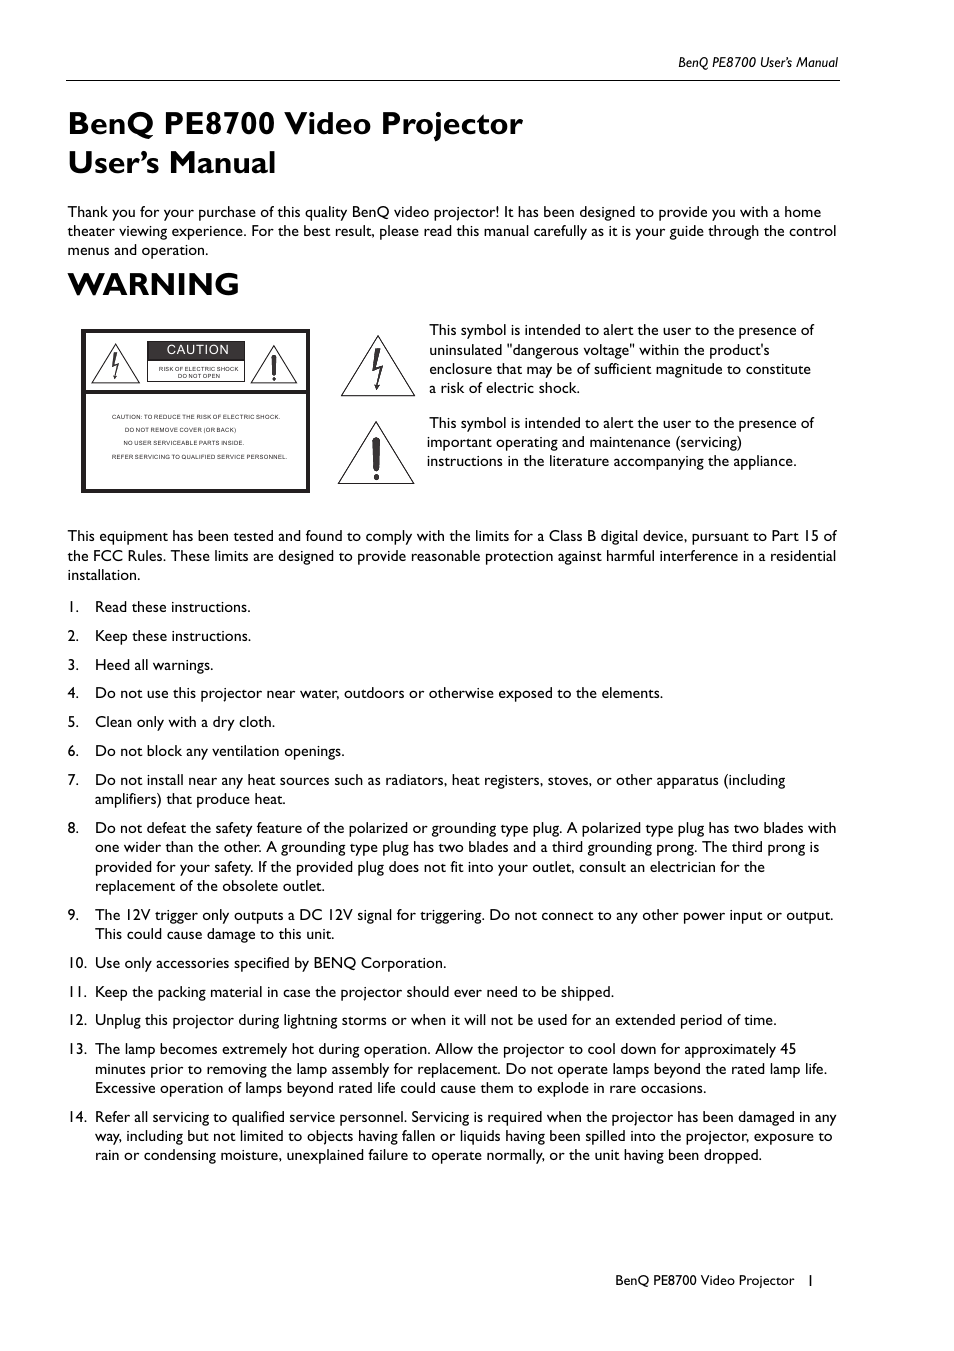
Table of contents
Document Outline
- SCREEN Å : Control the screen up directly. This function is only available for BENQ's accessory s...
- SCREEN Ç : Control the screen down directly. This function is only available for BENQ's accessory...
- ON
- Hold this button down for ONE second to turn the projector on.
- OFF
- Press this button to turn the projector off.
- ANA (Anamorphic): Expands an image with a 4:3 aspect ration linearly along the horizontal axis to...
- STANDARD (4:3): Displays the projected image with a 4: 3 aspect raion in the center of screen.
- LB (Letterbox): Enlarges an image in letter box format to display in full-screen format with a 16...
- WIDE: Expands an image with a 4:3 aspect ratio NON-linearly along the horizontal axis to provide ...
- THRO (Through): One- to-one mapping is performing without any scaling of the image. The image is ...
- V (VIDEO): Composite video signal input.
- S-V (S-VIDEO): S-Video signal input.
- CP (Component): Component Y/CB/CR input.
- CP HD (Component HD): DTV Y/PB/PR signal input.
- RGB HD: DTV RGBHV signal input.
- PC (DVI): Computer and DVI signal input
- +: Enlarges the size of the PIP window.
- ¯ : Shrinks the size of the PIP window.
- PIP (Picture-in-Picture)
- Enables the PIP function. Use the ARROW keys to adjust the position of the PIP window (Please see...
- ACTIVE: Switches to the active window in PIP display mode.
- POP (Picture-on- picture)
- Enables the POP function. ( Please see "PIP (Picture-In- Picture)/POP (Picture-On- Picture) funct...
- LIGHT: Turns the backlight of the remote control on.
- DEFAULT
- Restores the default settings for the current input source.
- Memory 1 : Restores settings saved in memory 1
- Memory 2 : Restores settings saved in memory 2
- Memory 3 : Restores settings saved in memory 3
- ARROW (Е/Й/З/С)
- Used to select the menu or to make various adjustments.
- ENTER
- Enters the setting for items shown in the menu.
- EXIT
- Exits and saves the setting(s) of items in the menu.
- MENU
- Turns the on-screen display control menu on or off.
- BenQ PE8700 Video Projector
- User’s Manual
- WARNING
- 1. Read these instructions.
- 2. Keep these instructions.
- 3. Heed all warnings.
- 4. Do not use this projector near water, outdoors or otherwise exposed to the elements.
- 5. Clean only with a dry cloth.
- 6. Do not block any ventilation openings.
- 7. Do not install near any heat sources such as radiators, heat registers, stoves, or other appar...
- 8. Do not defeat the safety feature of the polarized or grounding type plug. A polarized type plu...
- 9. The 12V trigger only outputs a DC 12V signal for triggering. Do not connect to any other power...
- 10. Use only accessories specified by BENQ Corporation.
- 11. Keep the packing material in case the projector should ever need to be shipped.
- 12. Unplug this projector during lightning storms or when it will not be used for an extended per...
- 13. The lamp becomes extremely hot during operation. Allow the projector to cool down for approxi...
- 14. Refer all servicing to qualified service personnel. Servicing is required when the projector ...
- Table of Contents
- 1. Overview
- Features
- Location
- Front/Upper Side
- Rear/Bottom Side
- Controls and Functions
- Control Panel
- 1.
- Lit orange when the AC power cord is plugged into the wall outlet (standby mode). Once in the sta...
- Lit green when the power is turned on (operational mode).
- Flashes orange for the first 30 seconds after powering up, indicating that the lamp is warming up.
- Flashes green for one minute after the projector is turned off to indicate that the lamp is cooling.
- Lit red when the lamp has developed a problem. Please contact your BenQ dealer for assistance.
- 1.
- Control Panel
- Zoom Ring
- Adjusts the size of image
- Focus Ring
- Adjust the focus of the projected images.
- 2. Installation
- Remote Control
- Projector
- Plug the supplied power cord into the AC inlet on the rear of this unit.
- Turn on the main power switch at the rear of this unit (next to the AC inlet). The POWER LED will...
- 1. Choose the screen width you desired from the chart below, installing the projector at a distan...
- 2. Fine tune the projected image size using the zoom and focus rings on the projection lens.
- 3. Decide on the exact height you desire for the center of the screen's Height.
- 4. Mount this unit using ceiling mounting rack with a suitable length (Roof - Height 1 - Offset -...
- 5. Alternatively, use the adjusters to fine tune the projection angle to meet your requirements, ...
- 1. Choose the screen width you desire from the chart below, installing the projector at a distanc...
- 2. Fine-tune the projection image size with the zoom and focus rings on the projection lens.
- 3. Decide on the exact height you desire for the center of the screen’s Height.
- 4. Place the projector on a table with a suitable height (Height - Offset) to meet your requireme...
- 5. Alternatively, use the adjusters to fine-tune the projection angle to meet your requirements, ...
- 3. Connecting
- 4. Basic Operation
- Turning the Power on
- The Power LED shines orange when power is applied and the power switch is in the on position.
- Press and hold the ON key on the remote control or the STANDBY/ON key on the projector for ONE se...
- " Searching…." will be displayed on the screen before the projector identifies the input signal. ...
- If the horizontal frequency of the input signal exceeds the range of the projector (XGA), a messa...
- Zoom/Focusing
- Selecting an Input Source
- Selecting an ASPECT Ratio
- Select a proper aspect ratio according to the format of the input signal. There are five aspect r...
- ANA (ANAMORPHIC): Expands an image with a 4:3 aspect ratio linearly along the horizontal axis to ...
- Standard (4:3): The input signal will be scaled to accommodate a 4:3 aspect ratio display in the ...
- LB (LETTERBOX): An image in letter box format is enlarged to accommodate a 16:9 aspect ratio full...
- THRO (Through): One-to-one mapping is performed on the input signal without any scaling with the ...
- WIDE: A 4:3 aspect ratio image is enlarged NON- linearly in horizontal direction to accommodate 1...
- Selecting the Video Memory
- Setting Menu
- Press the MENU button to turn the on-screen display menu on or off.
- Use the ARROW buttons (Е/Й/З/С) to select items in the menu or to make various adjustments.
- Press the ENTER button to enter the setting for the current items in the menu, or press the EXIT ...
- For more detailed settings, see "5. Menus" on page19.
- PIP (Picture-In-Picture)/POP (Picture-On-Picture) functions
- Press the PIP button to enable the PIP function.
- For PIP purposes, there are two groups of inputs classfied according to their display modes: Vide...
- The PIP function allows the projector to display one input from the Graphic Group within one inpu...
- Press the PIP button to switch to the main window or turn off the PIP function.
- Select the input source for the main window by pressing the INPUT button.
- Press the POP key to enable the POP function.
- Press the ACTIVE button to switch to the active window. You can change the input signal setting i...
- Press + or - to adjust the size of the PIP window.
- Adjust the position of the PIP window with the ARROW keys (Е/Й/З/С).
- Turning the Projector Off
- Turning the Power on
- 5. Menus
- Using the Menus
- PICTURE Menu
- 1. BRIGHTNESS: Adjusts the picture brightness to values between 0 and 60. The higher the value, t...
- 2. CONTRAST: Adjusts the picture contrast to values between 0 and 30. The higher the value, the g...
- 3. COLOR: Adjusts the color intensity to values between 0 and 60. The higher the value, the more ...
- 4. SHARPNESS: Adjusts the picture sharpness to values between -10 and +10. The higher the value, ...
- 5. TINT: Adjusts the color tones to values between 0 and 30. The higher the value, the more green...
- 6. COLOR TEMP.: Adjusts the color temperature.
- 7. FILTERS: Turn the video filters on or off. Filters can reduce noise in the picture to produce ...
- 8. RED: Adjusts red hues independently to values between 0 and 30. The higher the setting, the gr...
- 9. GREEN: Adjusts green hues independently to values between 0 and 30. The higher the setting, th...
- 10. BLUE: Adjusts blue hues independently to values between 0 and 30.The higher the setting, the ...
- 11. YELLOW: Adjusts yellow hues independently to values between 0 and 30. The higher the setting,...
- DISPLAY Menu
- 1. SOURCE: Selects the input source.
- 2. ASPECT: There are five aspect ratios that can be selected for video signal inputs:
- ANAMORPHIC: Expands an image with a 4:3 aspect ratio linearly along the horizontal axis to provid...
- STANDARD (4:3): Scales an input image so that it is displayed with a 4:3 aspect ratio display mod...
- LETTERBOX: Enlarges an image in letter box format to display in full-screen format with a 16:9 as...
- WIDE: Expands an image with a 4:3 aspect ration NON-linearly along the horizontal axis to provide...
- THROUGH : One-to-one mapping is performed without any scaling of the image, The image is displaye...
- 3. PC&HDTV: The following settings are only available with a PC or DTV RGB signal:
- 4. SAVE: There are three video memories in which the user can store settings, including all items...
- 5. LOAD: Loads the settings from one of three video memories.
- ENVIRONMENT Menu
- 1. DEFAULT: Loads the default value of the current input source.
- 2. LAMP TIMER: Resets the lamp timer. This should only be done after the lamp has been replaced.
- 3. AUTO OFF: Sets the auto-shutdown timer. The timer can be set to a value between10 minutes and ...
- 4. LAMP HOURS: This displays the number of hours the lamp has been used. (The lifetime of the lam...
- INSTALLATION Menu
- 1. LANGUAGE: There are eight languages that can be selected for the menus: English, French, Spani...
- 2. MIRROR: The projector can be installed on a ceiling or behind a screen, or with one or more mi...
- 3. KEYSTONE: Corrects for trapezoidal distortion resulting from the angle of projection. It can p...
- 4. OSD POSITION: OSD POSITION can be adjusted between 0 and 100 degrees in both vertical and hori...
- 5. BACKGROUND: Selects a proper background color for your screen when there is no input signal.
- 6. PATTERN: One test pattern (an 8 x 8 grid) will be displayed when you select this menu item. It...
- 6. Additional Information
- Warning Message
- It is normal for illumination from the lamp to dim somewhat when the projector has been used for ...
- The message "Lamplife is expired ! Please change a new lamp. And reset the lamp timer." will be d...
- The message " Please change the lamp, Lamp will exceed its lifetime after (hours): " will be disp...
- The message " Please change the lamp ! " will be displayed on the screen continuously and the POW...
- The projector will turn off automatically after 10 minutes.
- Replace the Lamp
- 1. Loosen the screws on the front lamp cover.
- 2. Remove the front lamp cover.
- 3. Loosen the three screws on the lamp shield.
- 4. Take off the lamp shield.
- 5. Loosen the two screws on the lamp module.
- 6. Pull out the lamp module horizontally.
- 7. Insert the new lamp module into the projector horizontally until it is securely in place.
- 8. Tighten the two screws on the lamp module.
- 9. Put on the lamp shield.
- 10. Tighten the three screws on the lamp shield.
- 11. Put on the front lamp cover.
- 12. Tighten the screws on front lamp cover.
- 13. Turn the power on and go into Environment menu to reset the "Lamp Timer" item.
- Troubleshooting
- Specifications
- Dimensions
- Warning Message