Pro mixer djx400, Connectors – Behringer DJX400 User Manual
Page 7
7
PRO MIXER DJX400
3.CONNECTORS
To exit the SYNC LOCK or BEAT ASSIST modes, simply push
the SYNC LOCK button once more on both channels.
3. CONNECTORS
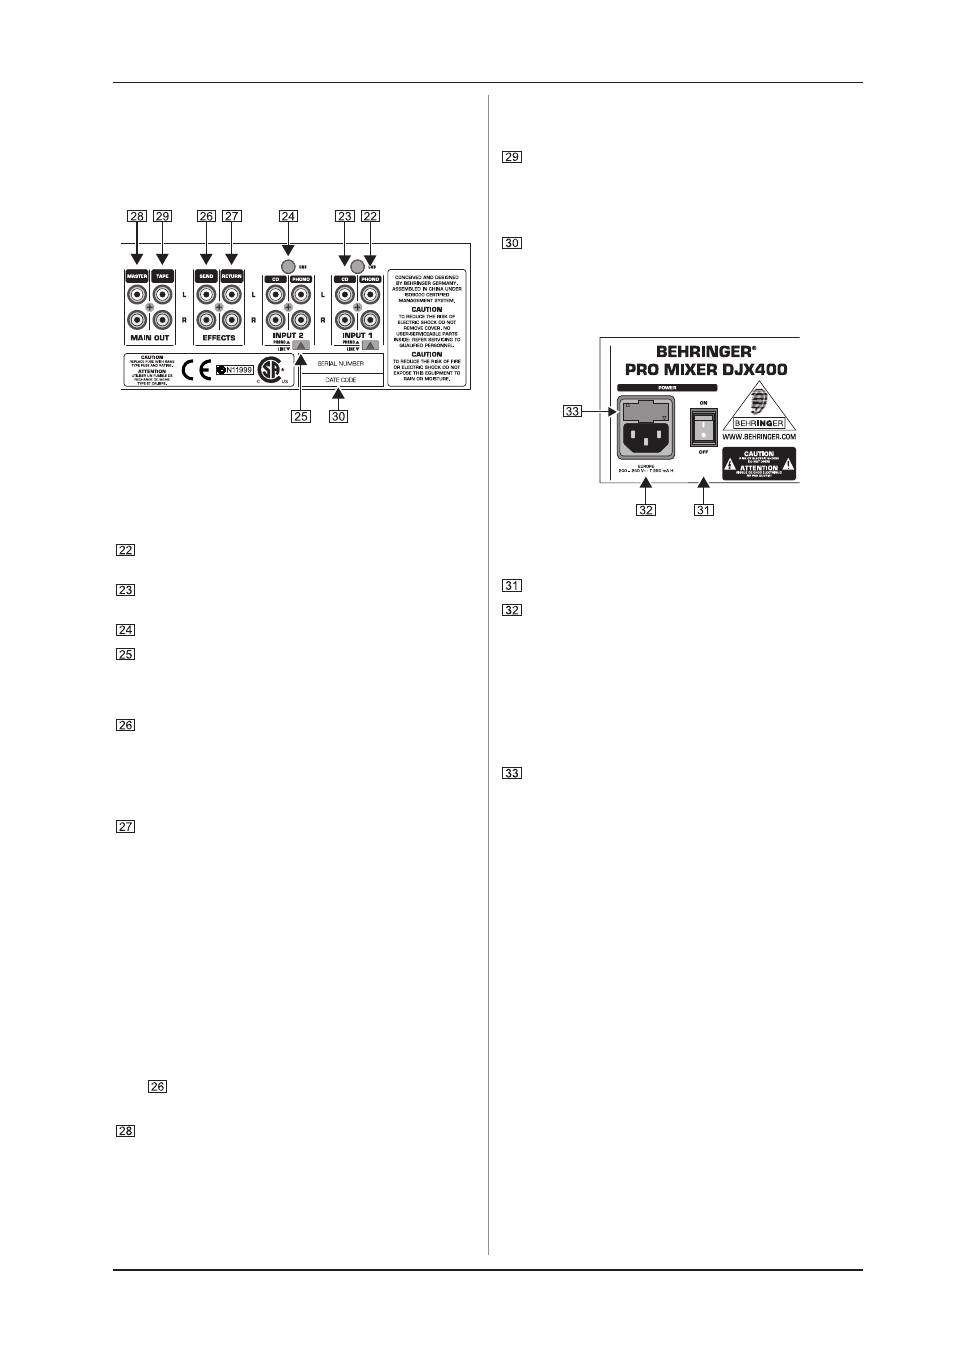
Fig. 3.1: The DJX400 rear panel connectors
With the exception of the microphone and headphone
connectors, the PRO MIXER DX400 only has cinch jacks, which
can be found on the rear panel of the console.
The PHONO inputs for channels 1 and 2 are for
connecting a turntable.
These are the CD inputs (Line) to connect a tape deck, CD
or MD player etc.
The GND connectors ground the turntables.
With the PHONO/LINE switch it is possible to switch the
input sensitivity of the PHONO inputs to line-level. This
allows you to connect a tape deck or a CD player to the
PHONO inputs.
The DJX400 has an integrated effect path for an external
effect device The MONITOR section signal is tapped via
SEND and routed, for example, to an echo device. Thus,
the signal at the SEND connector is identical to the
headphones signal and is selected with the MONITOR
SELECTOR button.
The externally processed signal is added to the MASTER
output signal upon its RETURN. The effect signal volume
may only be adjusted at the output control of the effect
device itself, as the DJX400 has no additional level control
for this purpose. If no effects are needed, the RETURN
can also be used as an additional recording path for a
sampler or the like. Here, too, the output volume must be
adjusted on the external device.
+
As soon as you are ready to add an effect signal to
the output signal, the channel on your headphones
(MONITOR) and the channel at the output (MASTER)
must be the same. If you are listening to the other
channel on your headphones, the effect signal of a
completely different song will be added to the
MASTER signal. This is because the effect device
gets its input signal from the MONITOR section (see
) and the effect signal produced in this way is
added to the MASTER signal.
The MASTER output is for connecting to an amplifier and
is to be adjusted with the MASTER LEVEL control.
+
Always turn the power amps on last to avoid inrush
currents that can easily damage your speakers.
And, to avoid sudden and unpleasant surprises
for your ears, make sure there is no signal at the
DX400 before turning on the power amps. To be
sure, slide all the faders to the bottom and switch
all controls to the zero position.
Using the TAPE output you can record your music by
connecting devices such as tape decks, DAT recorders
etc. Unlike the MASTER output, the output volume is fixed,
making it necessary for you to adjust the input level on the
recording device.
DJX400SERIAL NUMBER. Please take the time to complete
and return the warranty card within 14 days of the date
of purchase. Or, simply register online at
www.behringer.com
Fig. 3.2: DJX400 mains connection and serial number
Turn the DJX400 on with this switch.
This is the connector for the power cable. This is where
the advantage of a sophisticated internal power supply
can be seen: the pulse behaviour of each amplifying circuit
is mainly determined by the voltage reserves available.
Each mixing console is equipped with numerous
operational amplifiers (op amps) to process line level
signals. Due to limited output of their power supplies,
many mixing consoles show signs of stress when
subjected to heavy loads. But not your DJX400: the sound
is always clear and transparent.
FUSE HOLDER / VOLTAGE SETTING. Before connecting
the unit to the mains, ensure that the voltage setting
matches your local voltage. Blown fuses should only be
replaced by a fuse of the same type and rating. On some
units, the fuses holder can be switched to one of two
positions, i.e. 230 V and 115 V. N.B: should you desire to
operate the unit outside Europe at 115 V, a higher fuse
rating is required.