Hg f e, Latch installation, Removal – Britax Car Seat User Manual
Page 8
12
13
Removal
If connected, disconnect the Versa-Tether
®
from the
tether anchor.
Release each LATCH harness from the LATCH anchor
by pressing the red release button on the LATCH
connector.
When not in use, always store the LATCH connectors in storage slots. See
page 30.
•
•
•
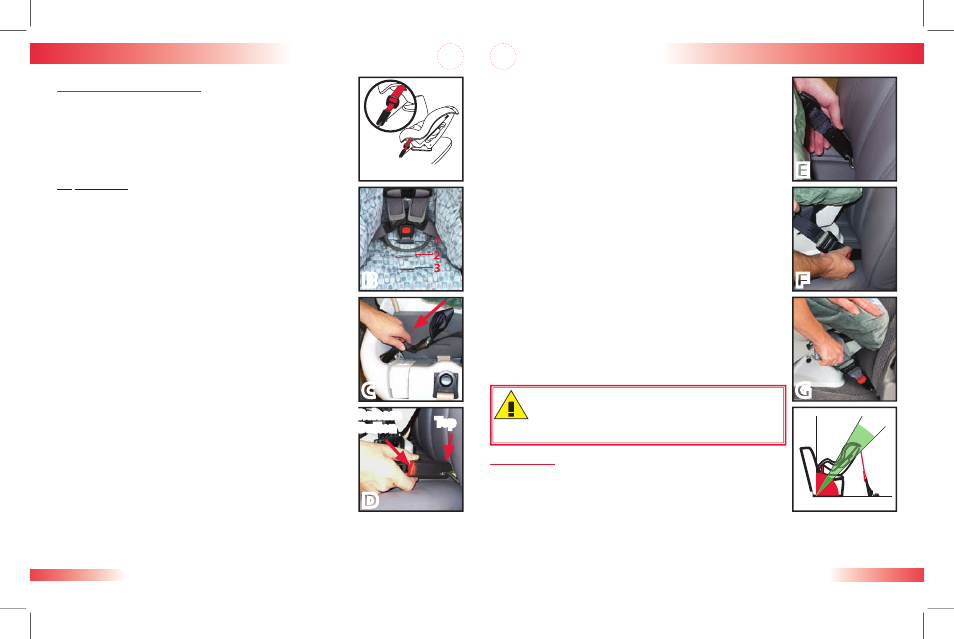
LATCH Installation
Figure A illustrates a typical rear-facing LATCH installation.
Verify that your vehicle is equipped with LATCH anchors.
If LATCH anchors are not available, you must use vehicle
belt installation methods.
IMPORTANT:
This child seat is shipped with the buckle in
position 1 (Fig. B). Use buckle position 1 or 2 that is closest to but
not underneath your child. Do not use buckle position 3 in rear-
facing mode. See page 33 for instructions on moving the buckle.
If stored, remove LATCH strap and connectors from
storage slots under cover. See page 30.
Press and hold each LATCH adjuster release button,
then pull each LATCH strap to full length.
IMPORTANT:
The LATCH strap must rest IN FRONT OF the
child seat buckle when using buckle slots 1 or 2 (Fig. B). If
the LATCH strap is not in this position, pull the LATCH strap
and connectors from behind the buckle strap and re-thread
accordingly.
Thread each LATCH connector through adjacent
rear-facing belt slot (Fig. C).
LATCH connectors should be in an upright position
(as shown in figure D).
Fully recline the child seat and place it sideways on the
vehicle seat with the front facing toward you.
Verify LATCH strap is not twisted and attach closest
LATCH connector to the vehicle seat back to the
farthest LATCH anchor (Fig. E).
Rotate seat into rear-facing position.
Verify the LATCH strap is not twisted and attach the
remaining LATCH connector to the adjacent LATCH
anchor (Fig. F).
NOTE:
It may be necessary to switch LATCH connectors as shown on page 29 if ANY
of the following conditions exist:
LATCH connector is not in an upright position as shown in figure D.
•
•
1
2
3
4
5
6
7
8
•
Installation: Rear-facing
Rear-Facing
Rear-Facing
A
D
Top
Release
Button
B
C
LATCH strap is twisted.
A positive click is NOT heard when LATCH connector and
LATCH anchor are connected.
NOTE:
If a positive click is not heard, but LATCH connector
is in an upright position, you should not switch LATCH
connector. The strap may be too tight or twisted, or there may
be debris in LATCH connector.
Push the child seat firmly into the vehicle seat while
pulling each LATCH adjuster strap tight (Fig. G).
Verify all connections are secure and the child
seat is secure.
When properly installed in the rear-facing position, the
back angle of the child seat should be 30º – 45º from
vertical (not to exceed 45º) when the car is parked on a
level surface (Fig. H).
If necessary, the proper recline angle can be achieved by
placing a rolled towel or pool noodle in the crease of the
vehicle seat to level the child seat’s base.
Rear-facing installation can be improved by the use of the
Versa-Tether
®
see pages 25 – 28.
The child seat is secure when it cannot be moved more than one
inch (2.5 cm) front-to-back or side-to-side at the belt path.
•
•
9
10
•
•
•
•
Installation: Rear-facing
30–45º
0º
90º
H
G
F
E
WARNING!
Do not raise the child seat off
the front edge of the vehicle seat. This could
cause your child seat not to perform as intended.
P276000_R2.indd 12-13
1/2/2008 10:16:01 AM