Operation, Basic operation, Using headphones – Pioneer U-05-S User Manual
Page 9: Settings, Direct setting, Hi-bit 32 setting, Up sampling setting
9
Operation
Basic operation
1
Turn power ON.
Press the front-panel
/I STANDBY/ON button.
• The power indicator in the center of the button will
light.
2
Select the desired output connector.
Rotate the front-panel
OUTPUT knob.
Set to LINE to select the analog output connector.
3
Select the desired input source.
Rotate the front-panel
INPUT knob, or press the
corresponding
direct input selector button on the
remote control.
• The selected input will appear in the display window.
• DSD data can be played only when using the USB
connection.
4
Operate the playback device.
For details, consult the operating instructions for your
playback device.
5
Adjust the sound volume.
Rotate the unit’s front-panel
VOLUME knob, or use the
VOL +/− buttons on the remote control.
Using headphones
1
Connect your headphones.
Connect your headphones to the appropriate front-
panel connectors (PHONES 1 to 3).
2
Select the headphones output.
Use the front-panel
OUTPUT knob to select the
connector to which you have attached the headphones.
3
Adjust the headphone gain.
The front-panel
PHONES GAIN knob can be used
select
LOW or HIGH gain.
Under normal conditions,
HIGH gain should be
selected. If the sound is distorted when the volume is
low, however,
LOW gain can be selected to equalize
the acoustic quality.
4 Make
fi ne adjustments to the headphones
volume.
Use the front-panel
FINE ADJUST knob or the remote
control’s
FINE +/− buttons to make fi ne adjustments.
F I N E A D J U S T
| >
F I N E A D J U S T
< |
• Adjustments are possible within ±6 steps of the
reference value.
• Settings are retained even after using the
VOL +/−
button or
VOLUME knob.
Settings
Direct setting
Input signals are output directly, without passing
through the DSP.
This makes it possible to achieve audio output loyal to
the original input signal.
• Factory default setting: ON
1
Change the setting.
• Each time the remote control’s
DIRECT button is
pressed, the setting alternates between ON and
OFF.
• When the function is set to ON, the front-panel
DIRECT indicator lights.
Hi-Bit 32 setting
This setting increases the dynamic range of digital
audio signals.
Audio signals between 16 bit and 24 bit are
requantized to 32-bit signals, making possible
musical expression that is smoother and more
fi nely graded.
This setting is supported when the Direct setting
is OFF, and has effect only on linear PCM signals.
• Factory default setting: ON
1
Change the setting.
• Each time the remote control’s
Hi-Bit 32 button
is pressed, the setting alternates between ON and
OFF.
• When the function is set to ON, the front-panel
Hi-
Bit 32 indicator lights.
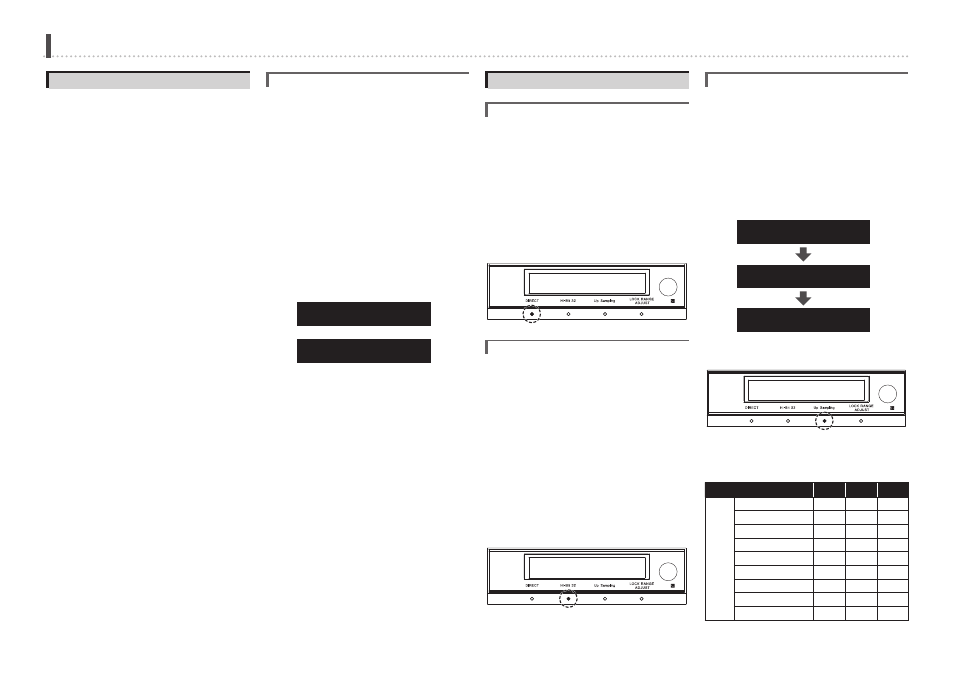
Up Sampling setting
This function raises the sampling frequency for
playback, making possible clear, highly transparent
audio playback.
This setting is supported when the Direct setting
is OFF, and has effect only on linear PCM signals.
• Factory default setting: LOW
1
Change the setting.
• Each time the remote control’s
Up Sample button is
pressed, the function cycles through the following:
LOW
HIGH OFF.
O P T I C A L 1
U p S a m p l e L O W
O P T I C A L 1
U p S a m p l e H I G H
O P T I C A L 1
U p S a m p l e O F F
• When set to LOW or HIGH, the unit’s front-panel
Up
Sampling indicator lights.
• At the various settings, playback is performed
with sampling frequencies raised as indicated in
the accompanying chart.
Sampling frequencies (kHz)
OFF
LOW
HIGH
PCM
32
32
32
32
44.1
44.1
176.4
352.8
48
48
192
384
88.2
88.2
176.4
352.8
96
96
192
384
176.4
176.4
176.4
352.8
192
192
192
384
352.8
352.8
352.8
352.8
384
384
384
384