Remote control, Controls and displays – Pioneer SC-2022-K User Manual
Page 11
11
02
Controls and displays
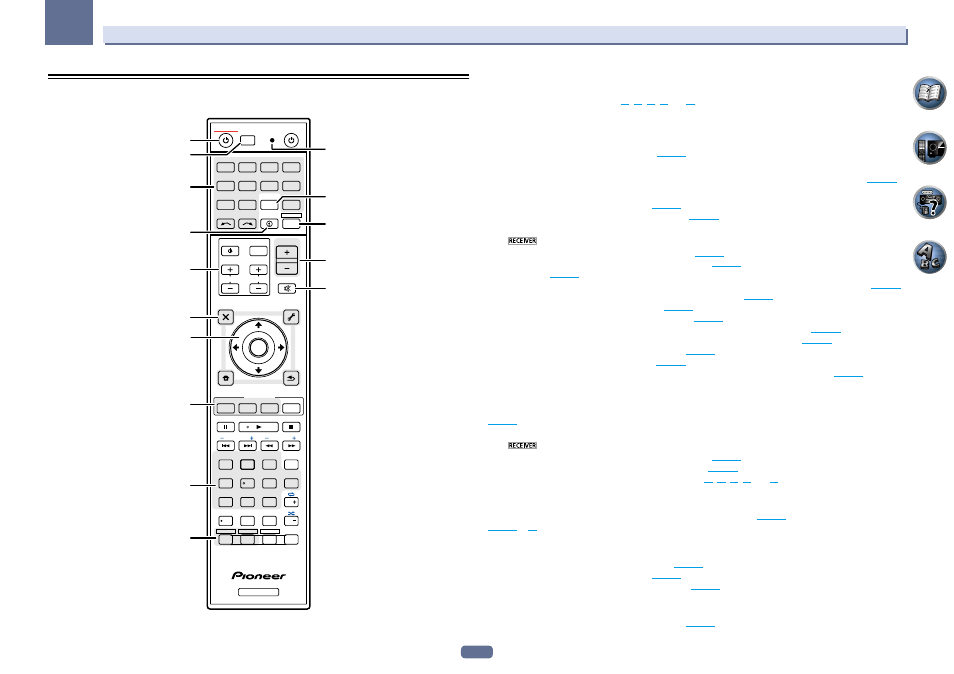
Remote control
This section explains how to operate the remote control for the receiver.
RECEIVER
D.ACCESS
CH LEVEL
DIMMER
HDMI OUT
SLEEP
SIGNAL SEL MCACC
AUTO/ALC/
DIRECT
AUTO
S.RTRV
STANDARD ADV SURR
SPEAKERS
D.FILT
MPX
PRESET
TUNE
PQLS
BAND
PHASE
Hi-Bit
PTY
iPod CTRL
HOME
MENU
FEATURES
TOOLS
MENU
CH
TV CONTROL
INPUT
INPUT SELECT
iPod
USB
CBL
OPTION 1
OPTION 2
STATUS
SAT
TUNER
ZONE 2
ZONE 3
ZONE 4
ADPT
CD
TV
RCU SETUP
SOURCE
RECEIVER
ALL ZONE STBY
DISCRETE ON
BDR
BD
DVD
DVR
NET
HDMI
RECEIVER
MUTE
VOLUME
VOL
TOP MENU
VIDEO
PARAMETER
AUDIO
PARAMETER
ENTER
RETURN
+Favorite
CLASS
ENTER
DISP
AUDIO
5
4
6
8
0
7
9
1
3
/ CLR
CH
Z2
Z3
Z4
CH
222
1
2,3
4
5
10
5
9
6
7
8
11
13
12
14
15
The remote has been conveniently color-coded according to component control using the following system:
! White – Receiver control, TV control
! Blue – Other controls (See pages
42
,
43
,
44
,
46
and
72
.)
1 u RECEIVER
This switches between standby and on for this receiver.
2 ALL ZONE STBY DISCRETE ON
Use this button to perform unique operations (
page 71
).
3 RCU SETUP
Use to input the preset code when making remote control settings and to set the remote control mode (
page 69
).
4 Input function buttons
Press to select control of other components (
page 69
).
Use INPUT SELECT
c/ d to select the input function (
page 41
).
5 Receiver Control buttons
Press
first to access:
! STATUS – Press to check selected receiver settings (
page 66
).
! AUTO/ALC/DIRECT – Switches between Auto Surround (
page 49
), Auto Level Control mode and Stream
Direct mode (
page 50
).
! STANDARD – Press for Standard decoding and to switch various modes (2 Pro Logic, Neo:6, etc.) (
page 49
).
! ADV SURR – Use to switch between the various surround modes (
page 49
).
! SIGNAL SEL – Use to select an input signal (
page 50
).
! MCACC – Press to switch between MCACC presets (
page 50
).
! CH LEVEL – Press repeatedly to select a channel, then use k/l to adjust the level (
page 84
).
! AUTO S.RTRV – Press to restore CD quality sound to compressed audio sources (
page 61
).
! SPEAKERS – Use to change the speaker terminal (
page 65
).
! DIMMER – Dims or brightens the display (
page 66
).
! SLEEP – Use to put the receiver in sleep mode and select the amount of time before sleep (
page 66
).
6 TV CONTROL buttons
These buttons can be used to perform operations on the TV to which the TV CONTROL INPUT button is assigned.
The TV can be operated with these buttons regardless of the input set for the remote control’s operation mode
(
page 69
).
7 Receiver setting buttons
Press
first to access:
! AUDIO PARAMETER – Use to access the Audio options (
page 61
).
! VIDEO PARAMETER – Use to access the Video options (
page 63
).
! HOME MENU – Use to access the Home Menu (pages
36
,
38
,
58
,
75
and
83
).
! RETURN – Press to confirm and exit the current menu screen.
8
i/j/k/l/ENTER
Use the arrow buttons when setting up your surround sound system (see
page 75
) and the Audio or Video options
(
page 61
or
63
).
9 FEATURES buttons
These let you operate the receiver’s features directly.
! PHASE – Press to switch on/off Phase Control (
page 51
).
! PQLS – Press to select the PQLS setting (
page 59
).
! Hi-Bit – Press to switch on/off the Hi-Bit 24 setting (
page 61
).
! D.FILT – With this receiver, D.FILT cannot be used.
10 MULTI-ZONE select buttons
Switch to perform operations in ZONE 2 and ZONE 3 (
page 65
).