Sampler editing, About the sampler slot details windows – Pioneer RMX-1000-M User Manual
Page 11
11
En
Editing
Effects
SAMPLER editing
This procedure can be used to edit the sampled sound sources loaded in
the RMX-1000’s [X-PAD FX] buttons.
Prepare the sampled sound sources in WAV file format beforehand.
! When using rekordbox Version 1.5.3 or later, sampled sound sources
can be prepared easily.
For details, see the rekordbox operating instructions.
1 Open the parameter settings screen in the X-PAD FX
section and click the [SAMPLER] button.
The sampler slot screen opens.
2 Drag the sampled sound sources to the sampler slots.
Open Finder when using Mac OS, Explorer when using Windows, and
assign the sampled sound sources to the sampler slots.
! Sampled sound sources can be deleted from the sampler slots by
dragging them to [DELETE].
! The sampler slot details windows can also be used to assign the
sampled sound sources to the sampler slots.
! The maximum length of the sampled sounds that can be set in the
BANK (the total for the 4 SLOT) is 16 seconds.
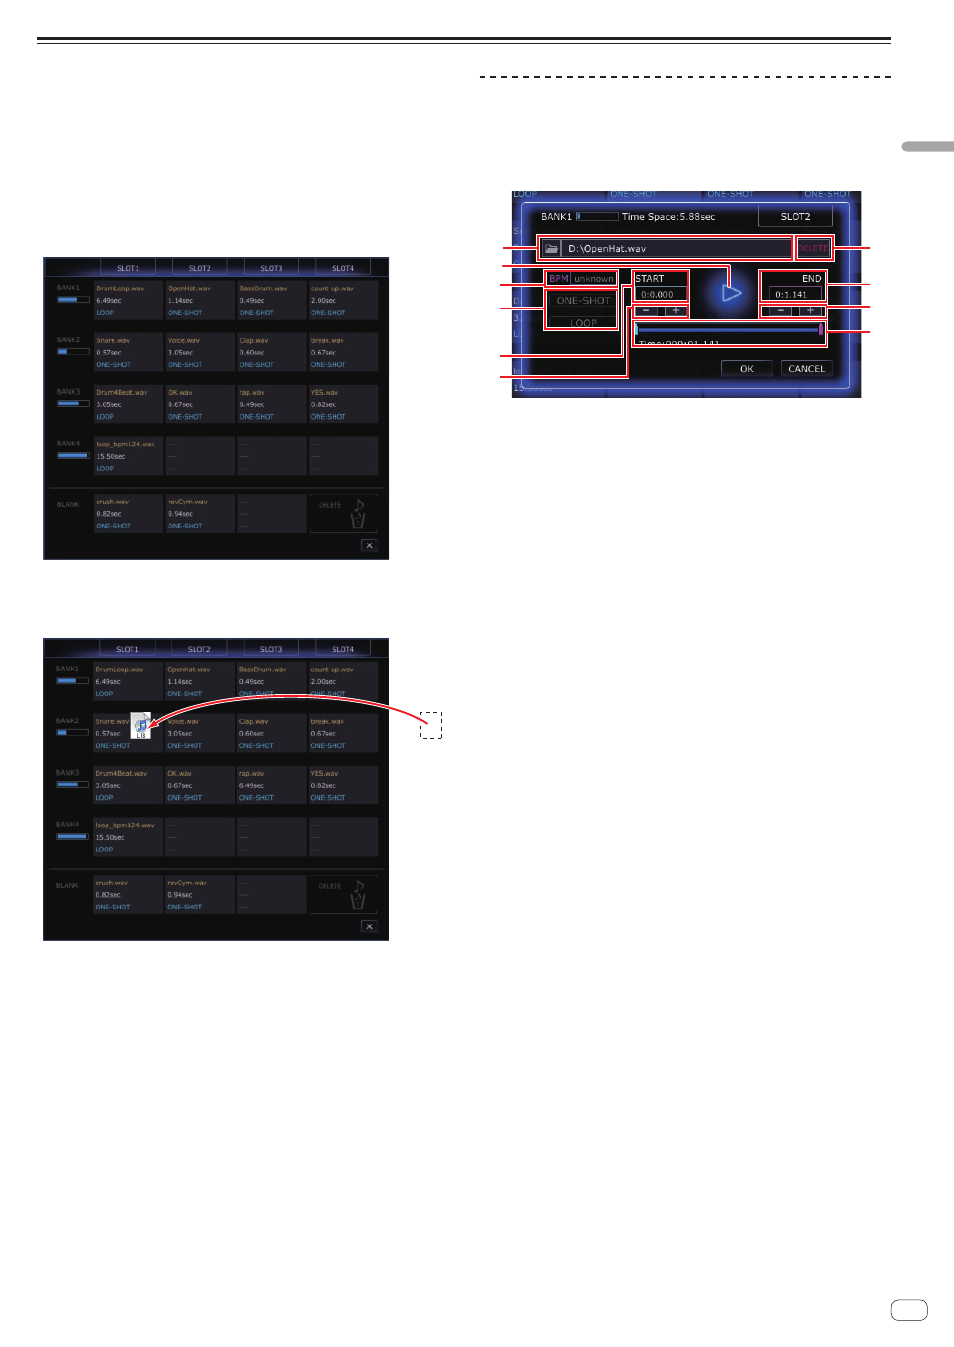
About the sampler slot details windows
When a sampler slot is double-clicked, the sampler slot details window
opens.
The sampler slot details windows can be used to listen to the sampled
sound sources and set the playing range, loop mode, etc.
1
2
3
4
5
6
7
8
6
9
1
Editing box
When loading sampled sound sources from a computer, specify the
sampled sound source’s file path here.
2 d
button
This is used to play the sampled sound source. The sampled sound
source is output from the audio device selected on the computer.
3
BPM
This is used to set the sampled sound source’s BPM.
! BPM values between 70 and 200 are valid.
4
Playing mode selector buttons
These are used to switch the sampled sound source’s playing mode.
— [ONE-SHOT] mode: The sampled sound source is played to the
end then stops.
— [LOOP] mode: The sampled sound source is played to the end,
then playback returns to the beginning and continues.
Only the sampled sound sources in [SLOT1] of the respective
BANKs can be set to the [LOOP] mode.
If you switch to the [LOOP] mode, the BPM value must be input
ahead of time.
5
START
The time of the sampled sound source’s playback start position is
displayed here.
6
–, + button
These are used to increase or decrease the sampled sound source’s
playing range in units of 10 msec (1/100th of a second).
7
DELETE button
This is used to delete the sampled sound source assigned to the
sampler slot.
8
END
The time of the sampled sound source’s playback end position is
displayed here.
9
Slider
This is used to change the sampled sound source’s playback start
and end positions in large increments.