Connecting your equipments – Pioneer P1DAB-S User Manual
Page 11
Connecting your equipments
11
En
3
Connect the other ends of the cables to the terminals of
speakers (make sure the positive and negative (+/–)
terminals on the speakers match those on the stereo
receiver).
CAUTION
• These speaker terminals carry HAZARDOUS LIVE voltage.
To prevent the risk of electric shock when connecting or
disconnecting the speaker cables, disconnect the power
cord before touching any uninsulated parts.
• Do not mistake the right and the left channels. The right
speaker is the one on the right side when you face the unit.
• Do not let the bare speaker wires touch each other.
• Make sure that all the bare speaker wire is twisted
together and inserted fully into the speaker terminal. If
any of the bare speaker wire touches the back panel, it
may cause the power to cut off as a safety measure.
Controlling the unit using a remote control of
other Pioneer component
This unit can be controlled using a remote control of other
Pioneer component if the stereo receiver is connected to the
component with a monaural mini-plug cord (commercially
available).
Using other subwoofer
You can connect a subwoofer with an amplifier to the
SUBWOOFER OUT socket.
Note
• No sound is output from the subwoofer without a built-in
amplifier.
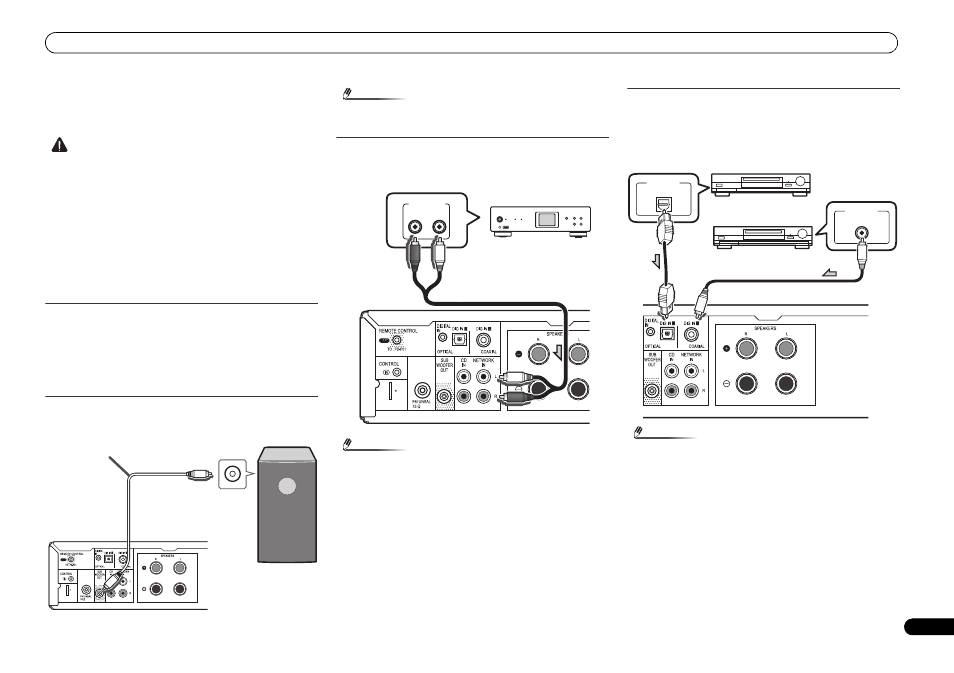
Connecting a network audio device
You can connect a network audio device to the stereo
receiver using a RCA audio cable (commercially available).
Note
• To select NETWORK input;
On remote control: Press the NETWORK button, or press
the INPUT button repeatedly until NETWORK is displayed
in the front panel display.
On stereo receiver: Turn the SOURCE knob until
NETWORK
is displayed in the front panel display.
Connecting digital audio device
You can connect a digital audio device to the stereo receiver
using an optical or coaxial cable (commercially available).
Note
• To select digital input;
On remote control: Press the DIG IN 1/2 button
repeatedly, or press the INPUT button repeatedly until
DIGITAL IN 1
(for optical input) or DIGITAL IN 2 (for
coaxial input) is displayed in the front panel display.
On stereo receiver: Turn the SOURCE knob until DIGITAL
IN 1
(for optical input) or DIGITAL IN 2 (for coaxial input)
is displayed in the front panel display.
• Digital signal formats that can be input to the stereo
receiver include linear PCM signals with sampling rate
and quantitative bits up to 192 kHz/24 bits. (Depending on
the connected device and environment, operation may
not be successful).
ANTENNA
Stereo receiver
(XC-P01 for
example)
Audio cable
(commercially
available)
To audio input
socket
To SUBWOOFER OUT
socket
Commercially
available subwoofer
(amplifier built in)
ANTENNA
ANALOG
R
L
AUDIO OUTPUT
Audio cable
(commercially
available)
Stereo
receiver
(XC-P01 for
example)
Network audio player
DIGITAL OUT
DIGITAL OUT
COAXIAL
OPTICAL
Coaxial cable (commercially
available)
Optical cable
(commercially available)
Digital recording device
Stereo receiver
Digital recording device