Baldor GLC GENERATOR GLC45 User Manual
Page 79
Series GLC A-3
MN2408
Replacement Parts
Continued
Description
Part No.
Description
GLC 80
GLC 100
GLC125
DECAL BONDED NEUTRAL"
LB0300A00
LB0300A00
LB0300A00
DECAL FUSE TYPE & WARNING"
LB0300A01
LB0300A01
LB0300A01
DECAL, CONTROL PANEL
LB0094B60
LB0094B60
LB0094B60
PLACARD, REMOTE START"
LB0095A42
LB0095A42
LB0095A42
DECAL, BALDOR LOGO,26"
LB0100A27
LB0100A27
LB0100A27
DECAL, BALDOR LOGO
LB0100A29
LB0100A29
LB0100A29
DECAL, DANGER-HIGH VOLTAGE
LB0094A11
LB0094A11
LB0094A11
DECAL, WARNING, AUTO START
LB0094A30
LB0094A30
LB0094A30
PLACARD, LINE"
LB0095A07
LB0095A07
LB0095A07
PLACARD, LOAD"
LB0095A08
LB0095A08
LB0095A08
PLACARD, NEUTRAL"
LB0095A15
LB0095A15
LB0095A15
PLACARD, L1"
LB0095A16
LB0095A16
LB0095A16
PLACARD, L2"
LB0095A17
LB0095A17
LB0095A17
PLACARD, L3"
LB0095A18
LB0095A18
PLACARD, A.C. CONNECTION"
LB0095A51
LB0095A51
LB0095A51
PLACARD, GROUND"
LB0095A37
LB0095A37
LB0095A37
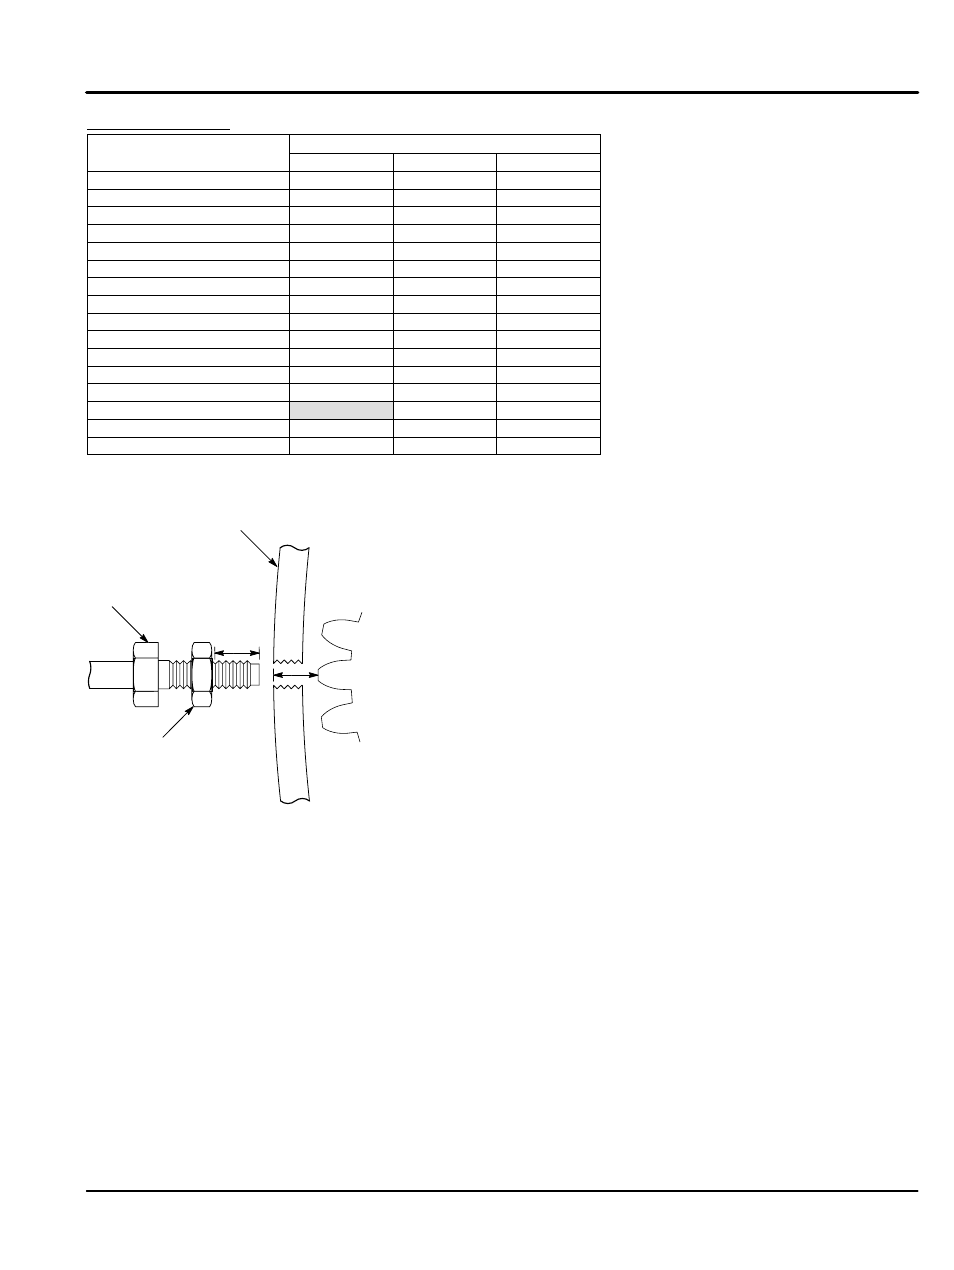
Figure A-1 Magnetic Pickup Replacement
d
d+
Flywheel
Gear Ring
Flywheel
Housing
Magnetic
Pickup
Cable
Jam
Nut
This procedure is intended to help during the replacement of a Magnetic Pickup speed
sensor.
1. Ensure that the battery is disconnected from the generator set prior to performing any
service work on the unit. Remove the old Magnetic Pickup sensor.
2. Ensure that a tooth on the flywheel gear ring is centered directly in the hole for the
Magnetic Pickup. If not, rotate the engine/generator to center a tooth by placing a
socket on the engine main crank pulley.
DO NOT insert a screwdriver into the hole for the magnetic pickup as the threads
in the flywheel housing can be damaged. DO NOT use the generator cooling fan
to rotate the engine/generator. The fan may crack and will have to be replaced.
3. With a tooth centered in the hole, measure the distance d" from the top of the tooth to
the outside top of the flywheel housing. Set the jam nut on the magnetic pickup slightly
beyond that measurement d+" to ensure that the magnetic pickup fully threads into the
housing. (If the flywheel housing or magnetic pickup threads are damaged, the
magnetic pickup may seem to have bottomed out when it stopped due to bad threads.)
4. Thread the magnetic pickup into the flywheel housing until it bottoms out on the
flywheel tooth.
5. Back the magnetic pickup out 1/2 turn and tighten the jam nut to the flywheel housing.
Note: The 1/2 turn out is very important. Too little can ruin the magnetic pickup and
create extra cleanup work. Too much can result in poor operation.
6. Verify proper operation. (1.3 VAC while cranking)
7. Apply a drop of wicking fastener adhesive to the locking nut of the magnetic pickup.
(Loctite, Permabond, etc.)