Table 3-1 – Agilent Technologies E8257D/67D User Manual
Page 27
Chapter 3
23
Operation Verification
Checking the Maximum Leveled Power
3. Ensure that the RF OUTPUT connector is connected to a 50
Ω
load.
4. Ensure that the power level entered corresponds to the value listed in
5. Refer to
for the recommended equipment and measure the output power.
If the measured power level is more than the power level listed in
, turn the front panel knob
counterclockwise until the measured power level equals the power level in
6. Note the signal generator front-panel amplitude value and use it to repeat the maximum leveled power
check.
If all of the above steps are followed and the check continues to fail, contact the nearest Agilent
Technologies call center for assistance. Refer to
“Contacting Agilent Sales and Service Offices” on
for contact information.
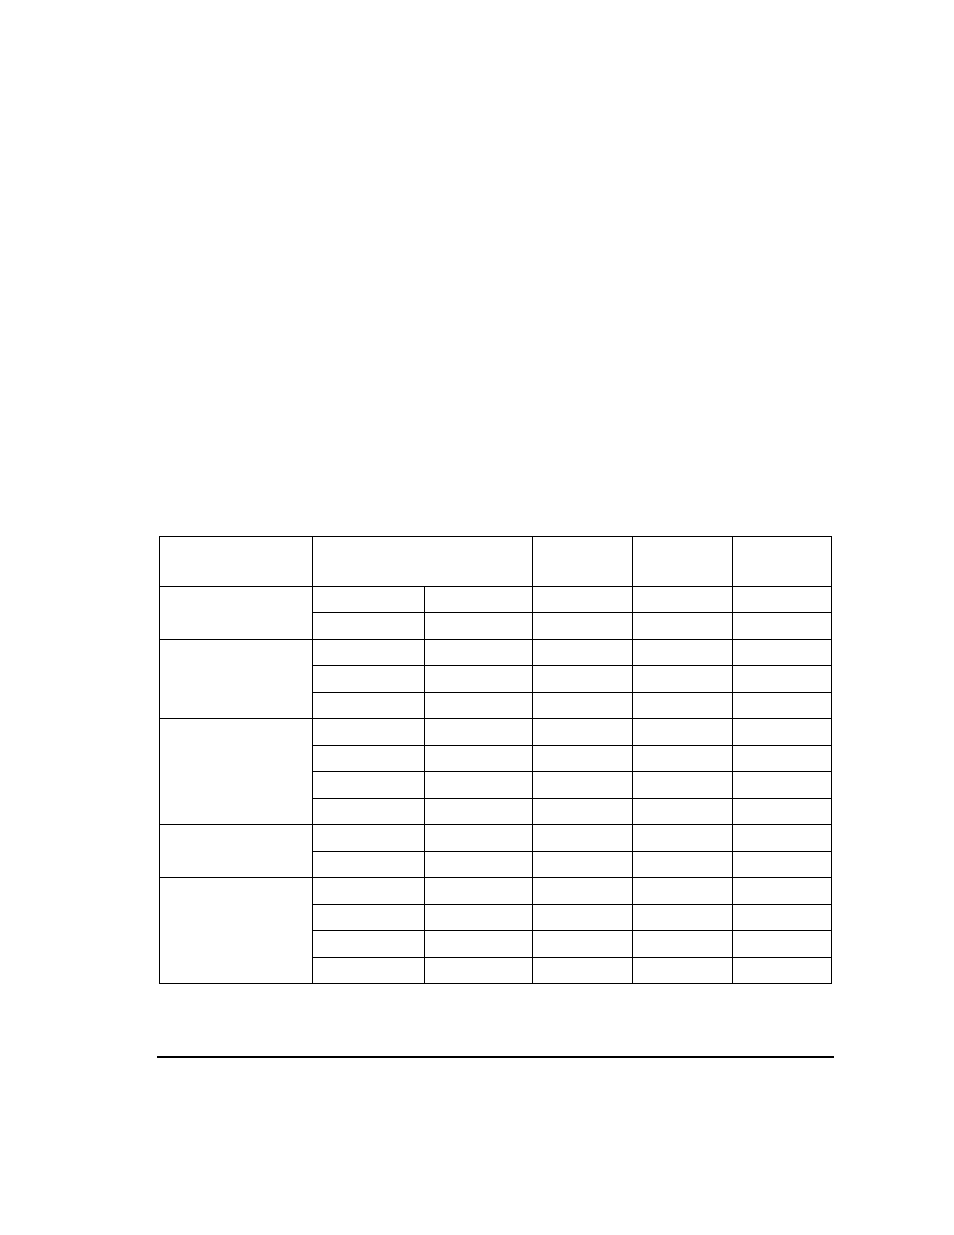
Table 3-1
Frequency and Power Level Limits
Instrument Option
Amplitude
Standard Option
1EA
Start
Frequency
Stop
Frequency
# Points
E8257D
Option 520
13 dBm
16 dBm
250 kHz
3.2 GHz
50
13 dBm
20 dBm
3.21 GHz
20 GHz
200
E8257D
Option 540
9 dBm
15 dBm
250 kHz
3.2 GHz
50
9 dBm
18 dBm
3.21 GHz
20 GHz
200
9 dBm
14 dBm
20.1 GHz
40 GHz
200
E8257D
Option 550 and
Option 567
5 dBm
14 dBm
250 kHz
3.2 GHz
50
5 dBm
16 dBm
3.21 GHz
20 GHz
200
5 dBm
14 dBm
20.1 kHz
60 GHz
200
5 dBm
12 dBm
60.1 GHz
67 GHz
100
E8267D
Option 520
13 dBm
N/A
250 kHz
3.2 GHz
50
18 dBm
N/A
3.21 GHz
20 GHz
200
E8267D
Option 532 and
Option 544
12 dBm
N/A
250 kHz
3.2 GHz
50
14 dBm
N/A
3.21 kHz
20 GHz
200
12 dBm
N/A
20.1 GHz
40 GHz
200
10 dBm
N/A
40.1 GHz
44 GHz
50