Troubleshooting guide – Graymills MVP Series Pump OMI User Manual
Page 4
- 4 -
bolts, two on each side, from the coupling. The
shaft pin should then be accessible and the shaft
can be removed from the pump.
The seal face is pressed into the pump housing.
Inspect for damage. If necessary replace by prying
out with a screwdriver. Inspect O-Ring that
surrounds seal face. Replace O-Ring if damaged.
Replace seal face by pressing in a new face in the
housing.
Reassembly
With new seal face installed in housing, replace shaft
and pin and secure coupling with four Allen-head bolts.
Replace coupling guard and screws.
Replace mechanical seal on shaft. Replace circlip
on shaft below seal.
Reinstall stages in the reverse order of removal.
Stages should not be warped, bent or damaged.
Note carefully how spacers are used to prevent
impeller from contacting the bowl/diffuser. Replace
nut and lock washer on shaft to retain stages.
Replace O-Ring in pump housing and fit
intermediate chamber sleeve into pump housing.
Install stay bolts into motor casing. Place O-Ring
into suction cover and place suction cover over
intermediate chamber cover. Thread nuts onto end
of stay bolts and tighten to retain suction cover.
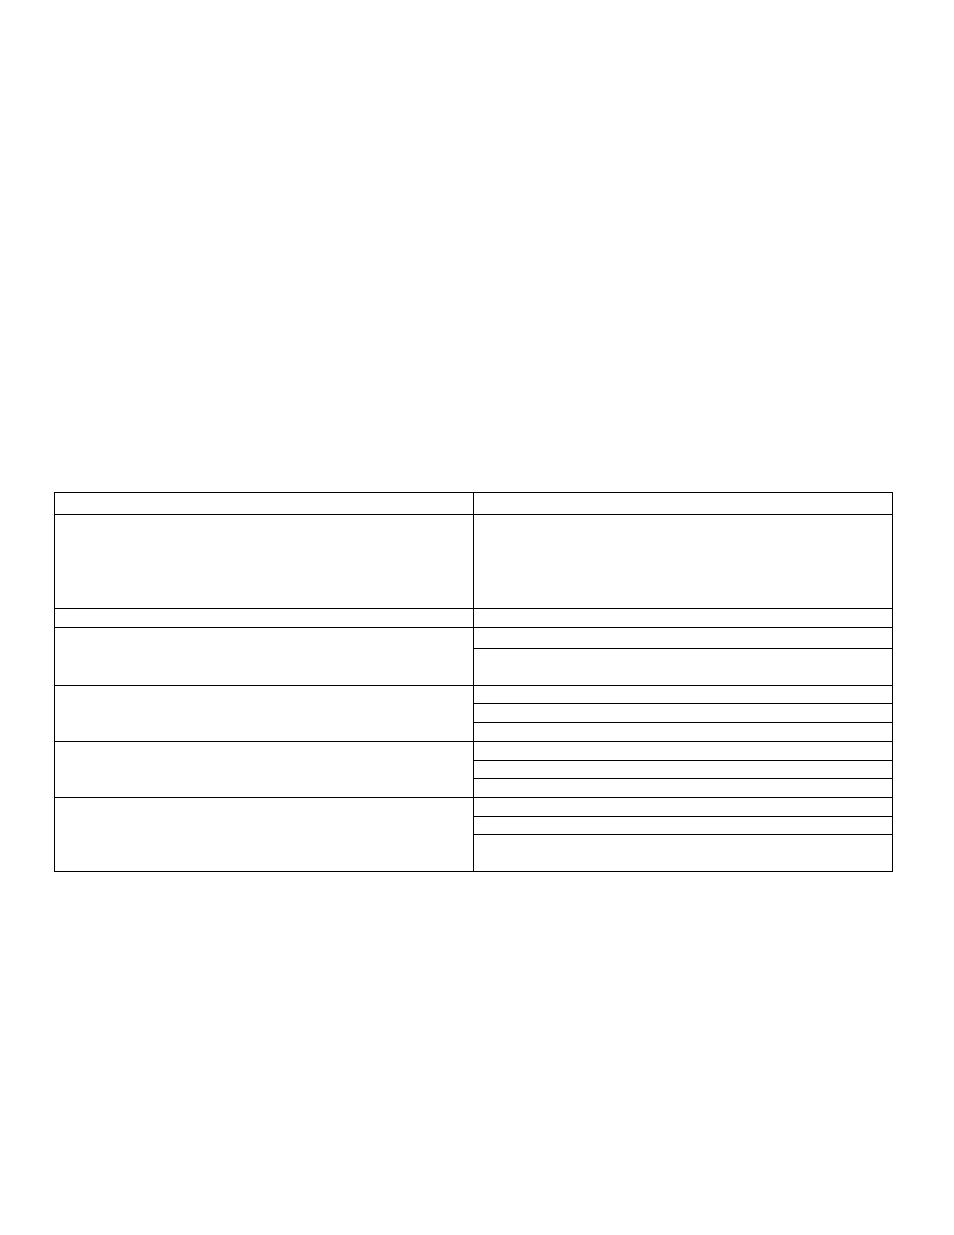
Troubleshooting Guide
Problem
Probable Cause
Pump Head Leakage
Mechanical Seal Wear; replace Mechanical Seal
Leakage between pump body, upper cover and/or casing
Damaged O-ring, replace the O-Ring
Low power during output during peak
Overload protector frequently trips during operation
Unstable voltage supply
Pump cavitation
Damaged motor bearing
Odd noise and vibration
Pump and piping not anchored properly
Pump not primed properly
Excessive head requirement from too much piping
Water is not coming out
Check for restrictions in plumbing
Release air from, or reconfigure intake pipe
Clean out clogged impeller
Pump is operating, but not normally
Check motor rotation to verify if pump is operating
properly