Spray gun high pressure, Lubrication, Storage – Silverline Spray Gun High Pressure User Manual
Page 8: Disposal, Maintenance, Fig. b
www.silverlinetools.com
7
Spray Gun High Pressure
General cleaning after every use
1. Remove the paint container, empty remaining material into a suitable sealed
container, and clean thoroughly with the appropriate solvent and clean cloths
2. Clean the nozzle assembly of the gun, lid and gasket of the paint container
3. Pour a small amount of solvent into the clean paint container and re-fit it to the gun
4. Connect the gun to the air supply
5. Direct the gun towards an empty container and spray the solvent through the gun
into the container, until the spray is clear of any paint
6. Turn off the air supply and disconnect the gun
7. Release the paint container, empty remaining solvent into the disposal container, and
let all components dry thoroughly
8. Re-fit paint container for storage
WARNING: In order to prevent solvents and other harmful substances from entering
the atmosphere, open solvent cleaning is not permitted in some territories, and special
cleaning procedures apply (e.g. cleaning inside special closed bags and containers, etc.).
Make yourself familiar with local regulations, and apply the recommended procedures.
Special cleaning procedures for air and fluid nozzles and
needles
WARNING: All nozzles and needles are precision made. They must be handled with utmost
care. Damage and alterations will cause decreased performance or faulty spray.
WARNING: Needles have a sharp point. Handle with care to avoid puncture wounds and
other injuries.
1. Referring to the ‘Assembly Diagram’, carefully disassemble the spray gun, remove
the nozzle assembly and fluid needle
2. To clean, soak nozzles and needle in a suitable solvent that dissolves any dried
material and clean with a suitable soft brush
Note: Never soak the entire spray gun in solvent, as this will damage the packings and
remove lubrication.
3. Carefully blow all components clean with filtered compressed air
WARNING: Do not probe any of the holes in the nozzles with metal instruments. If
mechanical cleaning becomes necessary, use only implements from materials softer than
brass, like specialised nozzle cleaning aids.
Lubrication
• Even though the air and material passages of the spray gun must remain free of oil and
other contaminants, some components require frequent lubrication
• Slightly lubricate all packings, bearings and dynamic O-rings with a specialised spray
gun lube, and apply a small amount of petroleum jelly to springs
Storage
• Store this tool carefully in a secure, dry place out of the reach of children
Disposal
• Air tools should not be disposed of with household waste
• Spray guns may contain traces of solvents and paint residue, and must be recycled
accordingly
• Surplus paints, solvents and cleaning solutions must be disposed of according to the
manufacturer’s instructions
• Contact your local waste disposal authority for information on the correct way to dispose
of air tools
Coating will be
light at this point
Coating will be
heavy at this point
Correct
200 - 250mm
Wrong
Coating should be even
and wet when spraying
End of
Stroke
Release
trigger
Pull
trigger
Start
stroke
FIG. B
763556
Operation
Trigger operation
• The trigger has a 2-stage mechanism:
• Press to the first stage, the air will flow through the gun
• Press further and the paint is released
Note: Adjusting the Knurled Needle Adjustment Screw (10) will determine how far the
trigger can be depressed
Spray technique
• To achieve a smooth even coat the material must be prepared and thinned in
accordance to the manufacturer’s guidelines
• The gun must be clean and correctly loaded, the spray pattern adjusted and the
compressor set at the correct pressure
• Always carry out a test spray and follow the procedures described in ‘Adjusting the
spray gun’, to establish the best settings
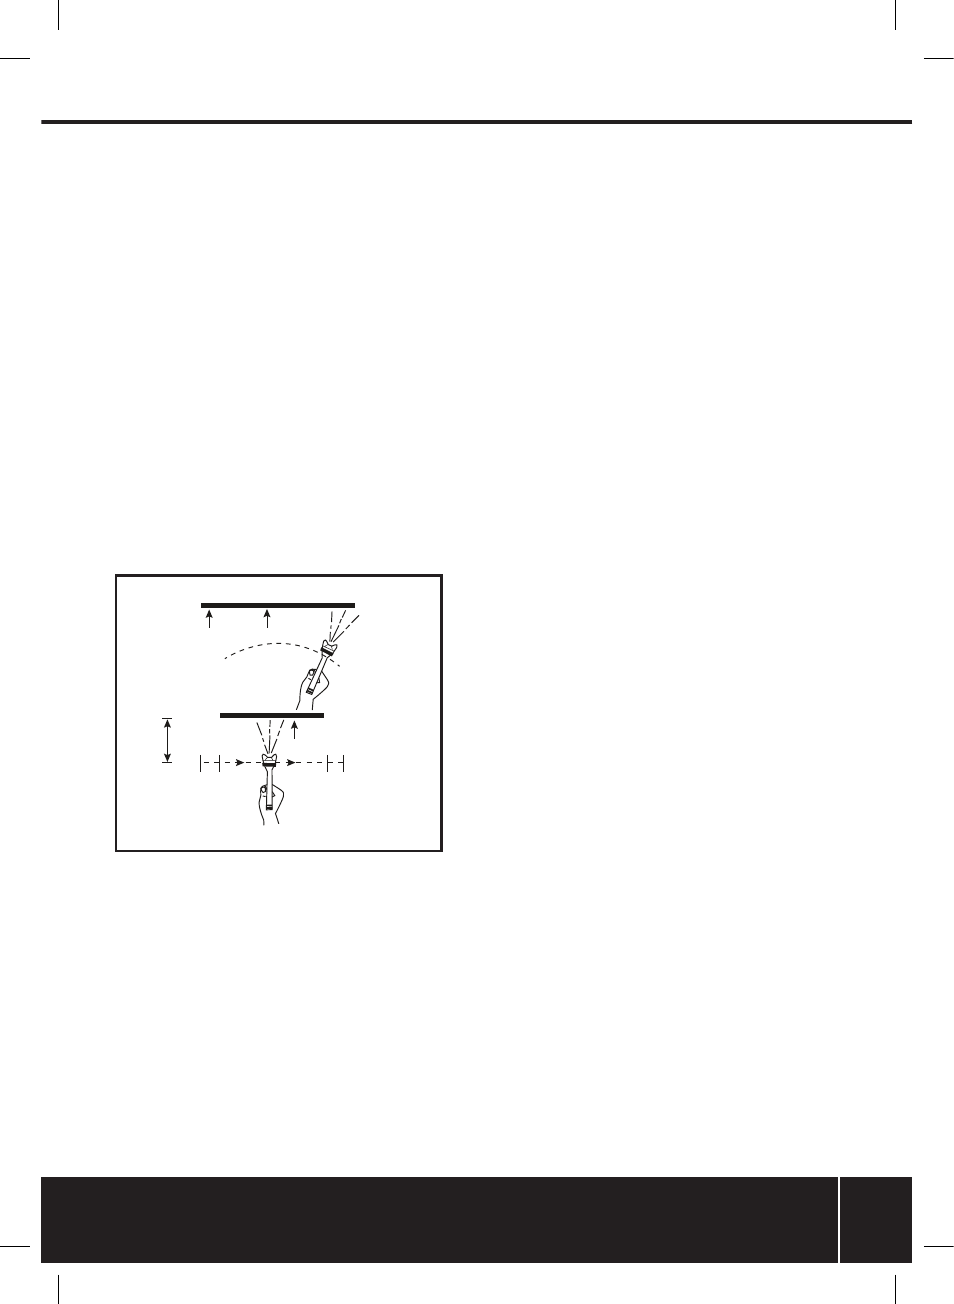
• Keep the distance of the spray gun approximately 200-250mm away from the
workpiece
• Spray workpiece edges first. Overlap approximately 50% of each applied spray beam
• Spray in continuous, even motion. Keep your hand as steady as possible and move the
spray in a straight pass across the workpiece (see Fig. B)
• Do not operate in an arc motion. Arcing will lead to an uneven finish (see Fig. B)
• Avoid intensive waving, as it will cause the air jacket to become unstable, allowing
clouds of atomized spray material to escape
• Before spraying it is good practice to visualise the entire spraying process. Start with the
least visible areas and work towards the parts that will be seen. This will create an even
finish, allow you to identify problematic areas of the workpiece, and let you work around
spots that may already have been covered
• After use, immediately disconnect the spray gun from the air supply
WARNING: Be aware that air tools may hold residual pressure after use. Always bleed air
pressure from the tool after shutting off air supply.
Maintenance
WARNING: Always disconnect from the air supply and depressurise before disassembly or
carrying out any maintenance.
WARNING: Always wear suitable protective equipment including eye and respiratory
protection as well as gloves when carrying out cleaning or maintenance procedures.
WARNING: The majority of solvents used for painting applications are toxic and highly
flammable. Comply with local laws and regulations with regards to handling, storage and
disposal of solvents and other harmful and potentially dangerous substances.
Note: Your spray gun is a fine precision instrument and must be treated and maintained
accordingly, in order to achieve consistent professional looking uniform results.
• The most common problems with spray guns are caused by paint being allowed to dry
inside the tip, nozzle or internal air/fluid passages
• Clean the entire spray gun thoroughly after each project, and when changing the type of
material being sprayed
• Always use the same solvent for cleaning that was used to thin the paint
763556_Z1MANPRO1.indd 7
05/07/2013 16:29