Meteor ProMover P64 User Manual
Page 2
2
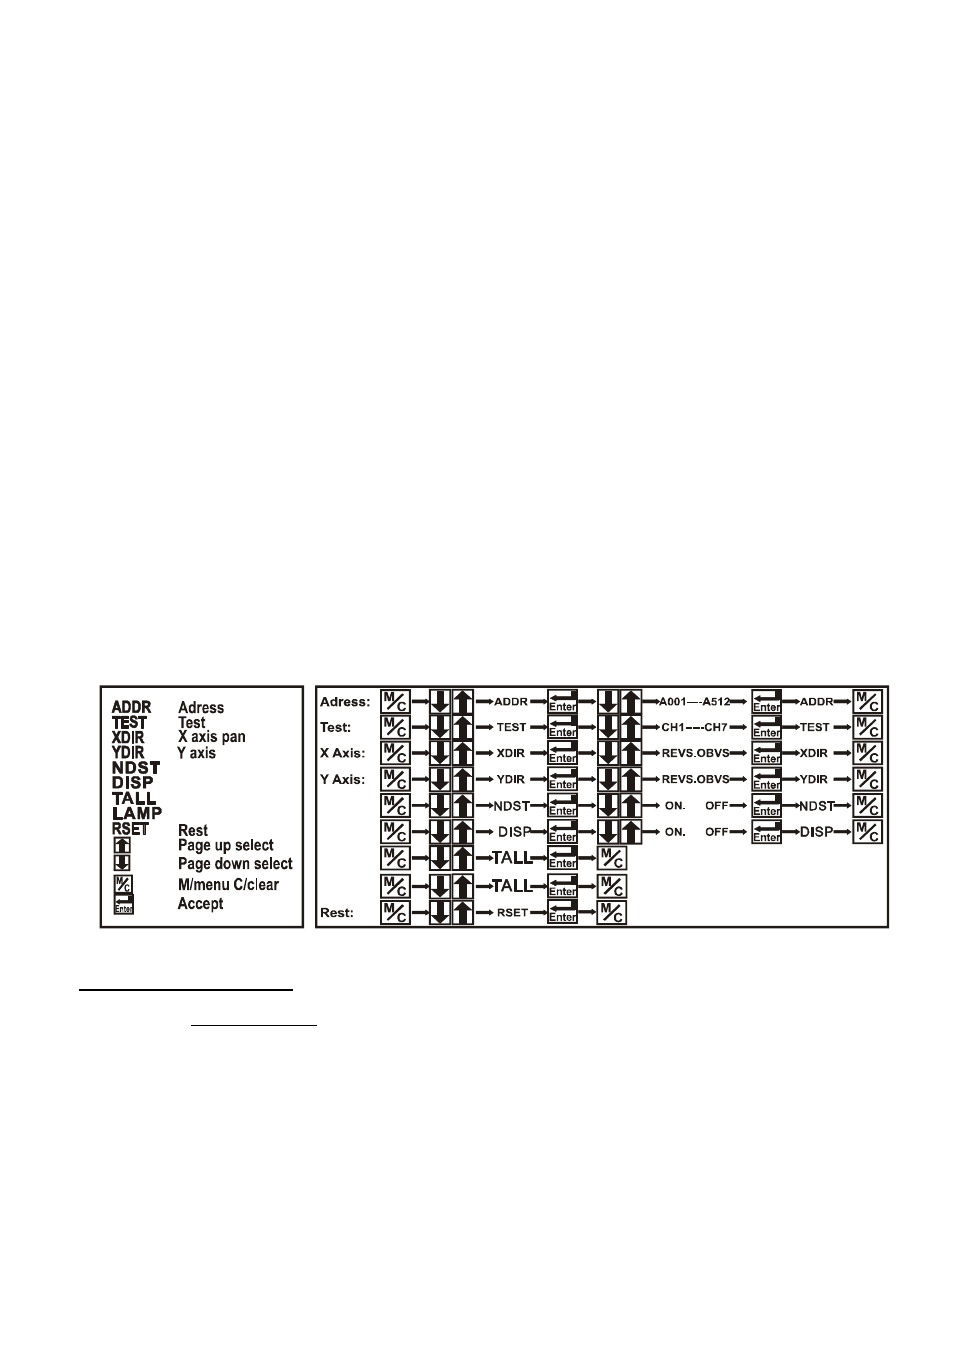
NDSP:
Inverted Digital readout - used while unit is mounted on truss or ceiling.
(if you are going to be looking at the LCD display while unit is hanging down – it is
recommended that you invert the LCD screen read out so you can look at it normal)
TALL:
Test all channels of unit. If you want to test all channels. Press Enter.
(LCD changes to read –
CH01
– press Enter. Channel 1 (lamp and fan channel) will
start to come up in brightness and the fans will increase in speed to cool fixture.
Press Black UP button. LCD changes to
CH02
. Press Enter. Lamp will start to flash and
strobe.
Press Black UP button. LCD changes to
CH03
. Press Enter. Fixture will run through it
full PAN capability.
Press Black UP button. LCD changes to
CH04
. Press Enter. Fixture will run through its
full TILT cycle.
Press Black UP button. LCD changes to
CH05
. Press Enter. Does fine adjust – PAN.
Press Black UP button. LCD changes to
CH06
. Press Enter. Does fine adjust – TILT.
Press M/C Black button to exit this test mode.
TLMP:
Time of usage on lamp. Press Enter. Fixture will start to come up and fans will increase
in speed for maximum cooling
RSET:
Unit resets itself to factory settings. TEST
Press Enter
DEMO:
Unit runs it programs in a demo mode. 3 options: O
OFF – Fixture to be controlled by lighting controller
SLAV – subordinate – daisy chained – inline with controller
AUTO – runs automatically
Press Enter
TEST:
Specific channel you wish to test.
Press Enter.
Y DIR:
Set either clockwise or counterclockwise response. Individual channel test runs
a full range of the Tilt Function (“Y” reverse) – Mirror image if need be.
Press Enter.
X DIR:
Set either clockwise or counterclockwise. Individual channel test runs a full
range of the Pan Function (“X” reverse). Mirror image if need be.
Press Enter.
NDST
DISP
TALL
LAMP
NDST
DISP
TALL
LAMP
LAMP INSTALLATION:
Replacing or installing the lamp.
-
Disconnect Power from fixture. If lamp is broken, make sure no pieces of glass are rattling around
inside.
-
On the back of the unit. Locate two (2) Spring clips. Push forward – the back will hinge open.
-
Remove 8” retaining ring.
-
Carefully insert Par 64 lamp of choice into / onto 4 long Teflon holders.
-
Push lamp forward enough to the front brace.
-
Position retaining clip back around the lamp to hold in place.
-
Carefully plug the Ceramic lamp socket onto lamp. As far as it can.
Note:
If not seated correctly, this could cause the socket to come loose from the lamp.
-
Hold Back the two spring loaded clips and shut back of unit. Lock in place.
-
Move unit head up and down to hear if there is any noise. If no noise, it is correctly seated.