Accessing the nxb-knx webconsole via zero-config, Admin menu, Connecting to a netlinx master – AMX NetLinx Interface NXB-KNX User Manual
Page 2: Device configuration tab, Determining the ip address of the nxb-knx, Ip settings, Additional documentation
For full warranty information, refer to the AMX Instruction Manual(s) associated with your Product(s).
7/09
©2009 AMX. All rights reserved. AMX and the AMX logo are registered trademarks of AMX.
AMX reserves the right to alter specifications without notice at any time.
3000 RESEARCH DRIVE, RICHARDSON, TX 75082 • 800.222.0193 • fax 469.624.7153 • technical support 800.932.6993 • www.amx.com
93-2031-01
REV: D
NetLinx Studio v3.0 (featuring Zero-Config functionality)
NetLinx Studio version 3.0 (or higher) features a "Zero-Config" tab in the
Workspace Window. This tab provides Zero-Config networking functionality
within NetLinx Studio.
Refer to the NetLinx Studio online help for details on using Zero-Config.
Accessing the NXB-KNX WebConsole via Zero-Config
Assuming that the NXB-KNX resides on the same LAN as the PC running
NetLinx Studio, and the NetLinx Master to which the NXB-KNX is connected,
you can access the NXB-KNX via the Zero-Config feature in Netlinx Studio:
1.
In NetLinx Studio (version 3.0 or higher), right-click inside the Zero-Config
tab of the Workspace Bar to access the Zero-Config context menu.
2.
Select Refresh List to generate an initial listing of all Zero-Config devices
detected.
3.
Click the plus symbol (+) to expand any device in the Zero-Config list. The
device’s current IP Address is listed below the device name.
4.
You can access any device in the Zero-Config list simply by double-click-
ing on its entry. The selected device's WebConsole (HTML) is displayed
in a NetLinx Studio window.
Admin Menu
There are several configuration pages included in the Configuration Manager,
all of which are accessed via the Admin drop-down menu. Click on an option in
this menu to access each of the configuration pages:
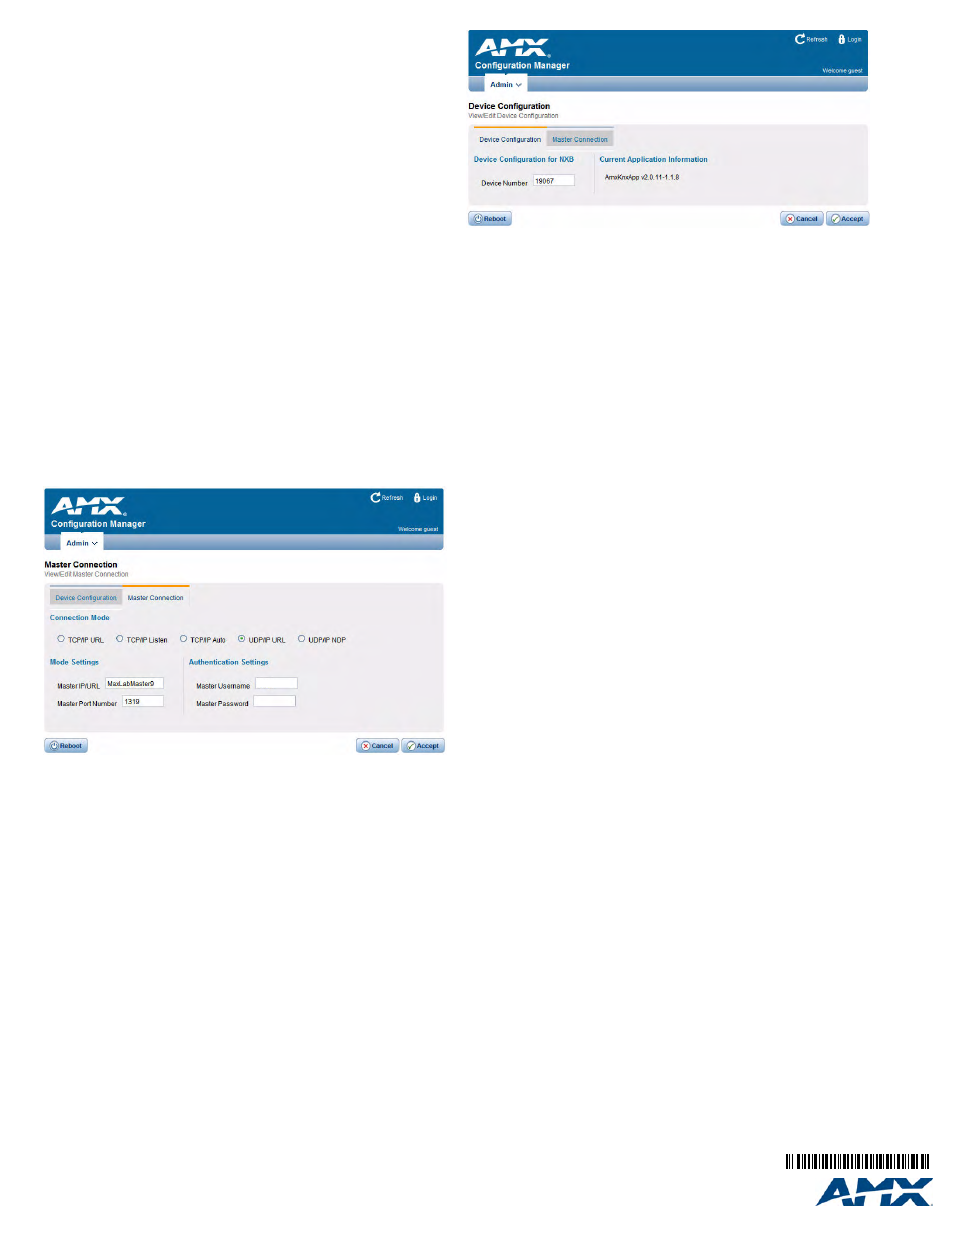
Connecting to a NetLinx Master
Select Device Configuration from the Admin menu to open the Master
Connection page. There are two tabs on this page: Device Configuration and
Master Connection. Open the Master Connection tab (FIG. 4).
The options in this tab allow you to view and edit connection details for the
NetLinx Master to which this NXB-KNX unit will be connected.
To establish communication between the NXB-KNX and a specific NetLinx
Master:
1.
Enter the Master’s IP/URL in the Master IP/URL text field.
2.
The default Master Port Number assignment is 1319 - do not change this
number.
3.
Under Authentication Settings, enter the NetLinx Master’s Username and
Password (only required if the target NetLinx Master has Authentication
enabled).
4.
Press Accept to save changes.
5.
Press Reboot to reboot the NXB-KNX. Once rebooted, the NXB-KNX
should be in communication with the Specified NetLinx Master (indicated
by a steady blink on the NXB-KNX Status LED).
Device Configuration tab
The Device Configuration tab is shown in FIG. 5. The current device number
assigned to this NXB-KNX unit is displayed in the Device Number field.The
version of the device Application currently loaded on this unit is displayed
under Current Application Information.
To Change the Device Number:
1.
Enter a Device Number for this NXB-KNX unit in the Device Number text
field.
2.
Click Accept to save your changes.
3.
Press Reboot to reboot the NXB-KNX and apply the new Device Number
assignment.
Determining the IP Address of the NXB-KNX
NXB-KNX units feature a built-in zero-configuration networking client that
allows you to determine the unit’s IP address via NetLinx Studio v3.0 (or
higher), or a similar zero-configuration client.
Zero-configuration (or Zero-Config) technology provides a general method to
discover services on a local area network. In essence, it allows you to set up a
network without any configuration.
Note: The NXB-KNX is set to DHCP by default.
IP Settings
Select IP Settings from the Admin drop-down menu to open the IP Settings
page. Use the options on the page to specify network/IP settings for this
NXB-KNX unit.
• Click Accept to save your changes, changes on this page take effect
immediately.
• Click Cancel to cancel any changes.
One-Time Upgrade of the NXB-KNX to a Native NetLinx Device
The initial release of the NXB-KNX operated as an IP Device (as opposed to a
native NetLinx device). Subsequent releases (including the current version) of
the NXB-KNX operate as a native NetLinx device.
Older NXB-KNX units that are still using the initial Application and Firmware
versions can be upgraded to allow them to function as a native NetLinx device.
Refer to the NXB-KNX Operation/Reference Guide for instructions on
upgrading the NXB-KNX to a native NetLinx Device.
Additional Documentation
Refer to the NXB-KNX Operation/Reference Guide (available to view/download
at www.amx.com) for additional configuration and NetLinx programming
information, as well as Application and Firmware upgrades.
FIG. 4 Device Configuration page - Master Connection tab
FIG. 5 Device Configuration page - Device Configuration tab
DHCP:
Click to toggle DHCP on this unit (default = enabled).
Note: DHCP must be enabled in order for the zero-configuration
client to detect the NXB-KNX on the network.
Hostname:
Enter a Hostname for this unit (enabled only if DHCP is
disabled.
IP Address:
Enter an IP Address for this unit (enabled only if DHCP is
disabled).
Subnet Mask:
Enter a Subnet Mask for this unit (enabled only if DHCP is
disabled).
Gateway:
Enter a Gateway for this unit (enabled only if DHCP is disabled).
Domain Suffix: Enter the Domain Suffix for this unit.
DNS 1, 2, 3:
Enter up to three DNS addresses for this unit.
Reboot:
Click to initiate a system reboot. IP Settings changes only take
effect after a reboot.