Ir 2 on ir 1 on, Ir out on, Ir 3 on – Vaddio REVEAL User Manual
Page 11: Ir 2 off ir 1 off, Reveal in-wall cameras
REVEAL IN-Wall Cameras
REVEAL IN-Wall Camera Manual Document Number 342-0059 Rev. A
Page 11 of 28
Step 14:
Place the glass over the exposed ¼”-20 posts. The Clear Glass model has a single pane of glass while the Smart Glass
model has a double glass pane with the liquid crystal matrix sandwiched between. The ¼-20 posts can be screwed in all
the way for the Clear Glass, but the Smart Glass, the ¼”-20 posts will need to be screwed out slightly to protrude through
the double pane glass. Put the four (4) ¾” OD nylon washers with centering ridge (ridge toward the camera) and attach
the four (4) ¾” OD brushed aluminum post caps. This concludes the installation of the REVEAL IN-Wall PTZ Camera into
the wall cavity.
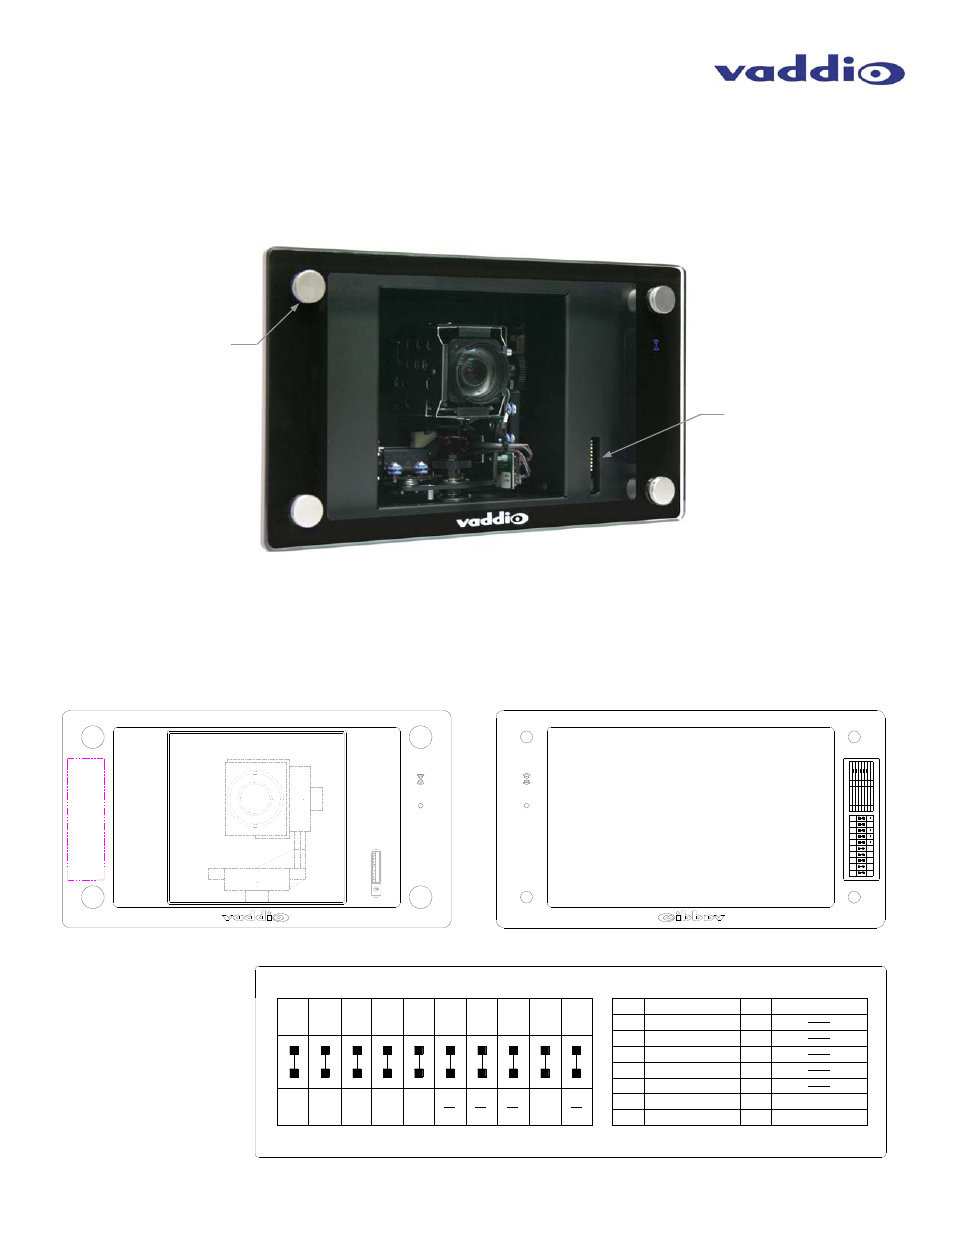
Camera Switch Settings:
There is a 16-position rotary switch that selects the video output resolution of the REVEAL camera and a 10-position dip
switch that sets other functions such as the IR remote control frequency and test bars on/off. The placement of the Switch
Setting Label is behind the black border masking on the glass pane as shown below.
Post Cap X 4 with
Nylon Washers with
Centering Ridge X
4 Underneath
IR 2
ON
IR 1
ON
1
38400
bps
4
IR
OUT
ON
2
IR 3
ON
3
55
4
8
6
77
6
8
IR 2
OFF
IR 1
OFF
DIP SWITCH SETTINGS
9600
bps
IR
OUT
OFF
IR 3
OFF
7
OFF
6
OFF
1080p/60
B
3
480i/29.97 (YPbPr)
7
6
5
4
9
10
10
9
1080p/50
1080i/50
720p/50
F
E
D
C
VIDEO SELECT
2
0
1080p/59.94
1
1080i/59.94
720p/59.94
576i/25 (YPbPr)
A
9
8
1080p/30
1080p/25
10
OFF
7
OFF
6
OFF
8
OFF
ON
TEST
BARS
OFF
16-Position Rotary
Switch for Video
Resolution Selection
and 10-Position Dip
Switch for Functionality
Settings
IR 2
ON
IR
1
ON
1
384
00
bps
4
IR
OUT
ON
2
IR 3
ON
35
5
4
8
67
7
68
IR 2
OFF
IR
1
OFF
D
IP
S
W
IT
C
H
S
E
T
T
IN
G
S
96
00
bps
IR
OUT
OFF
IR 3
OFF
7
OFF
6
OFF
10
80
p
/6
0
B
3
48
0i/29.9
7 (YPbPr)
7
6
5
4
91
0
10
9
10
80
p
/5
0
1
0
80
i/
50
720
p
/50
F
E
D
C
VI
D
E
O
SE
L
EC
T
2
0
108
0p
/59
.9
4
1
1
08
0
i/5
9
.9
4
72
0p
/59.
94
57
6i/25 (
YPbPr)
A
9
8
10
80p
/3
0
10
8
0p
/25
10
OF
F
7
OFF
6
OF
F
8
OFF
ON
TE
ST
BA
R
S
OFF
Front View - Behind Black Border Mask
Rear View - Remove Glass to Read and Change Settings as Needed
Switch Setting Label:
Set to required settings
in Installation Step 6.