Other operations, Precautions, Troubleshooting – Sony ZS-BTG900 User Manual
Page 2: Messages, Specifications, Using the display, Selecting play mode, Presetting radio stations, Listening to the radio from preset radio stations, Setting the sleep timer
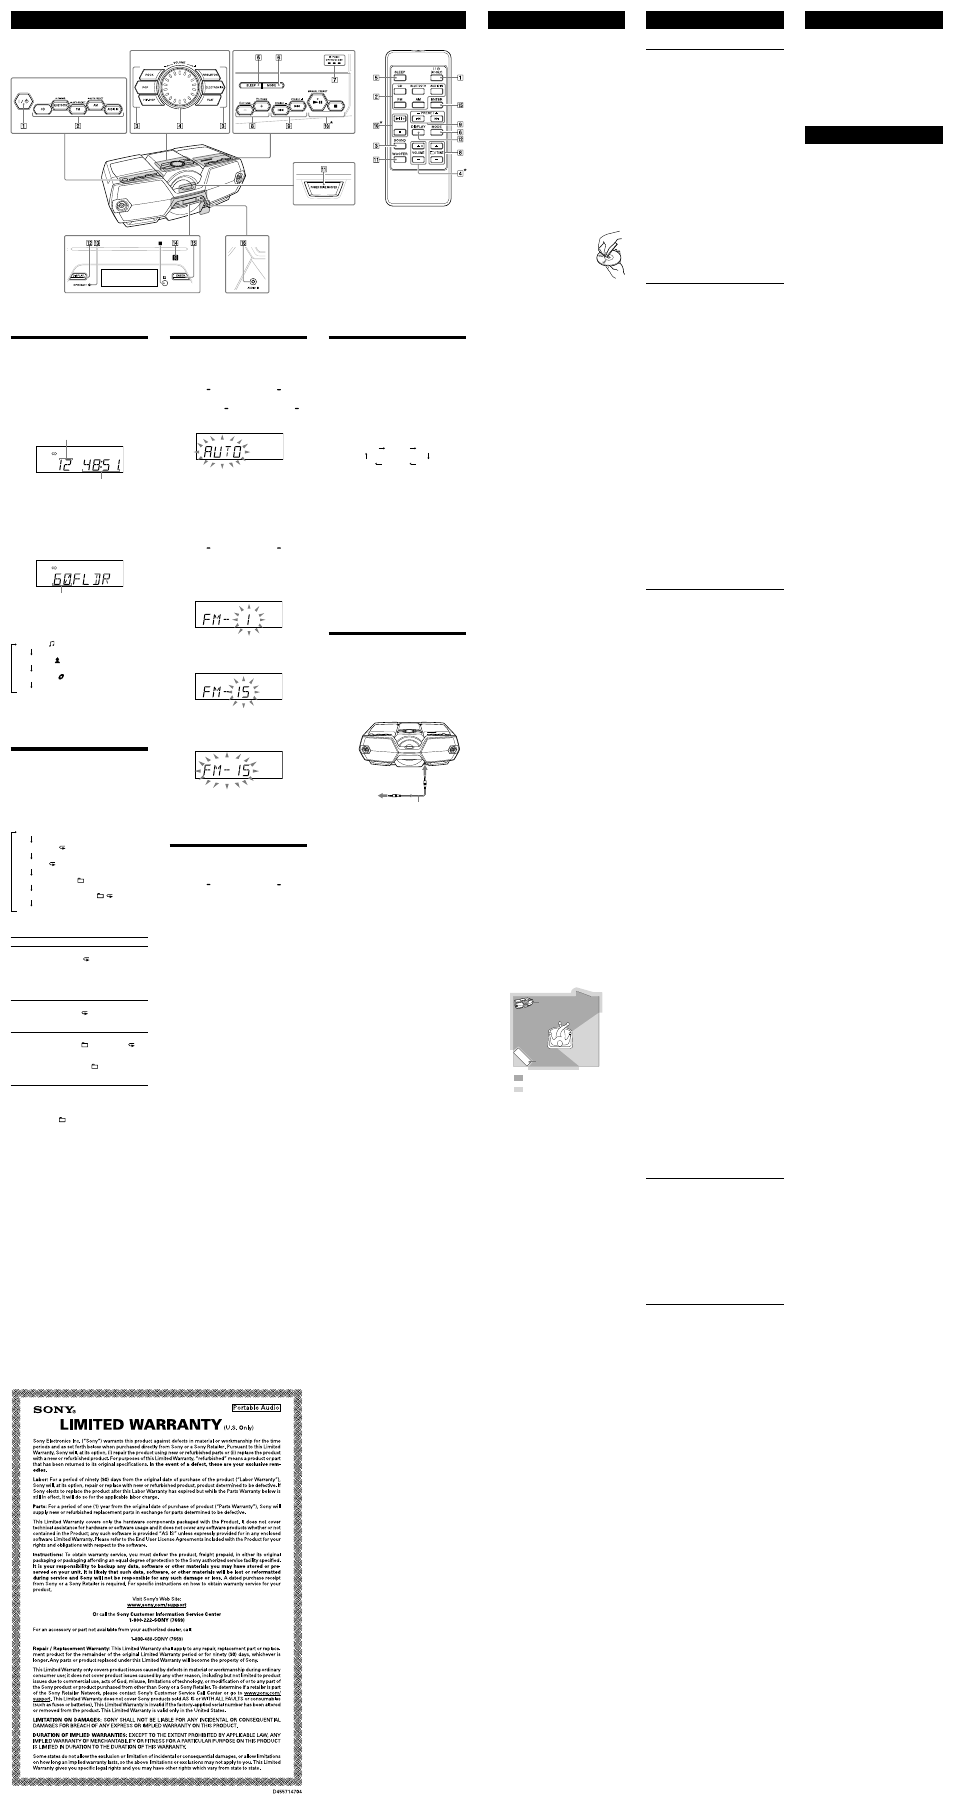
Other Operations
Unit
Remote
Using the display
You can check information about the currently
playing audio file from the disc using the display.
Information about the total number of
tracks and the playing time of an audio
CD
After the CD is loaded and the reading process is
completed, the total number of tracks and the
total playing time are displayed.
Total number of tracks
Total playing time
Information about the total number of
folders on an MP3/WMA disc
After the MP3/WMA disc is loaded and the
reading process is completed, the total number
of folders is displayed. The total number of files
and the total playing time are not displayed.
(Example: MP3 disc)
Total number of folders
To check MP3/WMA file information
Press DISPLAY
repeatedly while playing a disc.
The display changes as follows:
Song title ( )*
1
Artist name ( )*
1
Album name ( )*
1
Current file number and playing time*
2
*
1
If the file does not have corresponding ID3
information, the file name, “NO ARTIST,” and “NO
ALBUM” scroll.
*
2
The artist name or album name will change to this
in a few seconds.
Selecting play mode
You can set the unit to play tracks/files
repeatedly or in random order on a disc.
Press MODE
repeatedly while a disc
playback is stopped.
Each time you press the button, the indication
changes as follows:
Normal play (None)
Single repeat ( 1)
All repeat ( )
Selected folder play ( )*
Selected folder repeat play ( , )*
Shuffle play (SHUF)
* These functions are available only for MP3/WMA
files on an MP3/WMA disc.
To repeat
Do this
A single track/
MP3/WMA file
1 Press MODE
repeatedly
until “ 1” appears.
2 Press
or to
select an audio file that you
want to repeat.
3 Press
to start Repeat
Play.
All tracks/MP3/
WMA files
1 Press MODE
repeatedly
until “ ” appears.
2 Press
to start Repeat
Play.
A selected
folder on an
MP3/WMA disc
1 Press MODE
repeatedly
until “ ” (Folder) and “ ”
appear.
2 Select the folder by
pressing
ˋ or + .
3 Press
to start Repeat
Play.
Note
During Shuffle Play mode, you cannot select the
previous track/file by pressing
, nor select a
folder by pressing + or -
.
Presetting radio stations
You can store radio stations in the unit’s memory.
You can preset up to 30 radio stations, 20 for FM
and 10 for AM.
1
Press FM AUTO PRESET or AM AUTO
PRESET
to select the band.
2
Hold down FM AUTO PRESET or AM
AUTO PRESET
until “AUTO” flashes on
the display.
3
Press ENTER
to store the station.
The stations are stored in memory from lower
frequencies to higher ones.
If a station cannot be preset
automatically
You need to preset a station with a weak signal
manually.
1
Press FM AUTO PRESET or AM AUTO
PRESET
to select the band.
2
Tune to a station you want.
3
Press MANUAL PRESET
.
The band selected (“FM-xx” or “AM-xx”)
appears on the display.
4
Press PRESET
ˋ or + until the preset
number you want for the station flashes
on the display.
5
Press ENTER
to store the station.
If another station is already assigned to the
selected preset number, that station is
replaced by the new one.
Tip
The preset radio stations remain in the unit’s
memory even in the following situations.
ˋ
ˋThe AC power cord is unplugged.
ˋ
ˋThe batteries are removed.
Listening to the radio from
preset radio stations
1
Press FM AUTO PRESET or AM AUTO
PRESET
to select the band.
2
Press PRESET
ˋ or + to select the
radio station’s stored preset number.
Setting the Sleep Timer
You can fall asleep while listening to the radio or
music from the connected device using the sleep
timer.
The unit turns off automatically after a preset
duration.
1
Play the music source you want.
2
Press SLEEP
repeatedly to select the
sleep time duration.
Each time you press the button, the indication
changes as follows:
AUTO*
60MIN
30MIN
OFF
10MIN
20MIN
* For the CD function, the unit turns off
automatically when playback finishes or after
90 minutes. When using the BLUETOOTH, radio
or AUDIO IN function, the unit turns off after 90
minutes.
The sleep time duration is displayed for a few
seconds, then the display returns to the
previous indication. When the setting
becomes effective, the display will dim and
the light sync function will turn off.
When the preset time has passed, the unit
turns off automatically.
Note
Music playback on a device connected to the
AUDIO IN jack
does not stop automatically. To
stop playback on the connected device, operate
the connected device.
To cancel the sleep function
Press SLEEP
repeatedly to select “OFF.”
Connecting optional
components
You can enjoy the sound from an optional
component, such as a portable digital music
player, through the speakers of this unit.
Be sure to turn off the power of each component
before making any connections.
For details, refer to the instruction manual of the
component to be connected.
To AUDIO
IN jack
Audio connection cable
(not supplied)
To component
(e.g., portable
digital music
player)
1
Connect the AUDIO IN jack
to the line
output jack of the portable digital music
player or other component, using an
audio connection cable (not supplied).
2
Turn the connected component on.
3
Press AUDIO IN
and start playing
sound on the connected component.
The sound from the connected component is
output from the speakers.
To connect the unit to a TV or VCR, use an
extension cable (not supplied) with a stereo-
mini jack on one end and two phono plugs on
the other end.
Notes
ˋ
ˎ If connected to the monaural output jack of a
digital music player, sound may not come through
the right speaker of the unit.
ˋ
ˎ If connected to the line output jack of a digital
music player, distortion may occur. If the sound is
distorted, connect to the headphones jack of a
digital music player instead.
ˋ
ˎ If connected to the headphones jack of a digital
music player, increase the volume of the digital
music player, and then adjust the volume of the
unit.
Precautions
Discs that this unit CAN play
ˋ
ˎ Audio CD (CD-DA*
1
tracks)
ˋ
ˎ CD-R/CD-RW that contains MP3/WMA files and
is finalized*
2
correctly.
*
1
CD-DA is the abbreviation for Compact Disc Digital
Audio. It is a recording standard used for audio
CDs.
*
2
Finalizing is the process to make the CD-R/CD-RW
discs playable on the consumer disc player
products, and the finalizing can be enabled or
disabled as optional settings during disc creation
in most recording software.
Discs that this unit CANNOT play
ˋ
ˎ CD-R/CD-RW other than those recorded in
audio CD format or formats conforming to ISO
9660 Level 1/Level 2 or Joliet
ˋ
ˎ CD-R/CD-RW of poor recording quality, CD-R/
CD-RW with scratches or that is dirty, or CD-R/
CD-RW recorded using an incompatible
recording device
ˋ
ˎ CD-R/CD-RW that is unfinalized or finalized
incorrectly
Notes on discs
ˋ
ˎ Before playing, clean the CD with a
cleaning cloth. Wipe the CD from
the center out. If there are
scratches, dirt or fingerprints on
the CD, a tracking error may occur.
ˋ
ˎ Do not use solvents such as
benzine, thinner, commercially
available cleaners or anti-static
spray intended for vinyl LPs.
ˋ
ˎ Do not expose the CD to direct sunlight or heat
sources such as hot air ducts, or leave it in a car
parked in direct sunlight as there can be a
considerable rise in temperature inside the car.
ˋ
ˎ Do not stick paper or a sticker on the CD, or
scratch the surface of the CD.
ˋ
ˎ After playing, store the CD in its case.
Note on DualDiscs
ˋ
ˎ A DualDisc is a two sided disc product which
mates DVD recorded material on one side with
digital audio material on the other side.
However, since the audio material side does
not conform to the Compact Disc (CD)
standard, playback on this product is not
guaranteed.
Music discs encoded with copyright
protection technologies
ˋ
ˎ This product is designed to playback discs that
conform to the Compact Disc (CD) standard.
Recently, various music discs encoded with
copyright protection technologies are
marketed by some record companies. Please
be aware that among those discs, there are
some that do not conform to the CD standard
and may not be playable by this product.
On safety
ˋ
ˎ As the laser beam used in the CD player
section is harmful to eyes, do not attempt to
disassemble the casing. Refer servicing to
qualified personnel only.
ˋ
ˎ Should any solid object or liquid fall into the
unit, unplug the unit, and have it checked by
qualified personnel before operating it any
further.
ˋ
ˎ Discs with non-standard shapes (e.g., heart,
square, star) cannot be played on this unit.
Attempting to do so may damage the unit. Do
not use such discs.
On power sources
ˋ
ˎ For AC operation, use the supplied AC power
cord; do not use any other cord.
ˋ
ˎ Unplug the unit from the wall outlet if it is not
to be used for an extended period of time.
ˋ
ˎ When not using the batteries, remove them to
avoid damage that can be caused by battery
leakage or corrosion.
On placement
ˋ
ˎ Do not leave the unit in a location near heat
sources, in a place subject to direct sunlight,
excessive dust or mechanical shock, or in a car
subject to the direct rays of the sun.
ˋ
ˎ Do not place the unit on an inclined or
unstable surface.
ˋ
ˎ Do not place anything within 10 mm (
13
/
32
in) of
the rear of the cabinet. The ventilation
openings must be unobstructed for the unit to
operate properly and prolong the life of its
components.
ˋ
ˎ Since a strong magnet is used for the speakers,
keep personal credit cards using magnetic
coding or spring-wound watches away from
the unit to prevent possible damage from the
magnet.
On operation
ˋ
ˎ Condensation may form on outer surfaces or
internally, and cause the unit to malfunction if
the unit is suddenly moved from a cold to a
warm environment. If condensation forms, turn
off the unit, and leave the unit off until the
moisture evaporates. Do not use the unit until
the condensation has fully evaporated.
On cleaning the cabinet
ˋ
ˎ Clean the cabinet, panel and controls using a
soft cloth slightly moistened with a mild
detergent solution. Do not use any type of
abrasive pad, scouring powder, or solvent, such
as alcohol or benzine.
On BLUETOOTH communication
ˋ
ˎ BLUETOOTH wireless technology operates
within a range of about 10 meters (30 ft).
The maximum communication range may vary
depending on obstacles (human body, metal,
wall, etc.) or the electromagnetic environment.
The unit
Steel cabinet
Optimal performance
Limited performance
ˋ
ˎ The following conditions may affect the
sensitivity of BLUETOOTH communication.
ˋ
ˋThere is an obstacle such as a person, metal,
or wall between this unit and the BLUETOOTH
device used.
ˋ
ˋDevices or equipment such as wireless LAN
devices, microwave oven, cordless telephone,
etc., using a 2.4 GHz frequency band, are in
use near the unit.
ˋ
ˋThe unit is placed on a shelf made of steel.
ˋ
ˎ Because both the BLUETOOTH and the wireless
LAN (IEEE802.11b/g/n) devices use the same
frequency band (2.4 GHz), microwave
interference may occur, resulting in
communication speed deterioration, noise, or
invalid connection if this unit is used near
wireless LAN devices. In such cases, do the
following.
ˋ
ˋIf this unit is used within 10 m (30 ft) of other
wireless LAN devices, turn off the wireless
LAN devices if possible, or place this unit at
least 10 m (30 ft) away from the wireless LAN
devices.
ˋ
ˋUse the BLUETOOTH device as close to the
unit as possible.
ˋ
ˎ Microwaves emitting from a BLUETOOTH
device may affect the operation of electronic
medical devices. Turn off the power on this unit
and the BLUETOOTH device in the following
locations, as they may cause an accident.
ˋ
ˋWhere inflammable gas is present, in a
hospital, train, airplane, or a petrol station
ˋ
ˋNear automatic doors or a fire alarm
ˋ
ˎ This unit supports security capabilities that
comply with the BLUETOOTH standard to
provide a secure connection when BLUETOOTH
wireless technology is used, but security may
be insufficient, depending on the setting. Be
careful when communicating using
BLUETOOTH wireless technology.
ˋ
ˎ Sony cannot accept any responsibility for
leakage of information when using the
BLUETOOTH function of this unit.
ˋ
ˎ Connection with all BLUETOOTH devices cannot
be guaranteed.
ˋ
ˋBLUETOOTH devices used with this unit must
conform to the BLUETOOTH standard
specified by Bluetooth SIG, Inc., and must be
certified to comply.
ˋ
ˋEven when the connected BLUETOOTH device
conforms to the above mentioned
BLUETOOTH standard, some devices may not
be connected or work correctly, depending
on the features or specifications of the
device.
ˋ
ˎ Depending on the device to be connected, it
may require some time to start
communication.
If you have any questions or problems
concerning your unit, consult your nearest Sony
dealer.
Troubleshooting
General
“LIGHT SYNC DEMO MODE” appears on
the display.
ˋ
ˎ With the unit turned on, set the automatic
demonstration off by pressing MODE
until
“DEMO MODE OFF” appears on the display.
The unit does not turn on when the AC
power cord is connected.
ˋ
ˎ Make sure the AC power cord is connected to
the wall outlet securely.
The unit does not turn on during battery
operation.
ˋ
ˎ Make sure the batteries are inserted correctly.
There is no sound.
ˋ
ˎ Make sure the appropriate function is selected
for the music or sound source you want to
listen to.
The sound is noisy.
ˋ
ˎ Is someone using a mobile phone or other
equipment emitting radio waves near the unit?
If so, move the unit and the BLUETOOTH device
away from such devices. Devices such as
mobile phones, etc., can affect BLUETOOTH
communication.
CD/MP3/WMA player
The CD player does not play or “NO DISC”
is displayed even when a CD is in place.
ˋ
ˎ Place the CD with the label side up.
ˋ
ˎ Clean the CD.
ˋ
ˎ Take out the CD and leave the CD
compartment open for about an hour to dry
any condensation.
ˋ
ˎ The CD-R/CD-RW may be blank or unfinalized.
ˋ
ˎ There are no playable MP3/WMA files on the
disc.
ˋ
ˎ There is a problem with the quality of the
CD-R/CD-RW, recording device or application
software.
ˋ
ˎ Replace all the batteries with new ones if they
are exhausted.
The sound drops out (stops briefly).
ˋ
ˎ Reduce the volume.
ˋ
ˎ Clean the CD, or replace it if the CD is badly
damaged.
ˋ
ˎ Place the unit in a location free from vibrations.
ˋ
ˎ Clean the audio laser lens with a commercially
available blower.
ˋ
ˎ The sound may drop out or noise may be
heard when using a poor quality CD-R/CD-RW
or if there is a problem with the recording
device or application software.
Starting playback takes more time than
usual.
ˋ
ˎ The following discs take a longer time to start
playback.
ˋ
ˋA disc recorded with a complicated tree
structure.
ˋ
ˋA disc that has many folders or non-MP3/
WMA files.
BLUETOOTH device
There is no sound.
ˋ
ˎ Make sure that this unit is not too far from the
BLUETOOTH device (or smartphone), or that
this unit is not receiving interference from a
wireless LAN, another 2.4 GHz wireless device,
or a microwave oven.
ˋ
ˎ Check that the BLUETOOTH connection was
completed properly between this unit and the
BLUETOOTH device (or smartphone).
ˋ
ˎ Perform pairing again (see “To pair with a
BLUETOOTH device”).
ˋ
ˎ Keep away from metal objects or surfaces.
ˋ
ˎ Make sure that the BLUETOOTH function is
activated on the BLUETOOTH device (or
smartphone).
The sound skips or the correspondence
distance is short.
ˋ
ˎ If other equipment that generates
electromagnetic radiation, such as a wireless
LAN, other BLUETOOTH device(s), or a
microwave oven is nearby, move the device
and the unit away from such equipment if
possible.
ˋ
ˎ Remove any obstacle between this unit and
the device or move the device and the unit
away from the obstacle.
ˋ
ˎ Locate this unit and the device as close to each
other as possible.
ˋ
ˎ Re-position this unit.
ˋ
ˎ Re-position the BLUETOOTH device or
smartphone.
A connection cannot be established.
ˋ
ˎ Perform pairing again (see “To pair with a
BLUETOOTH device”).
ˋ
ˎ Check that the BLUETOOTH device is
compatible with this unit. For the latest
information on compatible BLUETOOTH
devices, check the information on the website
listed is under “Compatible BLUETOOTH
devices.”
Pairing fails.
ˋ
ˎ Bring the BLUETOOTH device closer to the unit.
ˋ
ˎ Delete the model name of this unit from the
BLUETOOTH device and perform pairing again
(see “To pair with a BLUETOOTH device”).
ˋ
ˎ Check that the BLUETOOTH device is
compatible with this unit. For the latest
information on compatible BLUETOOTH
devices, check the information on the website
listed is under “Compatible BLUETOOTH
devices.”
One-touch connection (NFC) is not
possible.
ˋ
ˎ Check that the smartphone is compatible with
this unit (see “Compatible smartphones”).
ˋ
ˎ Check that the “NFC Easy Connect” app is
displayed on the smartphone.
ˋ
ˎ Check that the NFC function of the smartphone
is set to on.
ˋ
ˎ Turn on the unit and touch the smartphone on
the N-marked part
again.
ˋ
ˎ Keep the smartphone close to the unit until the
smartphone responds. If you fail, move the
smartphone slightly on the N-marked part
of the unit.
ˋ
ˎ If the smartphone is in a case, remove it.
ˋ
ˎ NFC receiving sensitivity depends on the
device. If you fail to connect with a smartphone
by One touch several times, connect to the unit
by on-screen operation.
Radio
The sound is weak or reception is poor
quality.
ˋ
ˎ Replace all the batteries with new ones.
ˋ
ˎ Move the unit away from any nearby TV.
ˋ
ˎ For FM reception, extend the antenna to its full
length, and reorient it for best FM reception.
For AM reception, reorient the unit itself to find
the best reception.
The TV picture is unstable.
ˋ
ˎ If you are listening to an FM program near a TV
with an indoor antenna, move the unit away
from the TV.
Remote
The remote does not function.
ˋ
ˎ Replace both batteries in the remote with new
ones.
ˋ
ˎ Make sure that you are pointing the remote at
the remote sensor on the unit.
ˋ
ˎ Remove any obstacles in the path of the
remote and the unit.
ˋ
ˎ Make sure the remote sensor is not exposed to
strong light such as direct sunlight or
fluorescent lamp light.
ˋ
ˎ Move closer to the unit when using the remote.
After trying the suggested remedies, if the
problem persists, unplug the AC power cord or
remove all the batteries. After all the indications
on the display disappear, plug in the AC power
cord again, or re-insert the batteries. If the
problem persists, consult your nearest Sony
dealer.
Messages
NO BT: BLUETOOTH connection is not
established.
NO DISC: There is no disc in the CD
compartment.
NO TRACK: No playable tracks/files are on the
disc.
NOT SUPPORT: An unsupported disc is in the CD
compartment.
CANNOT PLAY: An unplayable disc is in the CD
compartment. (Example: broken disc)
Specifications
AUDIO POWER SPECIFICATIONS
POWER OUTPUT AND TOTAL HARMONIC
DISTORTION
With 4.6-ohm loads, both channels driven
from 200 Hz - 10,000 Hz; rated 3.5 W per
channel-minimum RMS power, with no more
than 10 % total harmonic distortion in AC
operation.
Woofer with 4.6-ohm loads, driven from 50 Hz
- 200 Hz; rated 12 W minimum RMS power,
with no more than 10 % total harmonic
distortion in AC operation.
CD player section
System
Compact disc digital audio system
Laser diode properties
Emission duration: Continuous
Laser output: Less than 44.6 μW
(This output is the value measurement at a
distance of 200 mm from the objective lens
surface on the optical pick-up block with 7 mm
aperture.)
Number of channels
2
Frequency response
20 Hz - 20,000 Hz +1/–2 dB
Wow and flutter
Below measurable limit
BLUETOOTH section
Communication System
BLUETOOTH Specification Version 3.0
Modulation method
FHSS
Output
BLUETOOTH Specification Power Class 2
Maximum communication range
Line of sight approx. 10 m (30 ft)*
1
Frequency band
2.4 GHz band (2.4000 GHz - 2.4835 GHz)
Supported BLUETOOTH Profiles*
2
A2DP (Advanced Audio Distribution Profile)
AVRCP*
3
(Audio/Video Remote Control Profile)
Supported codec*
4
SBC (Subband Codec)
*
1
The actual range will vary depending on factors
such as obstacles between devices, magnetic
fields around a microwave oven, static electricity,
reception sensitivity, aerial performance, operating
system, application software, etc.
*
2
BLUETOOTH standard profiles provide the
specifications for BLUETOOTH communication
between devices.
*
3
Some operations may not be available depending
on the device.
*
4
Codec: Audio signal compression and conversion
format
Radio section
Frequency range
FM: 87.5 MHz - 108 MHz
AM: 530 kHz - 1,710 kHz
Antennas
FM: Telescopic antenna
AM: Built-in ferrite bar antenna
Input
AUDIO IN
Stereo mini jack
General
Speaker
Full range: 10 cm (4 in) dia., 4.6 Ω, cone type (2)
Woofer: 13 cm (5 1/8 in) dia., 4.6 Ω, cone type
(1)
Tweeter: 3.5 cm (1 7/16 in) dia. (2)
Power output
4 W + 4 W (at 4.6 Ω, 10% harmonic distortion)
Woofer:
12 W (at 4.6 Ω, 10% harmonic distortion)
Power requirements
For unit:
120 V AC, 60 Hz (AC power supply)
12 V DC (8 R20 (size D) batteries)
For remote control:
3 V DC, 2 R6 (size AA) batteries
Power consumption
AC 12 W
Battery Life*
1
, *
2
CD playback
Approx. 20 hours
BLUETOOTH device playback
Approx. 22 hours
FM reception
Approx. 26 hours
*
1
Measured by Sony standards. The actual battery
life may vary depending on the circumstances of
the unit or operating conditions.
*
2
When using Sony alkaline batteries
Dimensions
Approx. 600 mm × 210 mm ×
355.5 mm (23
5
/
8
in × 8
3
/
8
in × 14 in) (W/H/D)
(incl. projecting parts)
Mass
Approx. 8.0 kg (17 lb 10 oz) (incl. batteries)
Supplied accessories
AC power cord (1)
Remote control (1)
Design and specifications are subject to change
without notice.
*
(on the unit and remote) and VOLUME + (on the
remote) have a tactile dot.