Sony VGN-AW190YBB User Manual
Page 2
VGN-AWxx Series Hard Disk Drive
Replacement Instructions
FOR TECHNICAL SUPPORT IN THE US CALL TOLL FREE 1-866-651-7669 FROM 9:00 AM TO 11:00 PM EST
P/N 994659800
Rev. A
2/2
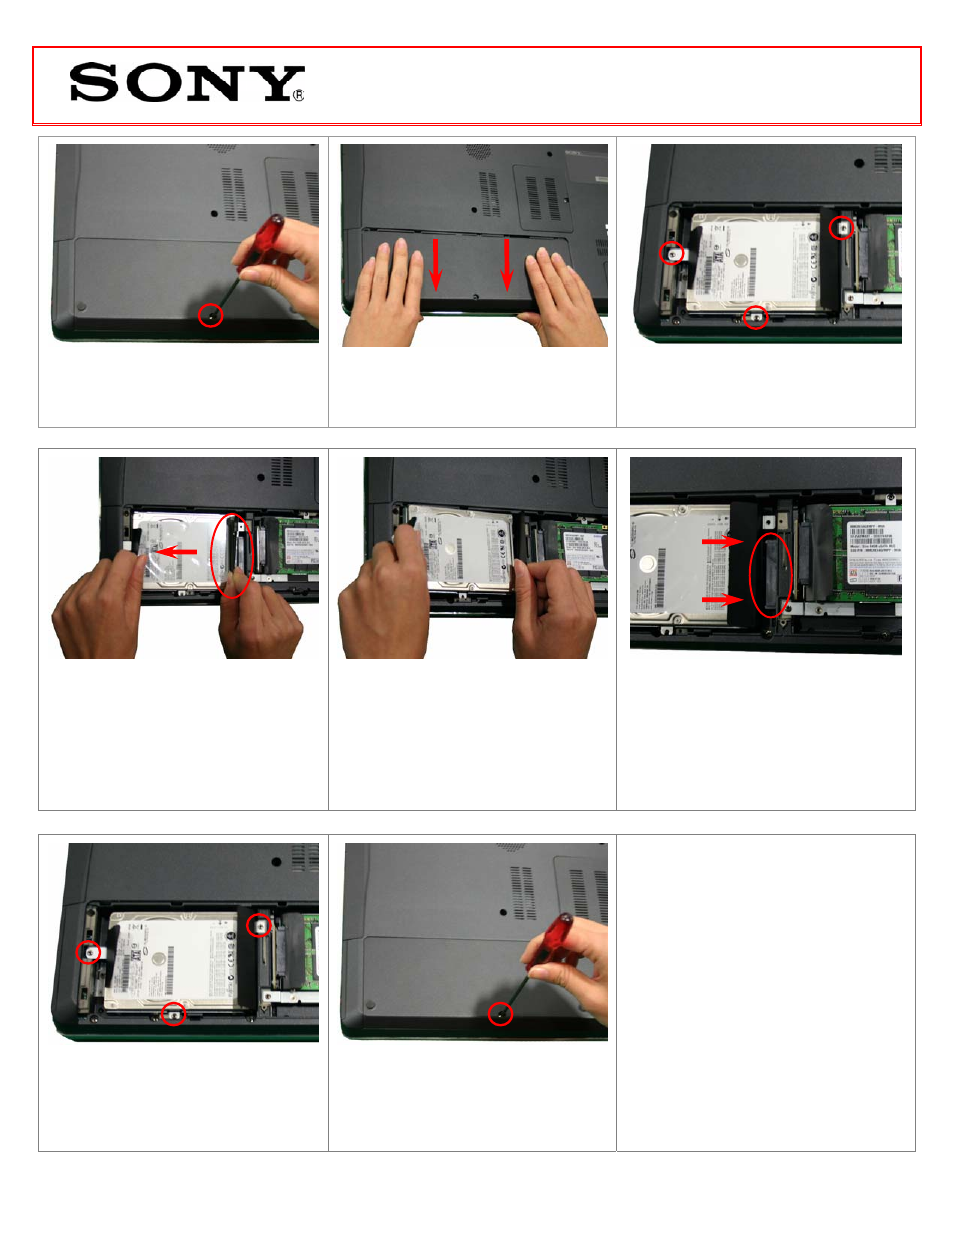
Step 5. Using the enclosed magnetic
screwdriver, remove the screw securing the
hard disk drive access cover.
Step 6. Remove the HDD access cover by
sliding it in the direction of the arrows
shown above.
Step 7. Using the enclosed magnetic
screwdriver, remove the three (3) screws
securing the HDD assembly.
Step 8. To remove the drive, carefully
detach the HDD from the connector in the
direction shown. Some force may be
needed to unlock the HDD from the
connector. Lift the drive by holding on the
black plastic tabs to remove it completely.
(HDD Reinstallation) Steps 9-12
Step 9. Replace the old HDD assembly
with the new one. Carefully place the HDD
assembly on the HDD bay.
Step 10. Attach the drive to the HDD
connector by moving the new HDD assembly
in the direction of the arrows shown in the
picture.
Step 13. Reinstall the battery pack and
reconnect the AC Adaptor.
Return the old HDD to Sony following the
included shipping instructions.
Step 11. Reinstall the three (3) previously
removed screws to secure the HDD bay in
place.
Step 12. Re-attach the HDD access cover
and secure it with the screw shown in the
picture.
- VGN-AW160J VGN-AW190JAH VGN-AW270Y VGN-AW230J VGN-AW210J VGN-AW190Y VGN-AW130J VGN-AW190 VGN-AW190NBB VGN-AW190YAB VGN-AW220J VGN-AW190N VGN-AW190J VGN-AW190YCB VGN-AW235J VGN-AW290 VGN-AW110J VGN-AW290J VGN-AW170Y VGN-AW110N VGN-AW150Y VGN-AW120J VGN-AW150 VGN-AW190NCB VGN-AW125J VGN-AW190NIH VGN-AW190NAB VGN-AW180Y VGN-AW290Y