Agri-Fab 45-02114 User Manual
Page 5
5
FIGURE 2
FIGURE 3
2. Assemble the two hitch braces to the inside of the hopper
frame, one on each side, using two 1/4" x 1-1/2" hex
bolts (A) and two 1/4" nylock nuts (D).
DO NOT TIGHTEN
yET. See figure 2.
3. Remove the nut from the middle bolt in the crossover
tube and shaft support plate. Leave the bolt in place.
See figure 2.
4. Assemble the hitch tube onto the middle bolt and secure
it with the same nut you removed.
DO NOT TIGHTEN
yET. See figure 2.
IMPORTANT: The hitch tube must attach to the side of the
crossover tube opposite the shaft support plate.
5. Assemble the two hitch braces to the hitch tube using a
1/4" x 1-1/2" hex bolt (A) and a 1/4" nylock nut(D).
DO
NOT TIGHTEN yET. See figure 2.
6.
Tighten the nuts and bolts fastening the hitch braces
to the hopper frame and the hitch tube, then tighten
the middle lock nut fastening the hitch tube to the
crossover tube.
DO NOT COLLAPSE TUBES WHEN
TIGHTENING.
(A) 1/4" x 1-1/2"
HEX BOLTS
(D) 1/4"
NYLOCK
NUTS
CROSSOVER
TUBE
HITCH BRACE
HITCH
TUBE
SHAFT
SUPPORT
PLATE
MIDDLE
NUT
MIDDLE BOLT
HITCH BRACE
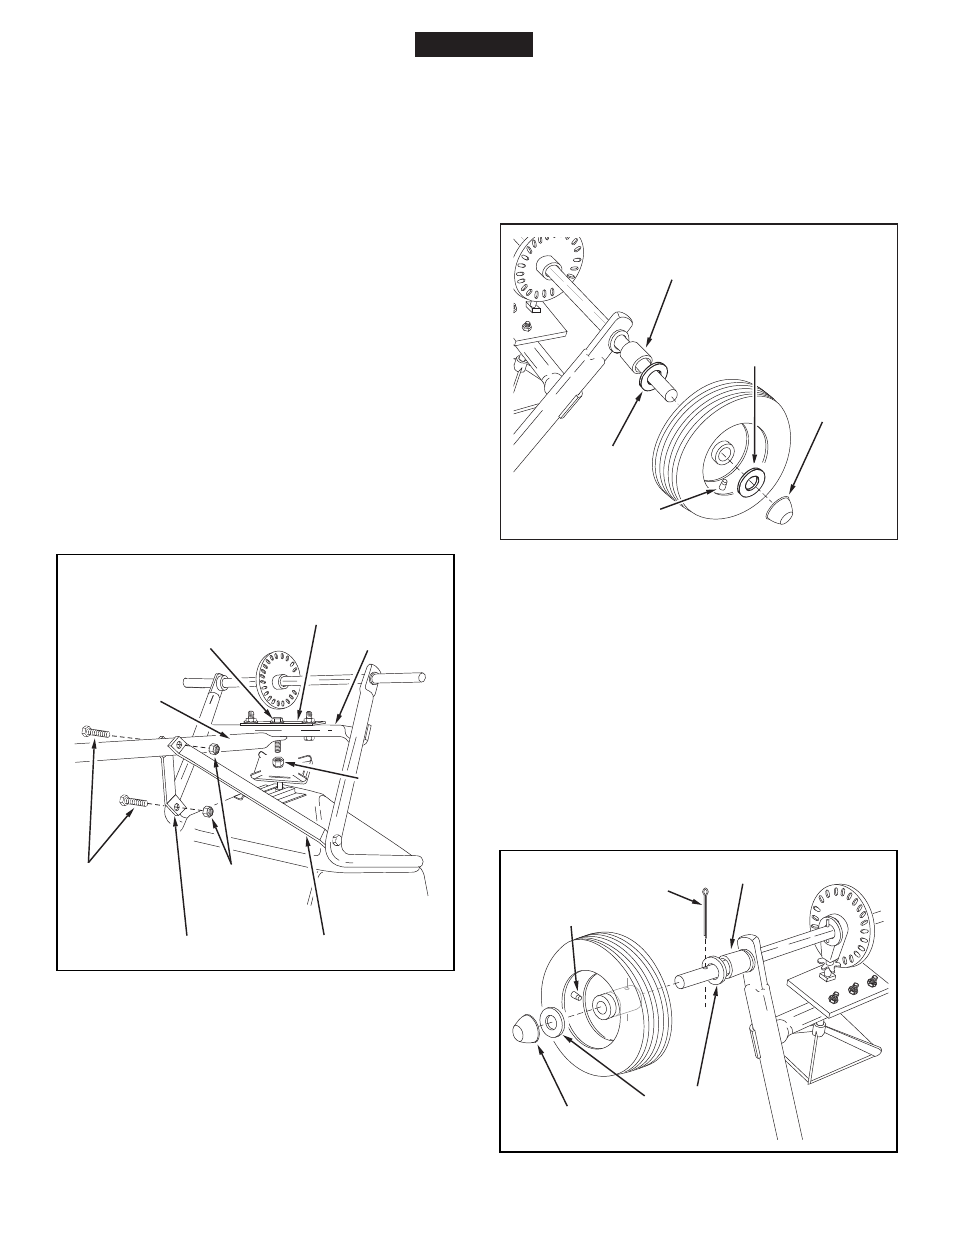
7. Select the end of the axle with no cross hole. Assemble
a spacer (L), a 5/8" flat washer (G), a wheel (air valve
facing out) and then another 5/8" flat washer (G) onto
the axle. See figure 3.
8. Install a hub cap (Q) by tapping it carefully onto the axle
with a hammer. See figure 3.
(L) SPACER
(G) 5/8" DIA.
FLAT WASHER
(G) 5/8" DIA.
FLAT WASHER
(Q) HUB CAP
AIR VALVE
ENGLISH
FIGURE 4
9. Select the end of the axle containing the cross hole.
Assemble a spacer (L), a 5/8" flat washer (G), a wheel
(air valve facing out) and then another 5/8" flat washer
(G) onto the axle. Insert the 5/32" x 2" cotter pin (I)
through the wheel hub and the axle and then spread
the ends of the pin. See figure 4.
10. Install a hub cap (Q) by tapping it carefully onto the axle
with a hammer. See figure 4.
(I) 5/32" x 2"
COTTER PIN
AIR VALVE
(L) SPACER
(G) 5/8" DIA.
FLAT WASHER
(Q) HUB CAP