Control elements – Karcher B 80 W Bp Pack User Manual
Page 14
-
2
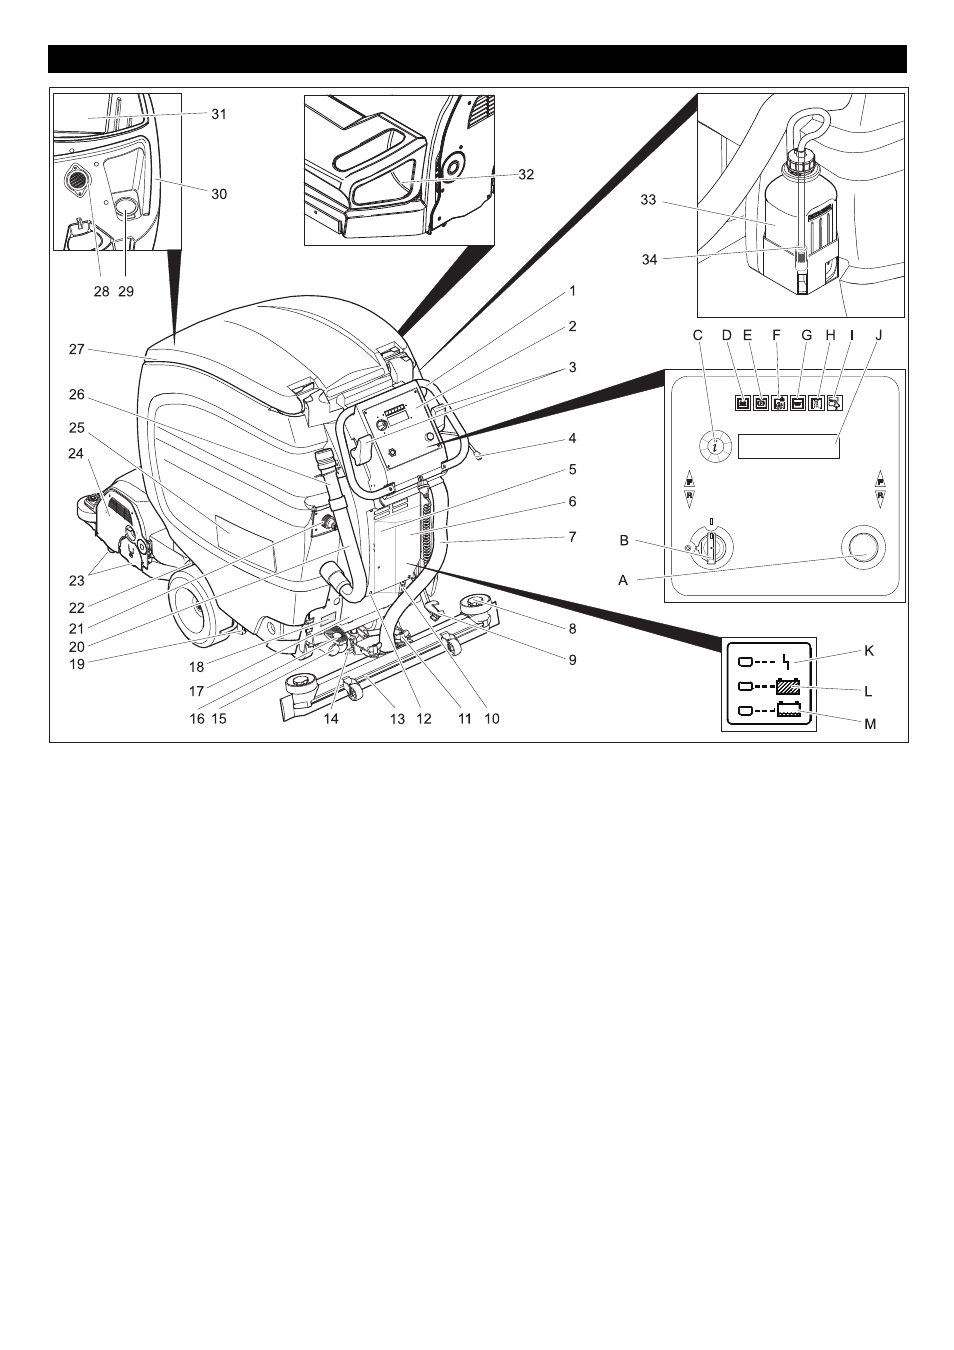
1 Push handle
2 Operator console
3 Driving lever
4 Vacuum bar lowering lever
5 Power cord for charger (only Pack model)
6 Charger (only Pack model)
7 Suction hose
8 Star grips to exchange the vacuum lips
9 Pedal for raising/ lowering the cleaning
head
10 Lever for adjusting the brush contact
pressure
11 Wing nuts for fastening and tilting the
vacuum bar
12 Screws of electronics cabinet cover
13 Vacuum bar (not included in the delivery)
14 Vacuum bar suspension
15 Fresh water filter
16 Pedal for operating the parking brake
17 Maintenance lid
18 Nameplate
19 Drain tap for fresh water
20 Dirt water discharge hose
21 Filling system (optional)
22 Screw to lock the tank
23 Brush rollers (R-Cleaning head)
Disk brush (D cleaning head)
24 Cleaning head
25 Batteries (below the tank)
26 Dosing equipment for dirt water
27 Cover of the dirt/fresh water reservoir
Under the lid of the dirt water tank:
28 Lint sieve (suction)
29 Fresh water reservoir filler neck
30 Fresh water tank
31 Dirt water reservoir
32 Waste container (only with R cleaning
head) *
33 Detergent bottle (only Dose model)
34 Suction hose for detergent (only Dose
model)
Operator console
A Emergency-stop button (turn to re-
lease)
B Key switch
C Info button
D Indicator lamp (red), lights up when the
batteries are discharged
E Indicator lamp (red), lights up when the
immobilising brake is applied
F Indicator lamp (red), lights up when the
brushes are overload
G Indicator lamp (red), lights up when the
waste water reservoir is full
H Indicator lamp (green), lights up when
the water is added
I
Indicator lamp (green), lights up when
vacuum is on
J Display for
Battery status
Water quantity
Cleaning speed
Brush speed
Detergent dosing unit
WDB function (only in connection with op-
tional attachment set for spray suction)
Operating hours
Speed
Manufacturer
program version
Charger (only Pack model)
K red LED lights up = Problem with charg-
er/ battery; inform Customer Service
L green LED lights up = battery is full
M yellow LED lights up = batteries are be-
ing charged
Control elements
14
EN