Haltech Platinum PRO PLUG-IN Mitsubishi Evolution 9 2005 - 2007 (HT055064) User Manual
Page 7
Rear Auxiliary Connector
The Platinum Pro Plugin Series allows further expansion of your ECU by the
Rear Auxiliary Connector.
The Rear Auxiliary connector allows you access to:
•
2 Additional Digital Pulsed Outputs ( DPO )
•
2 Additional Digital Switched Outputs ( DSO )
•
2 Additional Analogue Voltage Inputs ( AVI )
•
2 Additional Analogue Temperature Inputs ( ATI )
These extra Inputs / Outputs can be used to:
•
Fit additional sensors. (eg MAP and Temperature)
•
Control additional devices via relays
•
Control additional solenoids directly (eg Aftermarket Boost Control solenoid)
The Rear Auxiliary harness is available as an optional extra. ( HT040003 )
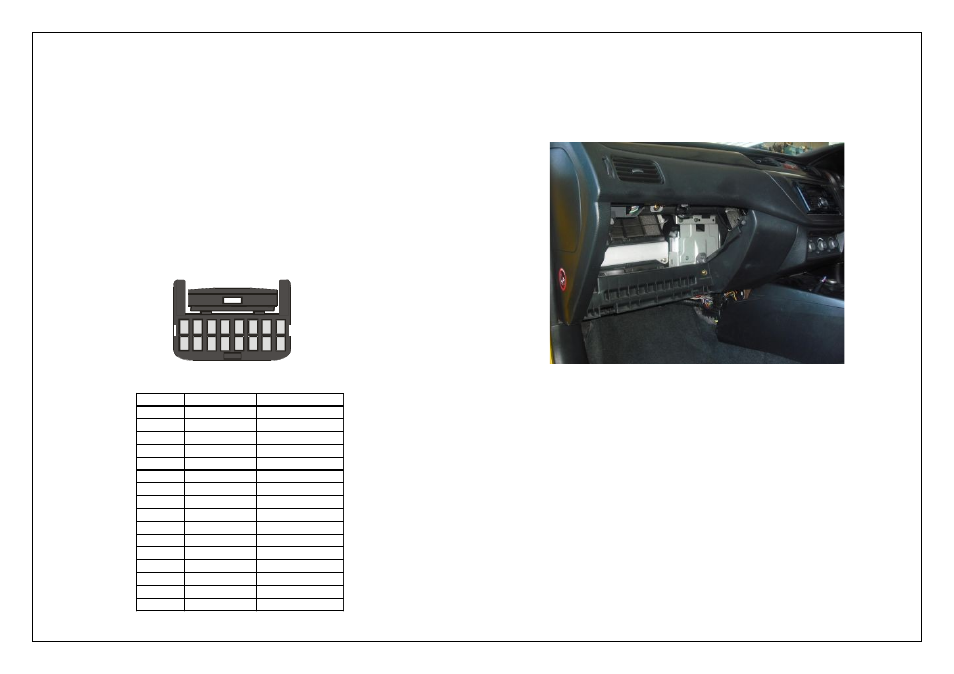
Figure 7 - Rear Auxiliary Harness Connector and Pinout
6.
Connect the supplied programming cable to the Haltech ECU.
Re-Mount the ECU in the original location using the 3 x 10mm bolts.
Re-Connect the 3 Harness connectors to the Haltech ECU.
Connect the internal MAP sensor to the engine intake system via silicon hose.
Re-Install glove compartment and covers removed.
Leave programming cable in an accessible location for ease of tuning.
ie. In glove compartment or in kick panel.
Figure 6 – Haltech Pro Plug-in ECU Installed
7.
With the ECU installed do not attempt to start the vehicle.
You will need to configure the ECU.
The ECU is Pre Configured for use with a standard 4G63 engine. If this is your setup
then you will not have to load a basemap. However, it is still strongly recommended
that you check your settings before starting your engine.
If a non standard engine or sensor combination is to be used please go online with
the ECU using the supplied ECU Manager software adjust any configuration settings
affected according to your setup. If the engine is modified, then all tables must be
checked as the standard fuel and ignition settings may not be appropriate to operate
your engine safely.
With the correct settings configured in the ECU, the engine should be able to be
started at this point.
8.
With the engine started and running its now time to tune
This is best achieved by your nearest engine tuner
See the listing of Haltech dealers on our website to find the one closest to you.
www.haltech.com
Pin #
Wire Colour
Connection
1
O
+5V
2
Y
AVI1 (MAP)
3
O/B
AVI2
4
B/W
SIGNAL GROUND
5
V/B
DPO1
6
V/BR
DPO2
7
-
-
8
-
-
9
O
+5V
10
GY
ATI1 (AIR)
11
GY/B
ATI2
12
B/W
SIGNAL GROUND
13
V/R
DSO1
14
V/O
DSO2
15
-
-
16
-
-
1
2
3
4
9
10
11
12
5
6
7
8
13
14
15
16
Looking into Back Of Connector