Alignment guides – Allied Telesis AT-LX3801 User Manual
Page 2
return the unit to Allied Telesyn.
2.
Select the slot in the AT-LX3800U chassis where you
want to install the blank slot cover.
3.
If an AT-LX3811/x Line Card is installed in the slot, do
the following:
a.
Disconnect the cables from the SFP transceiver in
the line card.
b.
Reinstall the SFP dust cap.
c.
Remove the line card from the slot.
d.
Put dust caps on the fiber optic connectors.
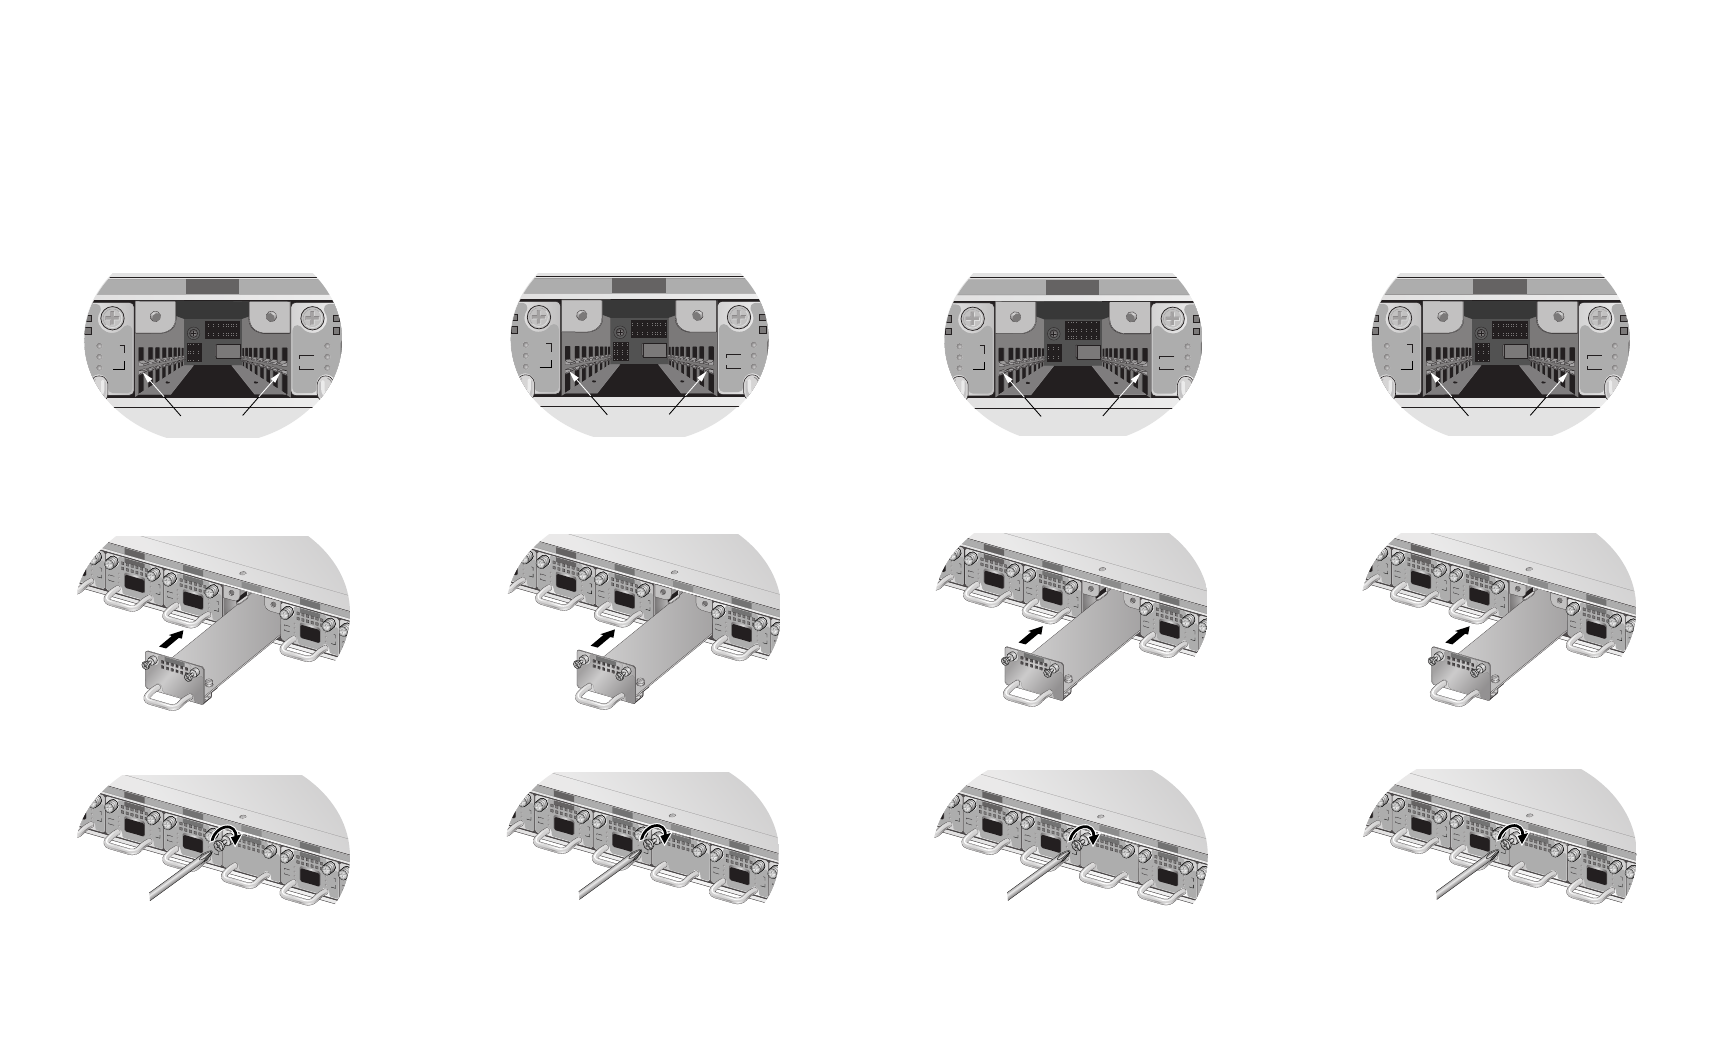
4.
Locate the left and right alignment guides in the slot.
5.
Align the back edge of the blank slot cover with the left
and right alignment guides.
6.
Slide the blank slot cover into the slot until the
faceplate is flush with the front.
7.
Use a Phillips head screwdriver to tighten the captive
screws.
8.
Repeat this procedure to install additional AT-LX3801
Blank Slot Covers.
Copyright © 2004 Allied Telesyn, Inc. All rights reserved. No part of
this publication may be reproduced without prior written permission
from Allied Telesyn, Inc. www.alliedtelesyn.com
RDY
TX
RX
TRIB
SYNC
TX
RX
LINE
138
Alignment Guides
142
3
4
5
6
SFP
SYNC
TX
RX
LINE
RDY
TX
RX
TRIB
AT-LX3811/3
SFP
SYNC
TX
RX
LINE
RDY
TX
RX
TRIB
AT-LX3811/4
TRIB
RD
T
R
TRIB
811/2
P
SYNC
TX
RX
LINE
AT-LX38
01
SFP
SYNC
TX
RX
LINE
RDY
TX
RX
TRIB
AT-LX3811/6
3
4
5
6
SFP
SYNC
TX
RX
LINE
RDY
TX
RX
TRIB
AT-LX3811/3
SFP
SYNC
TX
RX
LINE
RDY
TX
RX
TRIB
AT-LX3811/4
TRIB
RD
T
R
TRIB
811/2
P
SYNC
TX
RX
LINE
SFP
SYNC
TX
RX
LINE
RDY
TX
RX
TRIB
AT-LX3811/6
AT-LX3801
143
return the unit to Allied Telesyn.
2.
Select the slot in the AT-LX3800U chassis where you
want to install the blank slot cover.
3.
If an AT-LX3811/x Line Card is installed in the slot, do
the following:
a.
Disconnect the cables from the SFP transceiver in
the line card.
b.
Reinstall the SFP dust cap.
c.
Remove the line card from the slot.
d.
Put dust caps on the fiber optic connectors.
4.
Locate the left and right alignment guides in the slot.
5.
Align the back edge of the blank slot cover with the left
and right alignment guides.
6.
Slide the blank slot cover into the slot until the
faceplate is flush with the front.
7.
Use a Phillips head screwdriver to tighten the captive
screws.
8.
Repeat this procedure to install additional AT-LX3801
Blank Slot Covers.
Copyright © 2004 Allied Telesyn, Inc. All rights reserved. No part of
this publication may be reproduced without prior written permission
from Allied Telesyn, Inc. www.alliedtelesyn.com
RDY
TX
RX
TRIB
SYNC
TX
RX
LINE
138
Alignment Guides
142
2
3
4
5
6
SFP
SYNC
TX
RX
LINE
RDY
TX
RX
TRIB
AT-LX3811/3
SFP
SYNC
TX
RX
LINE
RDY
TX
RX
TRIB
AT-LX3811/4
TRIB
R
TRIB
X3811/2
SFP
SYNC
TX
RX
LINE
AT-LX38
01
SFP
SYNC
TX
RX
LINE
RDY
TX
RX
TRIB
AT-LX3811/6
3
4
5
6
SFP
SYNC
TX
RX
LINE
RDY
TX
RX
TRIB
AT-LX3811/3
SFP
SYNC
TX
RX
LINE
RDY
TX
RX
TRIB
AT-LX3811/4
TRIB
R
TRIB
811/2
P
SYNC
TX
RX
LINE
SFP
SYNC
TX
RX
LINE
RDY
TX
RX
TRIB
AT-LX3811/6
AT-LX3801
143
return the unit to Allied Telesyn.
2.
Select the slot in the AT-LX3800U chassis where you
want to install the blank slot cover.
3.
If an AT-LX3811/x Line Card is installed in the slot, do
the following:
a.
Disconnect the cables from the SFP transceiver in
the line card.
b.
Reinstall the SFP dust cap.
c.
Remove the line card from the slot.
d.
Put dust caps on the fiber optic connectors.
4.
Locate the left and right alignment guides in the slot.
5.
Align the back edge of the blank slot cover with the left
and right alignment guides.
6.
Slide the blank slot cover into the slot until the
faceplate is flush with the front.
7.
Use a Phillips head screwdriver to tighten the captive
screws.
8.
Repeat this procedure to install additional AT-LX3801
Blank Slot covers.
Copyright © 2004 Allied Telesyn, Inc. All rights reserved. No part of
this publication may be reproduced without prior written permission
from Allied Telesyn, Inc. www.alliedtelesyn.com
RDY
TX
RX
TRIB
SYNC
TX
RX
LINE
138
Alignment Guides
142
2
3
4
5
6
SFP
SYNC
TX
RX
LINE
RDY
TX
RX
TRIB
AT-LX3811/3
SFP
SYNC
TX
RX
LINE
RDY
TX
RX
TRIB
AT-LX3811/4
TRIB
TRIB
3811/2
FP
SYNC
TX
RX
LINE
AT-LX38
01
SFP
SYNC
TX
RX
LINE
RDY
TX
RX
TRIB
AT-LX3811/6
2
3
4
5
6
SFP
SYNC
TX
RX
LINE
RDY
TX
RX
TRIB
AT-LX3811/3
SFP
SYNC
TX
RX
LINE
RDY
TX
RX
TRIB
AT-LX3811/4
TRIB
RD
T
R
TRIB
3811/2
FP
SYNC
TX
RX
LINE
SFP
SYNC
TX
RX
LINE
RDY
TX
RX
TRIB
AT-LX3811/6
AT-LX3801
143
return the unit to Allied Telesyn.
2.
Select the slot in the AT-LX3800U chassis where you
want to install the blank slot cover.
3.
If an AT-LX3811/x Line Card is installed in the slot, do
the following:
a.
Disconnect the cables from the SFP transceiver in
the line card.
b.
Reinstall the SFP dust cap.
c.
Remove the line card from the slot.
d.
Put dust caps on the fiber optic connectors.
4.
Locate the left and right alignment guides in the slot.
5.
Align the back edge of the blank slot cover with the left
and right alignment guides.
6.
Slide the blank slot cover into the slot until the
faceplate is flush with the front.
7.
Use a Phillips head screwdriver to tighten the captive
screws.
8.
Repeat this procedure to install additional AT-LX3801
Blank Slot covers.
Copyright © 2004 Allied Telesyn, Inc. All rights reserved. No part of
this publication may be reproduced without prior written permission
from Allied Telesyn, Inc. www.alliedtelesyn.com
RDY
TX
RX
TRIB
SYNC
TX
RX
LINE
138
Alignment Guides
142
2
3
4
5
6
SFP
SYNC
TX
RX
LINE
RDY
TX
RX
TRIB
AT-LX3811/3
SFP
SYNC
TX
RX
LINE
RDY
TX
RX
TRIB
AT-LX3811/4
TRIB
RD
T
R
TRIB
3811/2
FP
SYNC
TX
RX
LINE
AT-LX38
01
SFP
SYNC
TX
RX
LINE
RDY
TX
RX
TRIB
AT-LX3811/6
2
3
4
5
6
SFP
SYNC
TX
RX
LINE
RDY
TX
RX
TRIB
AT-LX3811/3
SFP
SYNC
TX
RX
LINE
RDY
TX
RX
TRIB
AT-LX3811/4
TRIB
RD
T
R
TRIB
X3811/2
SFP
SYNC
TX
RX
LINE
SFP
SYNC
TX
RX
LINE
RDY
TX
RX
TRIB
AT-LX3811/6
AT-LX3801
143