Audiovox ACD-30 User Manual
Page 7
6
6
6
6
6
CHEVROLET-OLDS-BUICK-PONTIAC-GMC-CADILLAC-SATURN
INSTALLATION
CHEVROLET-OLDS-BUICK-PONTIAC-GMC-CADILLAC-SATURN
INSTALLATION
CHEVROLET-OLDS-BUICK-PONTIAC-GMC-CADILLAC-SATURN
INSTALLATION
CHEVROLET-OLDS-BUICK-PONTIAC-GMC-CADILLAC-SATURN
INSTALLATION
CHEVROLET-OLDS-BUICK-PONTIAC-GMC-CADILLAC-SATURN
INSTALLATION
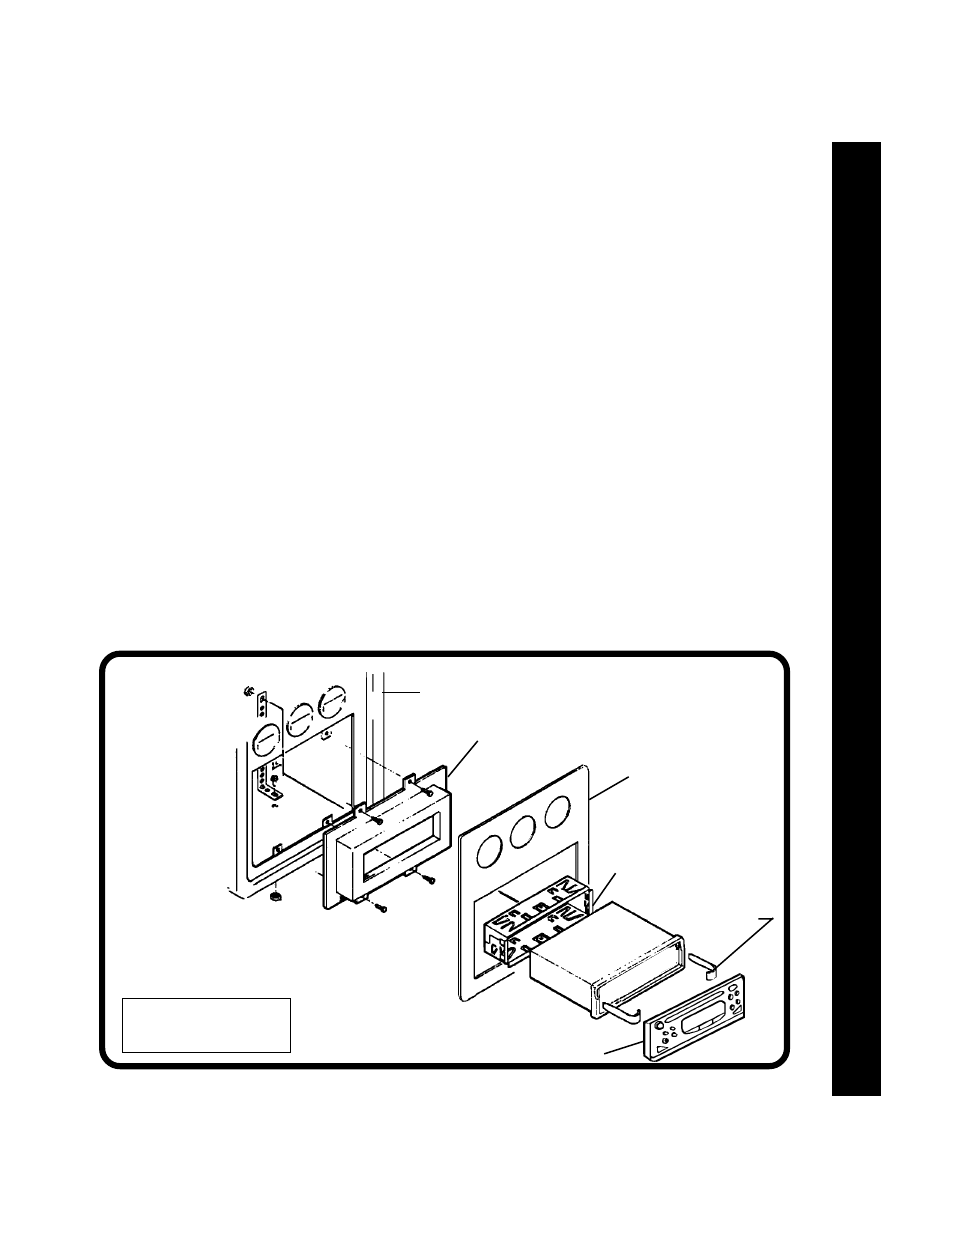
INSTALLRADIOUSINGSAME
PROCEDUREASEXPLAINED
ONPAGES3AND4
SUB-DASHBOARD
(RADIOAREA)
MOUNTINGPLATEFROMKIT
(NOTINCLUDEDWITHRADIO)
FACTORYDASHPANEL
MOUNTINGSLEEVE
RADIO
DETACHABLEFRONTPANEL
REMOVALTOOLS
IMPORTANT
AMOUNTINGKITISREQUIRED
FORTHISINSTALLATION
CHEVROLET-OLDSMOBILE-BUICK-PONTIAC-GMC-CADILLAC-SATURNINSTALLATION
CHEVROLET-OLDSMOBILE-BUICK-PONTIAC-GMC-CADILLAC-SATURNINSTALLATION
CHEVROLET-OLDSMOBILE-BUICK-PONTIAC-GMC-CADILLAC-SATURNINSTALLATION
CHEVROLET-OLDSMOBILE-BUICK-PONTIAC-GMC-CADILLAC-SATURNINSTALLATION
CHEVROLET-OLDSMOBILE-BUICK-PONTIAC-GMC-CADILLAC-SATURNINSTALLATION
AllU.S.MadeCars,Trucks,andVansBuiltSince1982
AllU.S.MadeCars,Trucks,andVansBuiltSince1982
AllU.S.MadeCars,Trucks,andVansBuiltSince1982
AllU.S.MadeCars,Trucks,andVansBuiltSince1982
AllU.S.MadeCars,Trucks,andVansBuiltSince1982
Important-This radio cannot be installed in any "GM" vehicle without an installation kit. Refer to Kit Listings
on page 2 for the required kit. Complete kit installation is explained in the instructions included with kit. This
radio cannot be installed in GM vehicles built before 1982.
CAUTION:
1. DO NOT CUT OR FILE THE OPENING TO THE OUTER EDGES OF THE TEMPLATE!
2. FOR PROPER OPERATION OF THE CD PLAYER, THE CHASSIS MUST BE WITHIN 20° OF
HORIZONTAL. MAKE SURE THE UNIT IS MOUNTED WITHIN THIS LIMITATION.
1. RemoveExistingRadio:
1. RemoveExistingRadio:
1. RemoveExistingRadio:
1. RemoveExistingRadio:
1. RemoveExistingRadio:
A. Remove existing radio dash trim panel surrounding the radio opening. This panel is usually secured
by screws and/or snap-in clips.
B. Remove the screws used to secure radio to the sub-dashboard.
Helpful Hint: If you do not have an existing radio, you will find the radio opening is covered by a
disposable cover plate.
C. Pull the radio forward to access the wiring and antenna cables plugged into the rear of the chassis.
D. Un-plug the wiring harness(es) and antenna cable and remove the radio.
2.InstalltheNewRadio:
2.InstalltheNewRadio:
2.InstalltheNewRadio:
2.InstalltheNewRadio:
2.InstalltheNewRadio:
A. Following the instructions included with the installation kit, secure the sleeve from the radio to the
mounting plate from the kit as explained on page 3.
B. Install the sleeve/mounting plate assembly to the sub-dashboard as per the instructions with the
installation kit.
C. Replace the dashboard trimpanel.
D. Following the instructions of steps 4 and 5 on page 4, carefully wire the radio and complete
installation into the mounting sleeve.