Kenwood KDC-BT47SD User Manual
Page 18
34
English
English
35
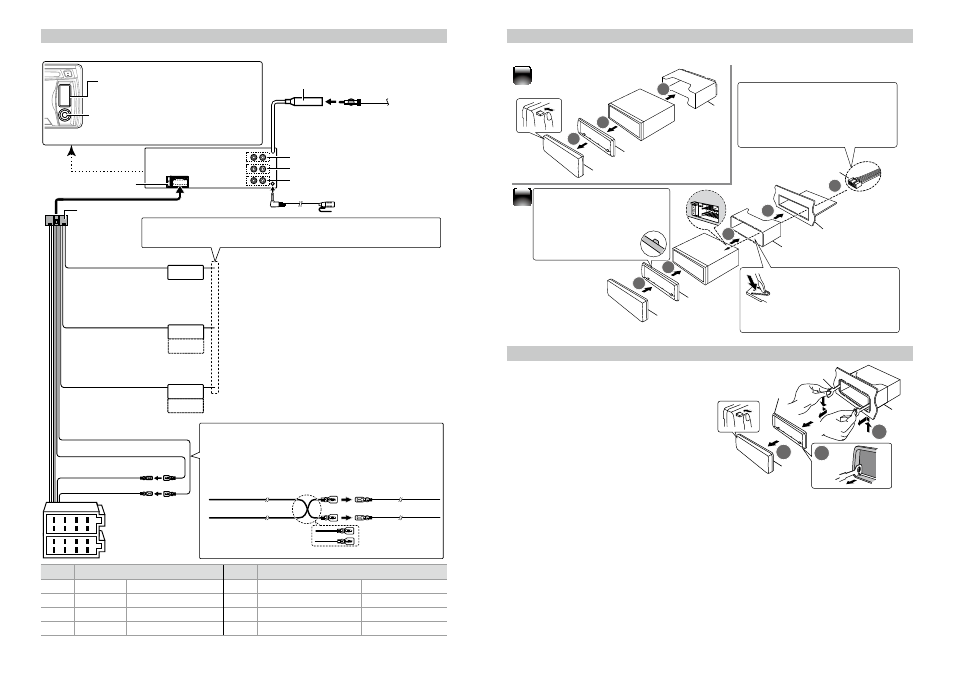
STEERING WHEEL
REMOTE INPUT
MUTE
ANT. CONT
P.CONT
REMOTE CONT
1
2
3
4
5
6
7
8
1
2
3
4
5
6
7
8
L
R
Antenna Cord
FM/AM antenna
input (JASO)
Pin
Color and function
Pin
Color and function
A4
Yellow
Battery
B1 / B2
Purple
ª / Purple/black ·
Rear speaker (right)
A5
Blue/White
Power control
B3 / B4 Gray
ª / Gray/black ·
Front speaker (right)
A7
Red
Ignition (ACC)
B5 / B6 White
ª / White/black ·
Front speaker (left)
A8
Black
Earth (ground) connection
B7 / B8 Green
ª / Green/black ·
Rear speaker (left)
Microphone F
Light Blue/Yellow
(Steering remote
control wire)
Brown
(Mute control wire)
Blue/White
(Power control/
Antenna control wire)
Red (A–7 Pin)
Yellow (A–4 Pin)
Yellow (Battery wire)
Yellow (Battery wire)
Yellow (A–4 Pin)
Vehicle
Unit
Default wiring
Red (Ignition wire)
Red (Ignition wire)
Red (A–7 Pin)
To use the steering wheel remote control feature,
you need to an exclusive remote adapter (not
supplied) matches your car is required.
To connect the Kenwood navigation system, consult
your navigation manual.
Connect either to the power control terminal when
using the optional power amplifier, or to the antenna
control terminal in the vehicle. (Max. 300mA, 12V)
If no connections are made, do not let the wire come out from the
tab.
Wiring
harness D
Fuse (10A)
Connecting the ISO connectors on some VW/Audi or
Opel (Vauxhall) automobiles
You may need to modify the wiring of the supplied
wiring harness as illustrated below.
Wiring connection
Connector A
Connector B
2
1
1
2
3
4
5
1
2
3
Installing the unit
Removing the unit
1
Detach the faceplate A.
2
Engage the catch pin on the removal
tools E into the holes on both sides of
the escutcheon B, then pull it out.
3
Insert the removal tools E deeply into
the slots on each side, then follow the
arrows instructions as shown on the
right.
1
2
3
B
A
E
E
C
A
B
C
A
B
C
Dashboard of
your car
D
Before attaching, make
sure the direction of the
escutcheon is correct.
(Wider hooks on the
bottom side.)
Connect the wiring harness to the
unit. Other wiring connection has
been completed earlier. (
Bend the appropriate tabs
to hold the mounting sleeve
firmly in place.
USB connector
AUX input (Stereo)
Use the mini-plug (3.5 mm ø) cable
which is stereo type and does not have
any resistance.
Rear output
Front output
Sub Woofer output