Acesonic BDK-2000 User Manual
Page 7
3
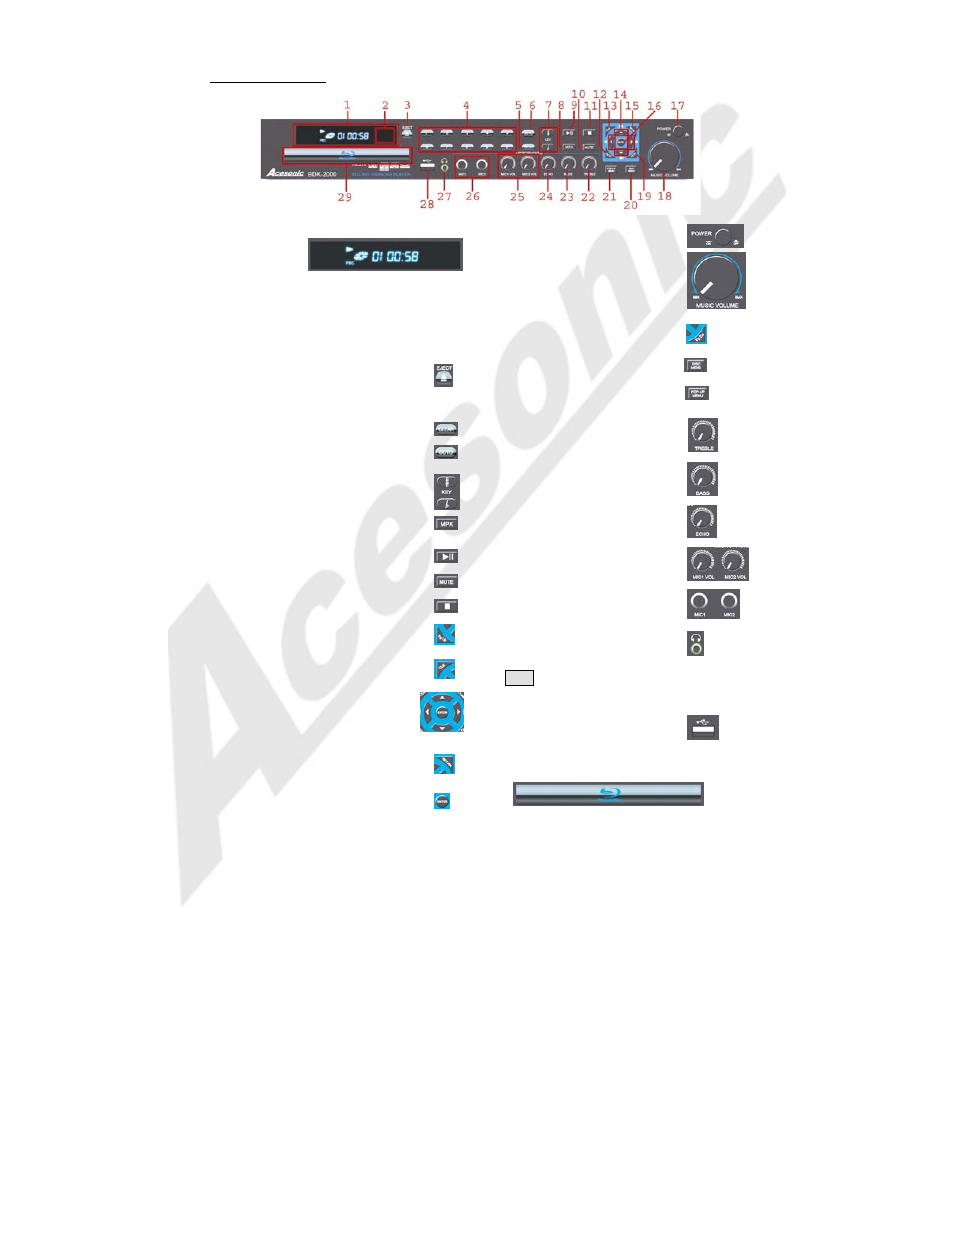
Front Panel Operation:
1)
DISPLAY WINDOW - Displays player status such as
time, disc
format, and
song
number. If no
disc is in the tray, the display window will display NO
DISC. Detailed information will also be shown on the
TV screen.
2)
REMOTE SENSOR window - Receives signals from
remote control. (Underneath display bezel and so not visible
here. This is where the remote should be aimed for best
operation.)
3)
EJECT - Press to open and close disc tray.
4)
Numeric Keypad - Used to enter numbers as
needed.
5)
6)
CLEAR - Press to reset any entered data.
7)
GOTO - Used to go to a specific point
during playback.
8)
KEY CONTROL Buttons -
# button: used to flatten by a half tone.
b button: used to sharpen by a half tone.
MPX - Selects Left/Right MONO and Stereo audio
output for CDs and audio track for DVDs.
9)
PLAY/PAUSE - Start to play the disc or
temporarily suspends playing.
10)
MUTE - Toggles muting on or off.
11)
STOP - Stops playing or recording.
12)
Pg Up - Used to scroll up through file lists
one full page at a time.
13)
CUE - Switches the Cue function on and
off. When switched on, the cue function will pause
playback at the end of the track currently playing.
14)
Direction Buttons - Press to move
through various menus and files. They also are
used as Fast Forward/Rewind buttons
(Direction Buttons [▲/▼]) and Chapter
Forward/Chapter Backwards (Direction Buttons [▲/▼])
buttons while playing media.
15)
RETURN - This button is used to return to a
menu screen while playing.
16)
ENTER - Used to confirm the selection.
17)
POWER - Press the button to
turn the unit on or off.
18)
MUSIC VOLUME Knob - Used to
control the music level.
19)
Pg DN - Press to scroll down
through file lists one full page at a time.
20)
Disc Menu - Returns to the main
DVD menu.
21)
POP UP MENU - Press to
activate the Blu-Ray Pop Up Menu (if available).
22)
TREBLE Knob - Used to control
the amount of Treble or “Highs” in the
audio.
23)
BASS Knob - Used to control the
amount of Bass or “Lows” in the audio.
24)
ECHO knob - Used to control the
amount of ECHO applied to MIC
CHANNELS 1 & 2.
25)
MIC 1 & 2 VOL Knob - Used to
control the volume output from MIC
CHANNEL 1& 2.
26)
MIC 1 & 2 INPUT Jacks -
Connects microphones with 1/4 inch plug.
27)
Headphones Jack - Connects a
pair of headphones (With a 1/8” jack) to
the unit.
Note:
While it is possible to use a set of headphones that have a
¼” jack through an adapter, many adapters are known to cause
intermittent problems and their use is not recommended.
28)
USB INTERFACE - Use this
interface to connect USB devices such as
flash drives or external hard drives.
29)
DISC TRAY - Press to open tray. Press or to close
the tray, it will play the disc automatically.