2 replacement of internal parts, 1 replacement of plug and stem, 2 replacement of seals of pressure balanced plugs – ARI Armaturen STEVI 462 EN User Manual
Page 10: Pressure balanced plugs
Page 10
Rev. 0040307000 0410
Operating and installation instructions
Straight through control valves - STEVI
®
422 / 462
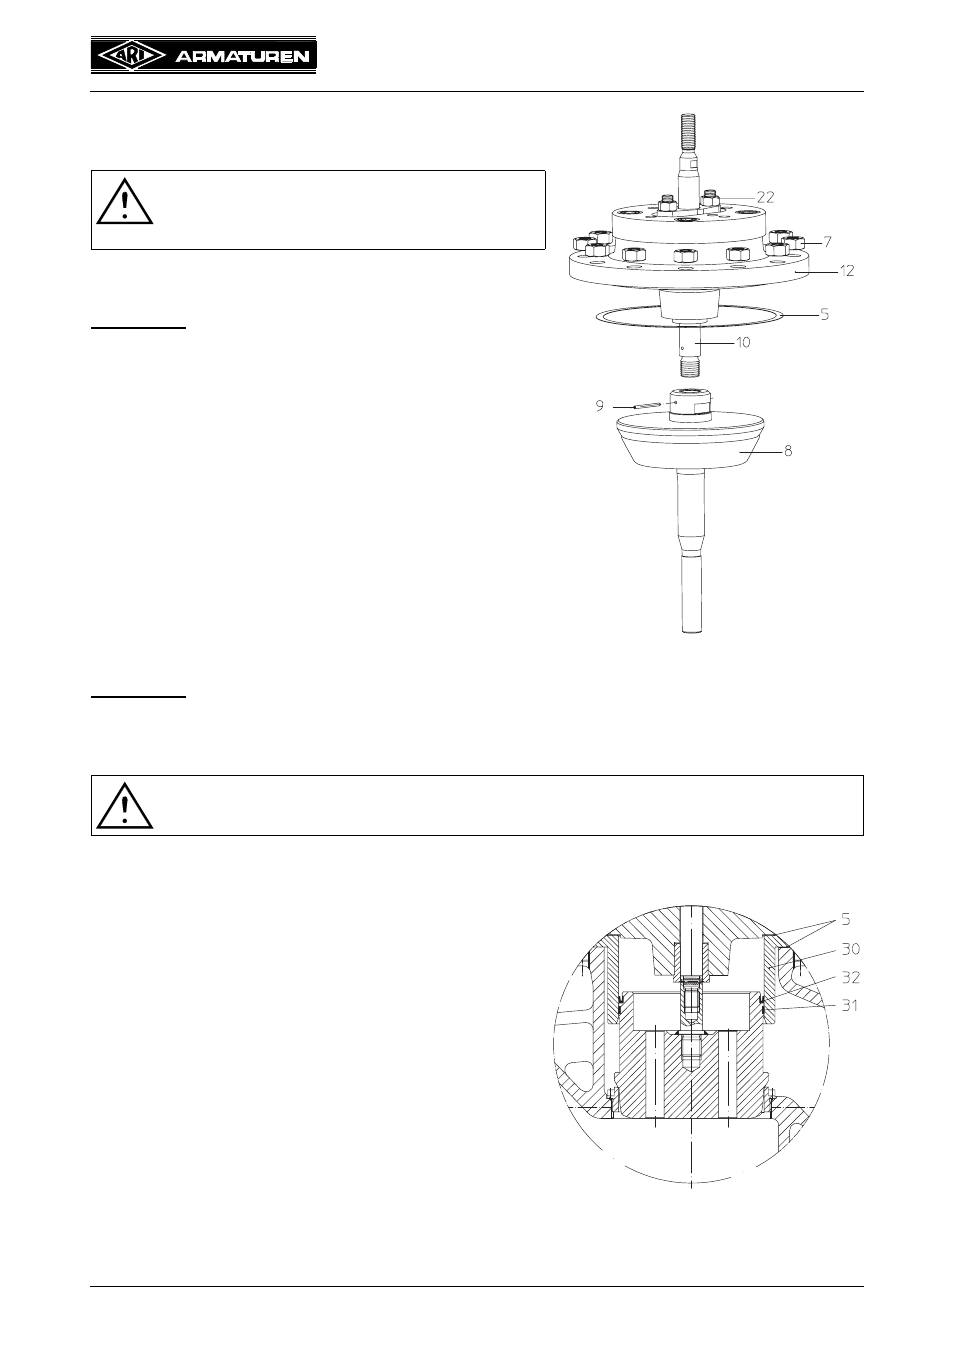
7.2 Replacement of internal parts
7.2.1 Replacement of plug and stem
- Remove actuator.
(Refer to operating instructions for actuator!)
Series 422
- Loose nuts (pos. 7).
- Detach stuffing box housing (pos. 12).
- Slacken nuts (pos. 22) by 2 or 3 turns.
- Extract plug (pos. 8) and stem (pos. 10).
- Drive pin (pos. 9) out with a drift.
- Unscrew plug (pos. 3).
- Bolt new parts together and drill them.
- Replace gasket (pos. 5).
- Assemble in reverse order.
- Secure with nuts (pos. 7) and tighten them
crosswise.
(For tightening torques refer to item 7.3.1)
Series 422
For replacement of plug and stem with bellows sealing (Series 462) refer to item 7.1.2.
7.2.2 Replacement of seals of pressure balanced plugs
- Remove actuator.
(Refer to operating instructions for actuator!)
- Remove plug as described in item 7.2.1.
- Prise worn piston seal (pos. 32) out of groove in
plug with suitable tool (e.g. screwdriver).
- Insert new piston seal (pos. 32), taking care that it
is in the correct position (refer to Fig. 11).
- Replace guide ring (pos. 31).
- Clean sliding surface of guide bush (pos. 30);
smooth with fine abrasive if necessary.
- Replace 2 gaskets (pos. 5).
- Assemble in reverse order.
- Secure with nuts (pos. 10) and tighten them
crosswise.
(For tightening torques refer to item 7.3.1)
ATTENTION !
Refer to item 10.0 and 11.0 before
dismantling the valve.
ATTENTION !
Refer to item 10.0 and 11.0 before dismantling the valve.
Fig. 10: Series 422
Fig. 11: Pressure balanced plug