3 reinstalling the cpu fan and heatsink assembly – Asus P1-AH1 User Manual
Page 24
2-8
Chapter 2: Basic installation
2.6.3 Reinstalling the CPU fan and
heatsink assembly
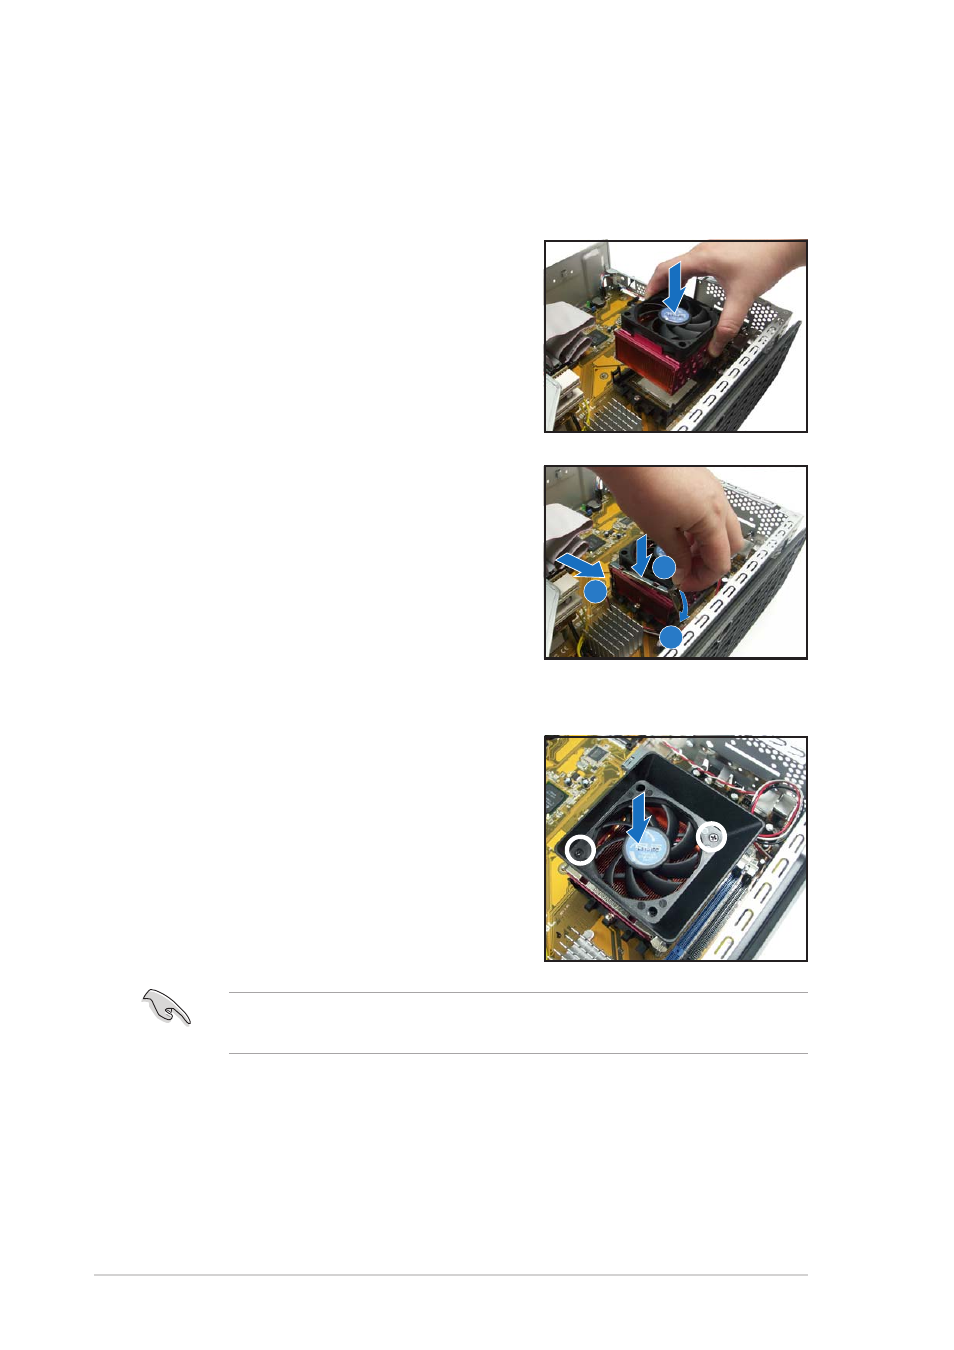
To reinstall the CPU fan and heatsink assembly:
1.
Position the CPU fan and heatsink
assembly on top of the installed
CPU.
2.
Connect the CPU cable to the
CPU fan connector on the
motherboard.
3.
Align the metal clips to the side rail of
the CPU fan and heatsink assembly,
with the locking levers in the reverse
orientation.
4.
Snap the hook of each metal clip into
the hole of the retention module.
5.
Carefully press down the locking lever
and hook its end into the retention module.
3
4
5
6.
Position the blower on top of the CPU
fan and heatsink assembly as shown.
7.
Secure the blower to the CPU fan and
heatsink assembly with the screws
you removed earlier.
Do not forget to connect the CPU fan connector! Hardware monitoring
errors can occur if you fail to plug this connect.
- CG8565 (410 pages)
- CG8565 (246 pages)
- CS5111 (26 pages)
- CS5120 (1 page)
- ET1611PUK (38 pages)
- S2-P8H61E (80 pages)
- P2-PH1 (80 pages)
- P1-P5945G (80 pages)
- P2-P5945GCX (90 pages)
- CG8270 (218 pages)
- CG8270 (536 pages)
- CG8270 (72 pages)
- CG8270 (76 pages)
- CG8270 (534 pages)
- CG8270 (362 pages)
- P3-PH4 (80 pages)
- P3-P5G31 (100 pages)
- P2-M2A690G (80 pages)
- P2-M2A690G (8 pages)
- P4-P5N9300 (1 page)
- P4-P5N9300 (82 pages)
- P1-P5945GC (92 pages)
- P2-P5945GC (92 pages)
- P3-P5G33 (98 pages)
- T3-P5945GC (80 pages)
- T3-P5945GCX (80 pages)
- P2-M2A690G (94 pages)
- T3-PH1 (80 pages)
- T3-PH1 (82 pages)
- T5-P5G41E (82 pages)
- T5-P5G41E (76 pages)
- S1-AT5NM10E (68 pages)
- P6-P7H55E (67 pages)
- ES5000 (174 pages)
- T4-P5G43 (104 pages)
- T-P5G31 (92 pages)
- BT6130 (60 pages)
- BT6130 (54 pages)
- BT6130 (2 pages)
- CG8265 (350 pages)
- CG8265 (210 pages)
- CM1740 (330 pages)
- CM1740 (70 pages)
- CM1740 (198 pages)
- P6-M4A3000E (59 pages)