Zkhss2 tubular stainless steel handles, Step 2 install handle onto panels, Step 2 (continued) – GE ZIS420NX User Manual
Page 21
21
ZKHSS2 Tubular Stainless Steel Handles
STEP 2 INSTALL HANDLE ONTO PANELS
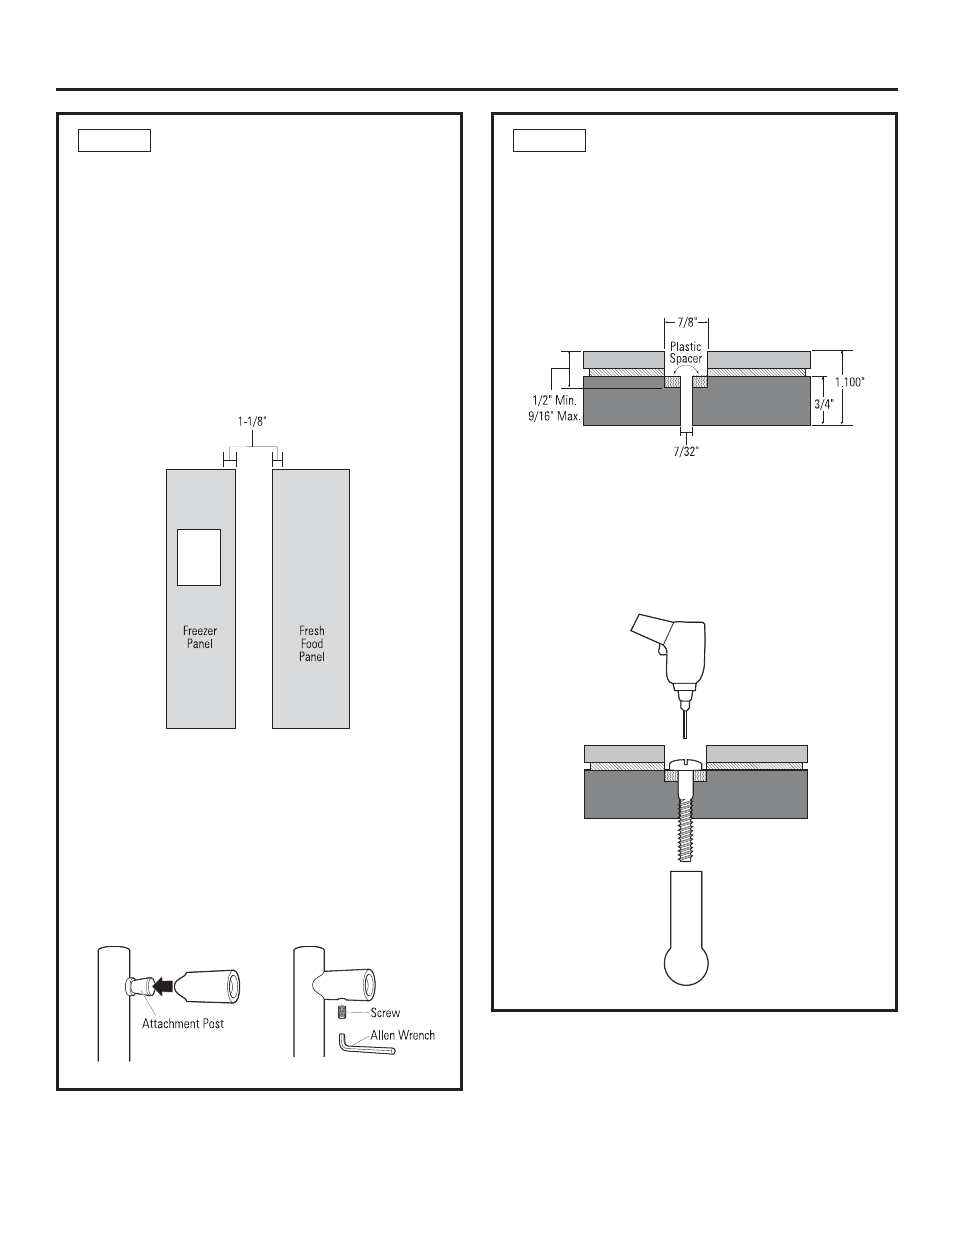
Drill Pilot Holes
0HDVXUHPDUNDQGGUDZDOLQHµIURP
the handle side edge, top to bottom.
+ROGWKHWXEXODUKDQGOHDJDLQVWWKHDSSHDUDQFHVLGH
centered top to bottom and on the marked line.
0DUNWKHVFUHZKROHORFDWLRQVDWWKHFHQWHU
of the handle attachment posts. Place the handle
over the marks to check again that the holes are
aligned to the handle posts.
&HQWHUSXQFKWRPDUNWKHKROHORFDWLRQV'ULOOµ
pilot holes from the appearance side and through
the entire panel thickness.
)ROORZWKHVDPHSURFHGXUHWRGULOOSLORWKROHV
on the opposite door.
CAUTION: Hole locations must be exact to
accept handle standoff and handle assembly.
STEP 2 (continued)
Secure Handles to Panels
8VHDµVSDGHELWWRGULOOµWRµPD[GHSWK
into the back side of the panel. At this depth there
will be enough screw threads to engage the handle
on the appearance side. See the illustration below.
6WDQGWKHSDQHOXSRQWKHKLQJHVLGH3ODFHDSODVWLF
VSDFHULQWRWKHµRSHQLQJWKHQGURSWKHVFUHZ
through the spacer.
3ODFHWKHKDQGOHVWDQGRIIVDJDLQVWWKHPRXQWLQJ
screws on the appearance side, then drive the top
screw partially into the standoff.
'ULYHWKHQH[WVFUHZSDUWLDOO\LQWRWKHVWDQGRII
&RQWLQXHLQVWDOOLQJVFUHZVWRWKHERWWRPORFDWLRQ
Alternate back to the top tightening screws one
at a time until the handle is tight against the panel.
Countersink
screw into
panel as shown.
Assemble Handles
3ODFHDKDQGOHVWDQGRIIRQHDFKDWWDFKPHQWSRVWRQ
the handle. Position the screw hole on the standoff to
point to the floor.
,QVWDOOVHWVFUHZVLQWRWKHERWWRPRIHDFKVWDQGRII
XVLQJWKH$OOHQZUHQFKSURYLGHG7KHVWDQGRIIVKRXOG
be tight against the handle.