Electrical connections – ASKO D3 User Manual
Page 6
Page 6
WARNING!
Before working on wiring for any
electrical appliance, be sure the electrical power
has been turned off at the breaker/fuse box.
WARNING!
D i s c o n n e c t e l e c t r i c a l p o w e r
supply and place a tag at the disconnect switch
indicating that you are working on the circuit.
WARNING!
E l e c t r i c a l a n d g r o u n d i n g
c o n n e c t i o n s m u s t c o m p l y w i t h t h e a p p l i c a b l e
p o r t i o n s o f t h e n a t i o n a l e l e c t r i c a l c o d e a n d / o r
other local electrical codes.
This unit must be grounded to operate properly. It must
be connected to a grounded metal, permanent wiring
system, or an equipment-grounding conductor must
be run with the circuit conductors and connected to the
equipment-grounding terminal or lead of the appliance.
NOTE:
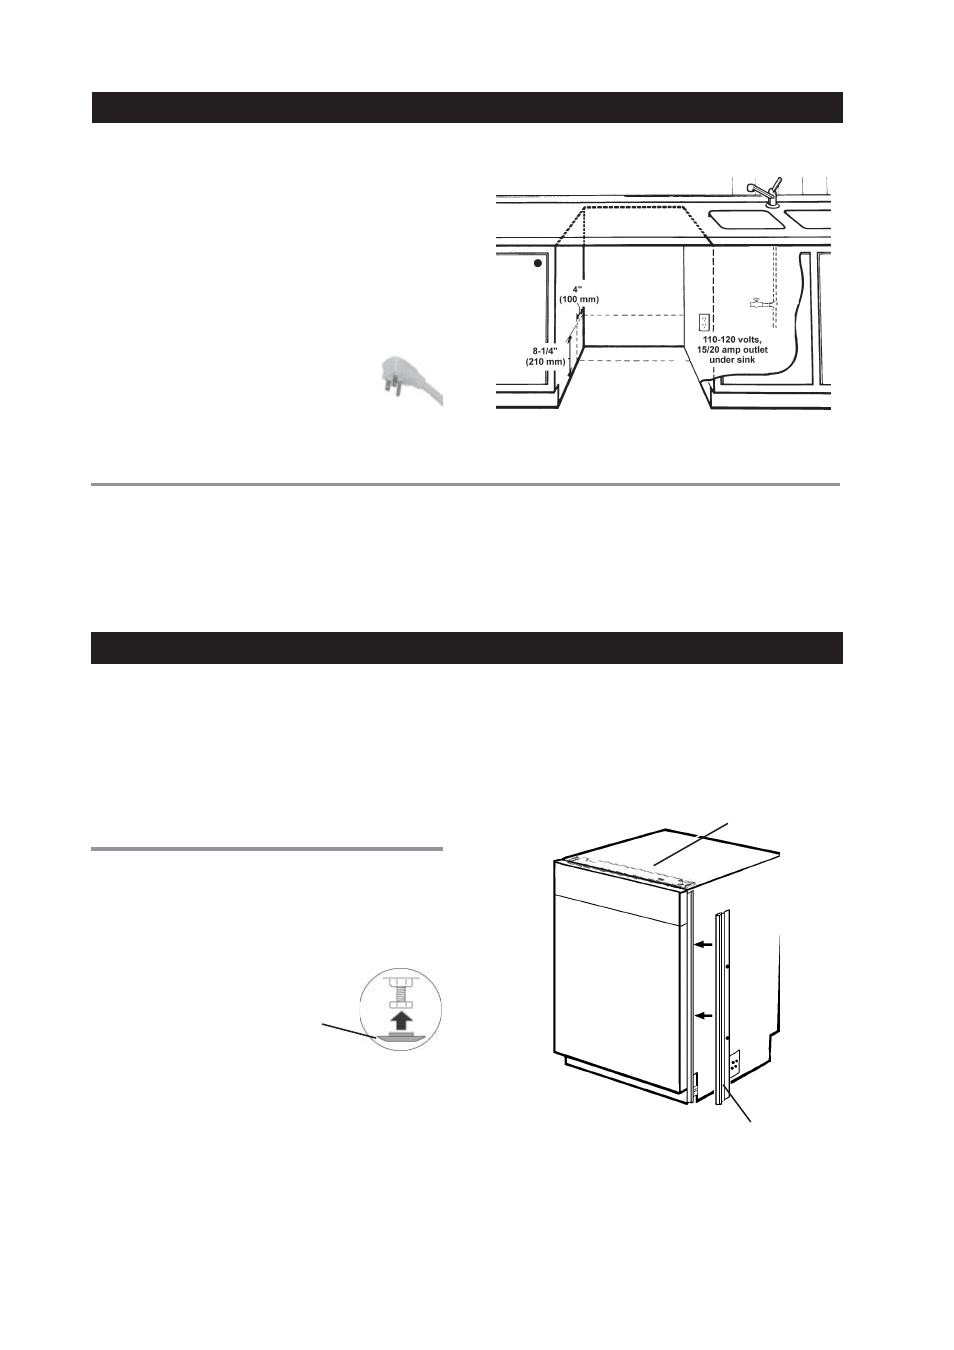
Access holes should be 1-1/2” to 2” (38 mm
to 50 mm) in diameter with no sharp edges.
The dishwasher comes with an electrical
cord for 110-120 volts, 15/20 amp
supplied. This cord should be plugged into
the 110-120 volt outlet under the sink.
If the cord is not long enough, or if a hard-
wire installation is needed, follow
instructions on page 8.
GR
GR
GR
GR
GROUNDING INSTR
OUNDING INSTR
OUNDING INSTR
OUNDING INSTR
OUNDING INSTRUCTIONS
UCTIONS
UCTIONS
UCTIONS
UCTIONS
Damage to the dishwasher could occur if it is not
properly grounded.
WARNING! Make sure the water supply line,
drain line and branch circuit wiring do not touch
any exposed terminals of dishwasher wiring.
At this point the styrofoam, plastic wrap, and the wood
pallet (base) should be removed from the dishwasher.
Now is an excellent time to inspect for any shipping
damage. Should you find any damage, you should
report it to your dealer or builder immediately.
Be sure to remove the toe kick and toe kick insulation
which are on top of the dishwasher.
SLIDES FOR LEGS
SLIDES FOR LEGS
SLIDES FOR LEGS
SLIDES FOR LEGS
SLIDES FOR LEGS
The unit comes with white plastic slides for the legs to
protect the kitchen floor from being damaged when you
slide the unit into place. The slides simply snap onto
the bottom of the legs.
ELECTRICAL CONNECTIONS
ELECTRICAL CONNECTIONS
ELECTRICAL CONNECTIONS
ELECTRICAL CONNECTIONS
ELECTRICAL CONNECTIONS
PREP
PREP
PREP
PREP
PREPARING
ARING
ARING
ARING
ARING THE DISHW
THE DISHW
THE DISHW
THE DISHW
THE DISHWASHER FOR INST
ASHER FOR INST
ASHER FOR INST
ASHER FOR INST
ASHER FOR INSTALLA
ALLA
ALLA
ALLA
ALLATION
TION
TION
TION
TION
WARNING!
Do not use an extension cord for this appliance.
THE FILL STRIPS
THE FILL STRIPS
THE FILL STRIPS
THE FILL STRIPS
THE FILL STRIPS
All Asko Tall Tank dishwashers come with color-coded
fill strips to finish out the installation.
Fill Strip
NOTE:
If the cabinet opening is European measure-
ment (23-1/2 inches [597 mm]), remove the fill
strips to fit the dishwasher into the opening.
Protective slides for legs simply
snap onto the bottom of the legs.
Fill Strip
(Not on all models)