Installation instructions, About reversing the door swing – GE GTDP740EDWW User Manual
Page 11
Installation Instructions
2
ABOUT REVERSING THE DOOR
SWING
IMPORTANT NOTES:
· Read the instructions all the way through before starting.
÷+DQGOHSDUWVFDUHIXOO\WRDYRLGVFUDWFKLQJSDLQW
· Set screws down by their related parts to avoid using them in
the wrong places.
÷3URYLGHDQRQVFUDWFKLQJZRUNVXUIDFHIRUWKHGRRU÷1RUPDO
FRPSOHWLRQWLPHWRUHYHUVHWKHGRRUVZLQJLV²PLQXWHV
IMPORTANT:
2QFH\RXEHJLQGRQRWPRYHWKHFDELQHWXQWLOGRRUVZLQJ
UHYHUVDOLVFRPSOHWHG7KHVHLQVWUXFWLRQVDUHIRUFKDQJLQJ
the hinges from the right side to the left side - if you ever
ZDQWWRVZLWFKWKHPEDFNWRWKHULJKWVLGHIROORZWKHVHVDPH
instructions and reverse all references to the left and right.
Tools Needed
6WDQGDUG3KLOOLSV6FUHZGULYHU
7DSHWLSSHGSXWW\NQLIH
6PDOOÀDWEODGHVFUHZGULYHU
Before you start
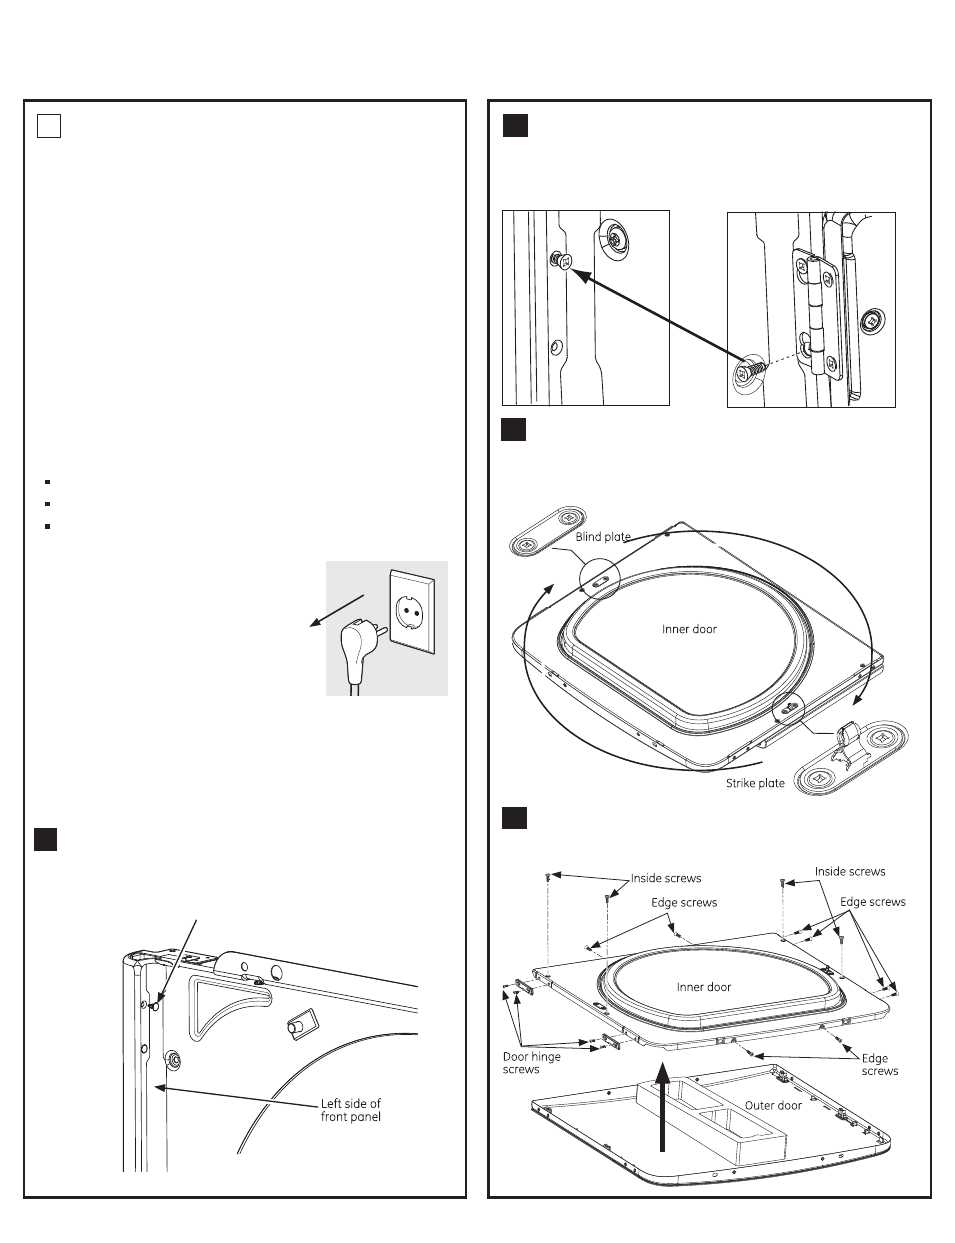
Unplug the dryer from its
electrical outlet
2SHQWKHGRRUWRDSSUR[LPDWHO\GHJUHHV
:LWKDSXWW\NQLIHUHPRYHWKHSODVWLFFDSVORFDWHG
along the left side of front panel and set them aside.
Remove the bottom screw from each hinge (right side)
and partially insert them into the top left side hinge holes.
NOTE: $OOIURQWSDQHOKLQJHVFUHZVZLOOQRZEHLQWKH
top hinge holes - 2 on the left and 2 on the right.
Plastic Cap (4)
3
Loosen the bottom 2 right side hinge screws. Remove
WKHGRRUDQGSODFHLWRQDSURWHFWHGÀDWVXUIDFHWRDYRLG
DQ\GDPDJH5HPRYHERWKWKH%OLQG3ODWHDQGWKH6WULNH
3ODWHDQGLQVWDOOWKHPLQRSSRVLWHSRVLWLRQV
5HPRYHWKHGRRUKLQJHVFUHZVHGJHVFUHZVDQG
LQVLGHVFUHZV/LIWWKHLQQHUGRRUXSZDUGVXVLQJDÀDW
blade screwdriver.
REVERSING THE DOOR
SWING
SOLID DOOR MODELS:
*7'3('::
*7'3*'::
*7'/('::
*7'/*'::