American DJ Emrald Beam User Manual
Page 3
©
American DJ
®
- www
.americandj.com - Emerald Beam™ Instruction Manual Page 5
©
American DJ
®
- www
.americandj.com - Emerald Beam™ Instruction Manual Page 6
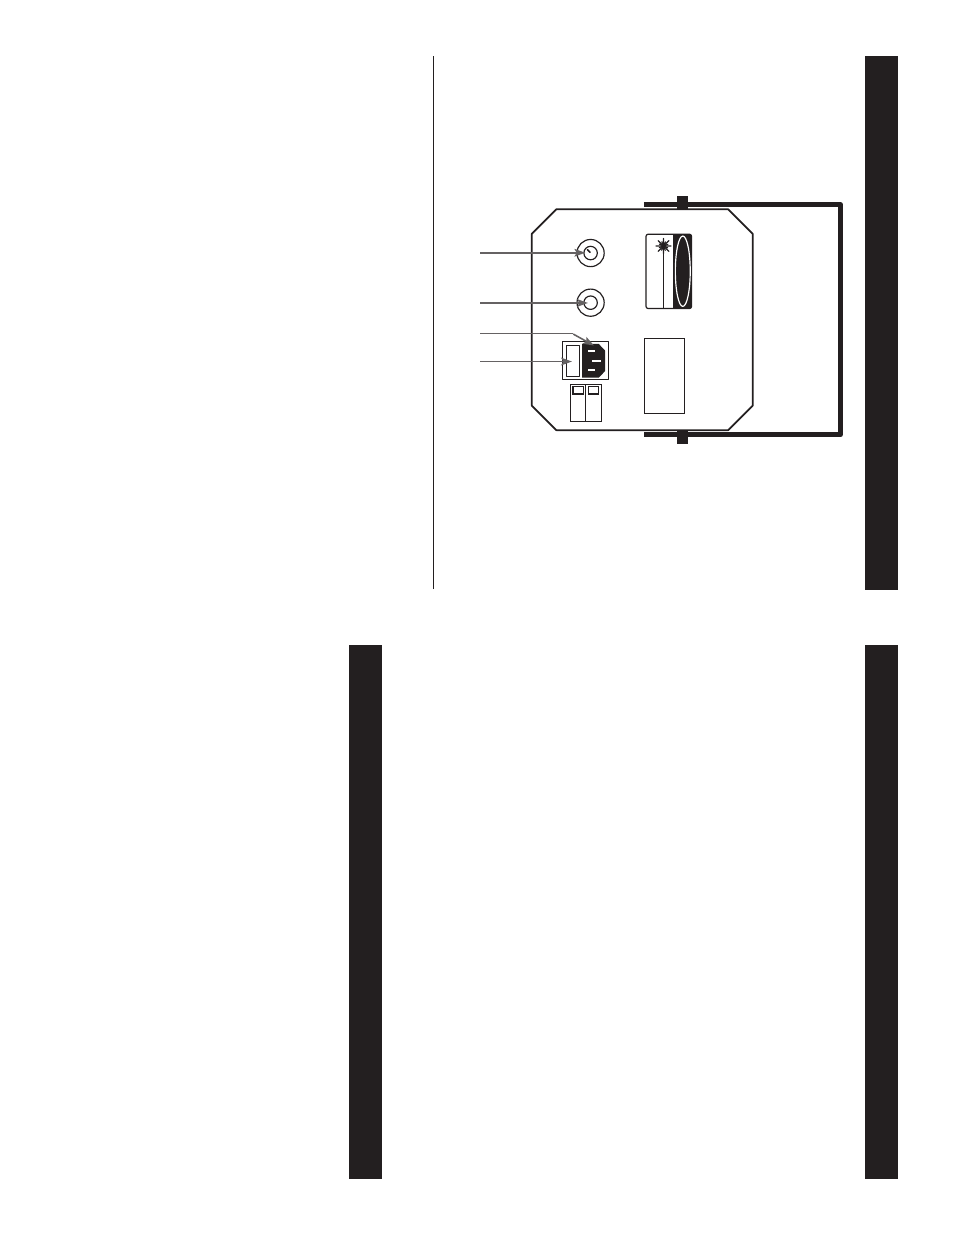
Emerald Beam™
Contr
ol & Functions
1.
Audio Sensitivity Knob -
This adjust audio sensitivity of the
inter
nal microphone (2
). Turning the sensitivity knob in the clockwise
direction will increase the sensitivity to sound. Turning the knob in
the counter clockwise direction will decrease the fi
xture’s sensitivity
to sound.
2.
Microphone -
This micro
p
hone receives external low frequencies
to trigger the unit in Sound-Active mode. This micro
p
hone is designed
to
re
c
e
iv
e
lo
w f
requency sound
s
only
, t
a
p
p
ing on the micro
p
hone and
high pitc
h sound
s
ma
y no
t trig
ge
r the unit.
3.
Pow
e
r C
o
rd
C
o
nn
e
c
tion -
This connection is used to supply main
power to the fi
xture. Use only the supplied I.E.C. power cord. Be sure
the main power matches the required power of your fi
xture.
4.
Fu
s
e
H
o
ld
er -
This housing stores the 2 amp GMA protective
fuse. Always replace with the exact same type fuse, unless other
wise instructed, by an authorized American DJ
®
service technician.
Emerald Beam™
Operation
Power Supply:
This unit is available in both 120v and 220v options,
before
plugging
your
fi
xture
in
be
sure
the
source
voltage
in
your
area
matches
the
required
voltage
for
your
American
DJ
®
Emerald
Beam.™
General Operation:
Plug and Play operation
.
This fixture is designed
to operate as a stand alone unit
to sound.
The Emerald Beam™ is
ready to be plugged in, out of the box, there is no power switch.
After
plugging the fixture in the laser will immediately begin to cycle through
the many built in programs.
The programs cycle through automatically
when
the
unit
is
operating
and
may
not
be
selected
manually.
The
unit requires sound to operate and will automatically blackout without
sound to conserve laser life. If the unit does not turn on after the unit
has
been
plugged
in,
be
sure
the
sound
sensitivity
is
tuned
up
(1),
fuse has not blown, and the unit is properly plugged in to a matching
wall
outlet.
If
problem
continue
to
persist,
please
contact
customer
support for further instructions.
Sensitivity Knob:
A
sound sensitivity knob is located on the rear of
the unit. Use this knob to regulate the amount of sound it takes to trig-
ger the unit.
T
urning the knob in a clockwise direction will increase the
units sensitivity to sound, turning the knob in a counterclockwise direc-
tion will decrease the units sensitivity.
T
urning the knob completely to
the counter-clockwise direction will turn of
f the sound-active mode.
Fix
tur
e Cl
e
a
ning
:
Due
t
o
f
o
g r
e
s
id
u
e
, s
m
o
k
e
, a
n
d d
u
s
t c
le
a
n
in
g
the in
te
rn
al and e
x
te
rn
al lenses should be c
a
rried out pe
rio
d
ic
ally t
o
op
ti
m
iz
e
l
igh
t out
p
ut.
1.
U
s
e nor
m
al glass c
leane
r and a sof
t c
lo
th t
o
wipe d
o
wn the outside
ca
s
in
g
.
2.
Clean the e
x
te
rn
al o
p
tic
s
with glass c
leane
r and a sof
t c
lo
th e
v
e
ry
20 d
a
y
s
.
4.
A
lw
a
y
s
b
e
s
u
re
to
d
ry
all
pa
rt
s c
o
m
p
le
te
ly
b
e
fo
re
p
lu
g
g
in
g
t
h
e
unit bac
k
in
.
Cleaning f
requency depend
s on the en
vi
ronmen
t in whic
h the fix
tu
re
ope
ra
te
s
(
I.e
. sm
ok
e
, f
o
g residue
, dust, de
w)
. In hea
v
y use w
e
rec
o
m
-
mend
c
leaning
on
a
mont
hly
basis.
P
e
rio
d
ic
c
leaning
will
ensu
re
longe
v
it
y,
and cris
p beam out
p
ut.
Emerald Beam™
Cleaning
SOUND
MIN
MIN
LEVEL
FUSE
AC 100-120V
AC 200-240V
Model : Emerald Beam
Serial No : ____________
Power : ___________
Fuse : ___________
Bulb : ___________
DANGER
VISIBLE LASER RADIA
TION
-A
VOID DIRECT
EYE EXPOSURE
LASER DIODE
WA
VELENGTH : 532 nm
Max Output : <4.9mW
Class IIIa Laser Product
14
3
2