Instructions, Tools required for assembly, Vapor tight light assembly – LUMATEQ LK848-20-110-00 User Manual
Page 2: Mounting options, Technical specifications
LUMATEQ is a division of TACO Metals, Inc.
To view the entire portfolio of LUMATEQ products and for Warranty and Product Information, go to lumateq.com
Corporate Headquarters 50 NE 179 Street, Miami, FL 33162 • 305.770.2392 • Fax: 305.653.8569 ©2014 All Rights Reserved
INSTRUCTIONS
Note:
•
Always hire a licensed electrician for proper installation.
•
Always mount this fixture to a grounded junction/breaker box.
Tools Required for Assembly:
•
Phillips screwdriver
•
Pliers
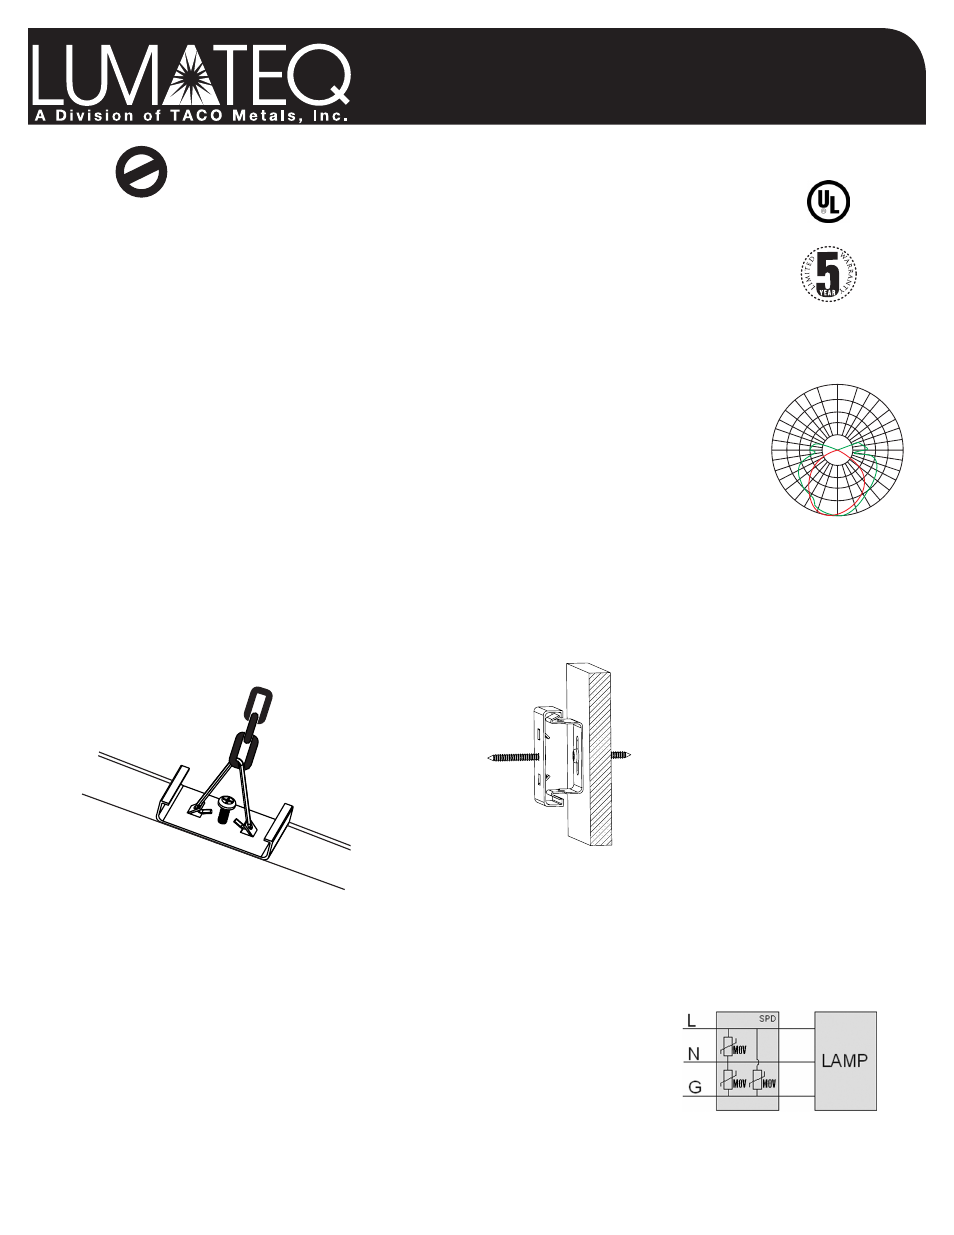
Vapor Tight Light Assembly
1)
Turn off the power at the main fuse or breaker box.
2)
Thread wires through wire gland and back cover wire hole.
3)
Connect the wires to the wire terminal L to L, N to N then
fasten the wire gland.
4)
Attach the LED tubes to the lamp holder.
5)
Put the tube fixing board in the back cover, fixing poles
through the board’s holes. Then turn around the head of
fixing poles 90º to fix the board to back cover.
6)
Use the lens and back cover clips to attach lens
to back cover.
7)
Use the wall fixing clips to fix the light fi xture to wall.
8)
Turn on power at main fuse or breaker box.
Mounting Options
WARNING
IN
ST
R
U
C
-L
K8
48
-2
0-1
10
-0
0
Vapor Proof Kit (LK848-20-110-00)
Chain Hanger Mount
Wall Mount Configuration
180
150
120
90
60
30
0
330
300
270
240
210
129.6°
*non-submersible
Technical Specifications:
• Operating Voltage: 110-277VAC
• Lamps: 2, 20-Watt
• Total Lumen Output: 3675 lm
• Amperage: 0.45 amps @120VAC
• Light Spread: 129.6°
• Operational Temperature Range:
-40°F/+180°F
• Material: Impact-Resistant Polycarbonate Lens
• Life Expectancy: Up to 50,000 hours
• UL-Approved for “Wet Location” (non-submersion)
• 5-Year Limited Warranty
Addendum:
LUMATEQ equipment that is directly connected to AC mains (e.g. 120/220/277VAC) can be damaged by short circuit and overload
conditions. In addition, lightning surges or load switching transients (originating outside the bulb) can create voltage spikes or ring waves
that can stress and ultimately damage components and render the fixture inoperable. Given that the value proposition for LED bulbs is
not only lower energy usage, but longer lifetimes, it will be crucial that transient voltage protection is taken into account to eliminate field
failures driven by the electrical environment.
Ensure the following steps are taken to decrease the chance of damage from short circuits and overload conditions:
1. Do not use mechanical timers or contactors to switch on the lamp. These contacts are known
to produce voltage spikes which are detrimental to the circuitry of the lamp.
It is recommended to use a solid state relay to provide power to the fixture.
2. Replace old circuit breakers, as corroded contacts on both the bus bar and internal contacts
of the breaker can cause destructive electrical spikes.
3. Use a surge protection device (SPD) spanning both Line, Neutral and Ground.
These devices contain MOV’s (a metal oxide varistor) which can help protect the LED bulb from
overvoltage surges and ring-wave effects by clamping short-duration voltage impulses as shown in drawing.