Control locations and descriptions, Installation instructions, Mounting – Water Inc EVERBREW1033518 User Manual
Page 3
Page 3
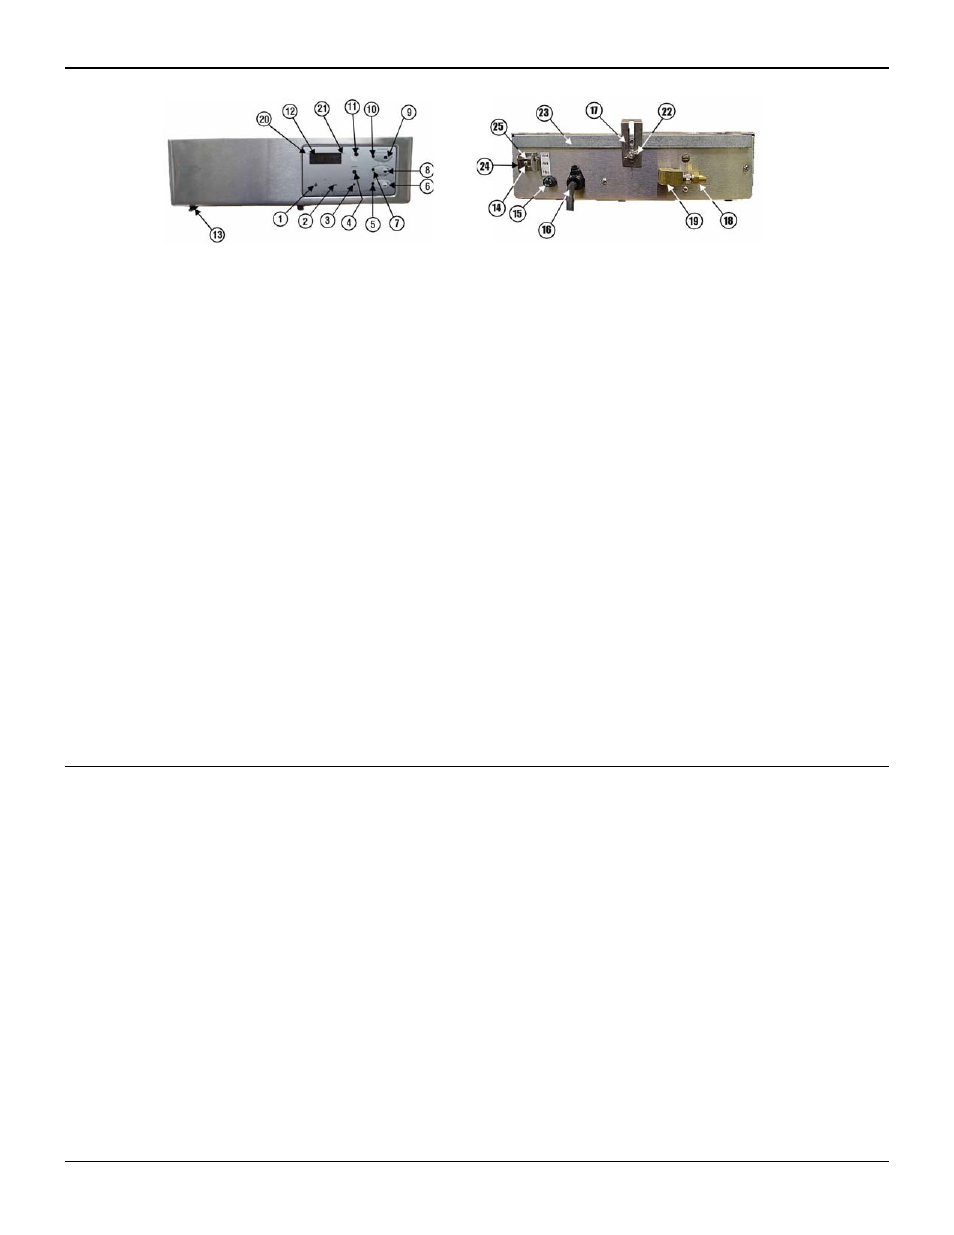
CONTROL LOCATIONS AND DESCRIPTIONS
1.
“+” Button
Press to adjust the clock (hr) and or adjust the time (hr) for “Brew Start Time”.
14.
Toggle Switch (On-Off-Fill)
Turns ON the power to the coffee appliance and fills the tank prior to use.
2. “-”
Button
Press to adjust the time (min.) and or adjust the time (min.) for “Brew Start Time”.
15. Fuse
Holder
Holds the fuse to the coffee appliance.
3. Program
Button.
Press this button to change the time and selection settings.
16. Power
Supply
Cord
Connect this cord to appropriate wall receptacle.
4. Power
Light.
When lit, indicates unit is in ON.
17. Rear
Mounting
Bracket
Holds the rear of the machine
5.
Quarter Brew Selection Light
Will light when Quarter Brew selection is pressed, or flash when selection is in
program mode.
18. Flared
Nut
Fitting
Insert this to copper tube before flaring.
6.
Quarter Brew Selection Button
Press this button to select Quarter Brew selection to brew coffee.
19.
Water Inlet Fitting
The incoming water supply connects here.
7.
Half Brew Selection Light.
Will light when Half Brew selection is pressed, or flash when Half Brew selection is in
Program Mode.
20.
LIGHT Dot Display (“PM” Indicator)
When lit, indicates time is past 12 O’clock in afternoon.
8.
Half Brew Selection Button
Press this button to select Half Brew selection to brew coffee.
21.
LIGHT Dot Display “Brew time SET” Indicator
Will light when a “Brew time” is Set.
9.
Full Brew Selection Button
Press this button to brew a full decanter
22. Wing
Nut
Secures the machine to the “L” bracket
10.
Full Brew Selection Light
Will light when Full Brew selection is pressed, or flash when Full Brew selection is in
Program Mode.
23. Top
Mounting
Plate
Secure this to the underneath the cabinet.
11. “Service”
Light
Indicates problem with the machine and service is required.
24. Safety
Bracket
Prevents the user from dry firing when the screw is in place during installation.
12. Display
Window
Displays the time in hours, minutes and program information
25. Safety
Screw
Prevent the toggle switch from being pushed up before filling the tank with water.
13.
Brew Cone Guide Rails
Slide the brew cone in here.
INSTALLATION INSTRUCTIONS
WARNING: Read these installation instructions completely before connecting this coffee brewer to a power supply or water supply. The water tank must be filled with water
for this coffee brewer to function properly.
WARNING: Incorrect installation or operating procedures will void the warranty and may damage this coffee brewer.
Note: Any changes to the internal plumbing or wiring of the building should be performed by a licensed plumber or a licensed electrician. Check applicable building codes
and requirements for procedures and restrictions that may apply during this installation.
This appliance is designed to be mounted to the underside of a kitchen wall cabinet near a convenient source of water and power.
MOUNTING:
(See mounting Diagram Page 4 For Details)
1. Check the contents of the package carefully. In addition to the coffee brewer and these instructions, the following items should be present. If any item is missing, contact
Water Inc. to arrange for a replacement.
Coffee Appliance (Brewer)
Mounting Brackets and Screws
Brew cone. (Installed on Coffee Brewer.)
Flared nut. (Installed on water inlet fitting.)
Filter Paper
Fig. 1