Installation continued – Water Inc HP-RO-1000 User Manual
Page 8
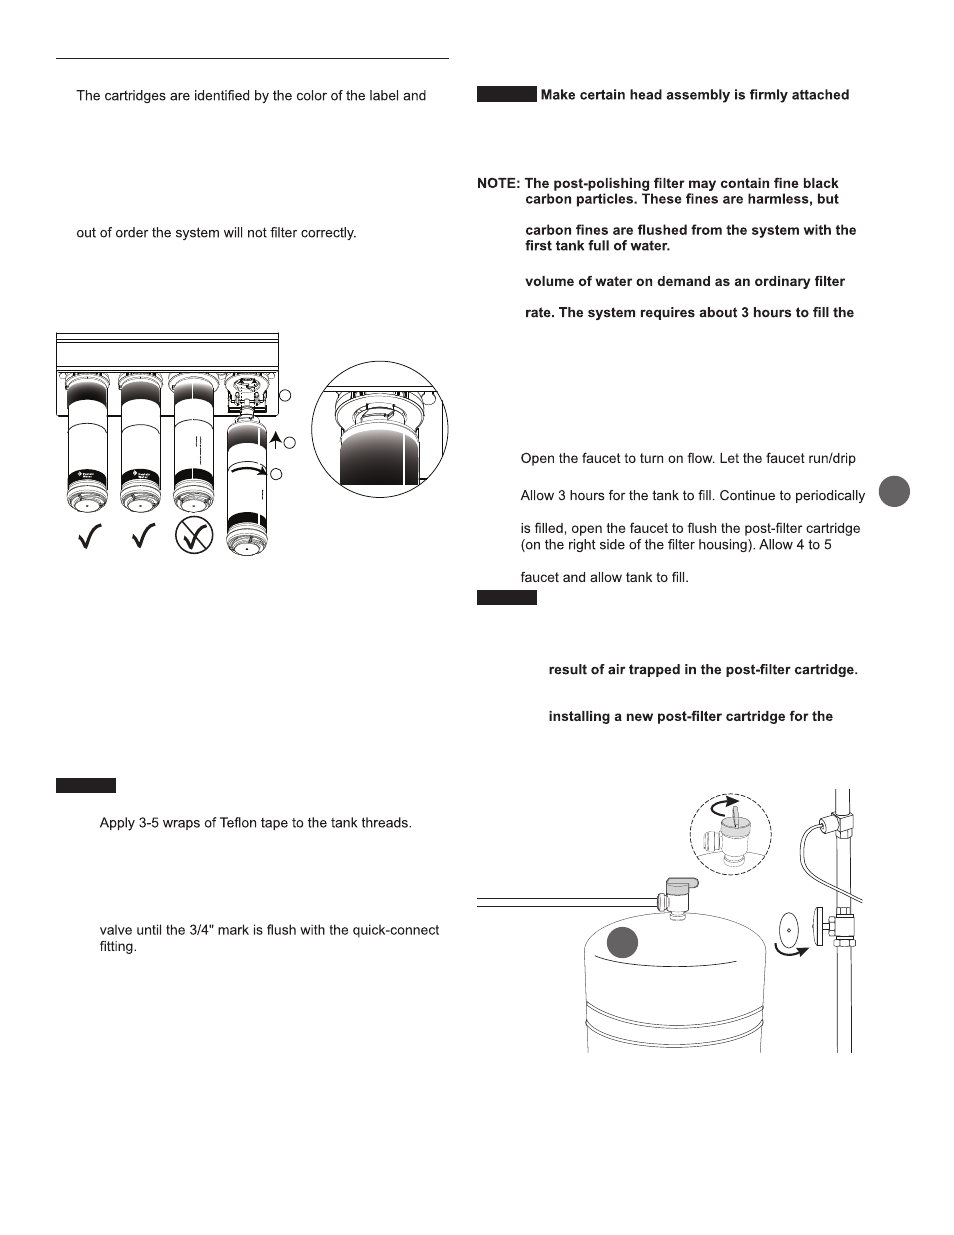
9. Installing the Cartridges
the model number.
Cartridge #1 = PW-S2500R, Yellow
Cartridge #2 = PW-C5000R, Blue
Cartridge #3 = PW-RO75R, Green
Cartridge #4 = PW-C2500R, Violet
Install the cartridges in order. If the cartridges are installed
A. Slide the cartridge into the head until it stops.
B. Twist the cartridge 1/4 turn clockwise until it snaps into
place. Gently pull out on the cartridge to ensure the
cartridge is locked into place.
CAPACITY:
Replace every 12 months
TEMPERATURE RANGE:
40-100°F (4.4-37.8°C)
PRESSURE RANGE:
30-125°F (2.4-8.6 Bar)
Quick Change
Sediment Cartridge
For use with Pentair Water models:
PB4RO-75, PP4RO-75 and PB5RO-75
CAPACITY:
Replace every 12 months
TEMPERATURE RANGE:
40-100°F (4.4-37.8°C)
PRESSURE RANGE:
30-125°F (2.4-8.6 Bar)
Quick Change
EP Cartridge
For use with Pentair Water models:
PB4RO-75, PP4RO-75 and PB5RO-75
©
20
10
Pe
nt
ai
r R
es
id
en
tia
l F
ilt
ra
tio
n,
LL
C
M
ilw
au
ke
e,
W
I,
U
S
A
A
ss
em
bl
ed
in
Ch
in
a
SH
24
71
44
Re
v A
M
R1
0
W
arning: Do not use with water that is
microbiologically unsafe or of unknown
quality without adequate disinfection
before or after the systems. Systems
on disinfected waters that may contain
M
ilw
au
ke
e,
W
I,
U
S
A
A
ss
em
bl
ed
in
Ch
in
a
SH
24
71
43
Re
v A
M
R1
0
1
2
3
PW
-C2
500R
on disinfected waters that may contain
PW-S 2500R
PW-C5000R
PW
-C2
500R
Figure 13
10. Connecting the Storage Tank to the System
CAUTION
When tank is full, it weighs approximately 35
pounds. Provide ample support under the tank.
A.
B. Thread the tank valve onto the top of the tank opening
by turning it clockwise until snug.
C. Locate the green tubing and a mark 3/4" from the end.
Moisten one end of the green tubing with water and
insert with a twisting motion into the free port of the tank
NOTE: Do not cut green tube. This line should be left at
the pre-cut length for future service.
NOTE: The pressurized storage tank has capacity of
3.2 gallons. The tank's air pressure is factory
set at 5 to 7 psi when tank is empty.
INSTALLATION continued
11. Putting the System Into Operation
CAUTION
to wall to prevent it from falling and possibly
becoming damaged.
NOTE: Use caution not to bend or pinch the tubing behind
the system while attaching to mounting screws.
may make the water appear gray in color. The
NOTE: The HP-RO-1000 system does not produce a high
does. Water is produced at a slow, drop-by-drop
storage tank. As water is taken from the tank, the
system automatically starts the cycle of replacing
the water and then stops water production when
the tank is full.
A. Make sure cold water faucet is “off” (Figure 14).
B. Make sure tank valve is in the open position.
C. Slowly turn on cold water supply.
D.
for 12 hours, then close it.
E.
check the installation for leaks. After the storage tank
minutes for all of the water to drain from the tank. Close
CAUTION
Visually check the entire system for leaks. If a leak is
present, see TROUBLESHOOTING.
F. Repeat Step E four times.
NOTE: Initially, the water may appear cloudy. This is a
It is not harmful and will disappear in a matter
of minutes. It may take up to a week after
trapped air to dissipate.
The system is ready for operation. You can now enjoy quality
water from the HP-RO-1000.
Open
Tank Valve
Closed
Tank Valve
B
Figure 14
8 • HP-RO-1000 Undersink Reverse Osmosis System
A
NOTE:
Installing the green reverse osmosis cartridge PW-RO75R
requires additional force than the other cartridges to rotate
into the proper position. Improper installation of the cartridge
may prevent water from flowing through the system.
To ensure proper installation, rotate the cartridge in the port
until the cartridge label faces directly forward and the side tab
on the cartridge aligns with the side port on the filter body.