Owner's periodic maintenance guide, Charging batteries – ProMariner ProMar1 User Manual
Page 9
14
Owner's Periodic Maintenance Guide
Item:
Process:
When:
Battery Connections
Clean and tighten all battery connections. Follow battery manufacturer's
instructions for cleaning a battery. Clean all battery terminals with a
wire brush where required and tighten all battery connections.
Monthly
Item:
Process:
When:
Battery Electrolyte
In the case of flooded batteries, per battery manufactures instructions,
monitor and maintain proper levels of distilled water in each battery.
Monthly
Item:
Process:
When:
DC Output Wiring
Visually inspect all wiring for cuts and abrasions. Contact ProMariner
if charger needs to be serviced with new wiring.
Monthly
Item:
Process:
When:
AC Power Cord and Mounting Hardware Inspection
Process: Visually inspect the AC power cord. Confirm ground blade
is present and all plug blades are in good conditions and not bent out
of place.
Check all mounting hardware to ensure there is no loose hardware.
Tighten were required.
Monthly
M A I N T E N A N C E
Distributed-On-Demand
™
Technology vs. Traditional Fixed Amp per Bank Chargers
Charging Batteries
The ProMar1 Battery Charger is designed to charge and maintain your batteries. Please follow these
steps each time you use your ProMar1 charger:
1. Open all battery compartments and ventilate for at least 15 minutes before applying AC power to
your charger. While charging your batteries make sure to keep your battery compartment open
allowing for free air ventilation.
2. Make sure all DC battery connections are tight and clean. Follow battery manufacturer's
recommendations for battery cell caps (loosen caps if applicable).
3. Connect a heavy duty U.L. approved extension cord to the ProMar1 charger first. After connecting
the extension cord to the charger then proceed to plug the extension cord to a nearby 120VAC GFCI
protected (Ground Fault Circuit Interrupt) outlet.
4. Observe the on-board LED indicators for a solid blue and solid red LED Indication. This will tell you
the batteries are in the charging process.
5. Charge your batteries until only the blue and green LED indicators remains on. This indicates the
charging process is completed and your batteries are fully charged and are now being maintained in
a gentle float / storage mode. (recommended while your boat is not in use).
The battery charger can be left on in this mode indefinitely and will never overcharge your batteries.
Refer to the page 4.
6. When ready to use your boat, unplug the extension cord from the 120 VAC outlet first, followed by
unplugging the charger.
13
C H A R G I N G
Distributed-On-Demand
™
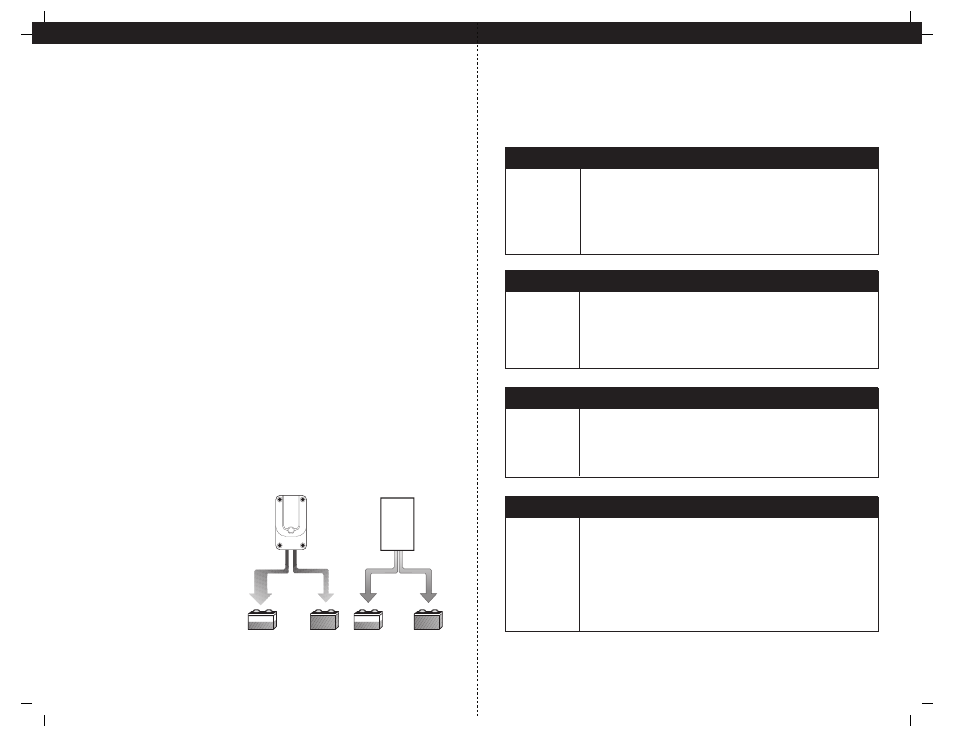
Charging
Technology ensures 100% of the
available charging amps are fully utilized
to meet the demand of each battery on-
board. Let’s say your engine start battery
is fully charged and needs 0 amps from
your “ProMar1” (5/5) 2 bank charger.
No problem, the unused 5 amps will be
automatically Distributed-On-Demand
™
to your trolling motor battery providing
a total of 10 amps for faster charging
versus only 5 amps that the conventional
5/5 charger would provide.
How Distributed On-Demand
™
Technology Works...
VS
Trolling Battery
Engine
Start Battery
0
+
5
Fully
Charged
Other
5/5 10 amp
chargers
5 Amps Max.
ProMar1
5/5
Trolling Battery
Engine
Start Battery
0
+
10
Fully
Charged
10 Amps Fully Distributed