Dwyer LVT2 User Manual
Page 2
To modify the program settings:
1. Press [PRG], and all 4 event icons and day icon
representing the program number start flashing, indicating
that is the program setting mode. Time and temperature
digits become blank.
2. Use the [▲] / [▼] to select the program to be changed.
3. Press [PRG] to advance to set the WAKE time; the hour
and minute digits will flash. Minute is set in steps of 10
minutes. Press [D/T] to set the program on or off for each
event, the display will show “ --:-- ” when it is off.
4. Press [PRG] to set the heat temperature. Temperature and
the “HEAT” icon starts flashing. Temperature is set in steps
of 1 °F / 0.5 °C
5. Press [PRG] to set the cool temperature.
6. Press [PRG] to continue setting the next three events.
Repeat step 3 – 5, when all programming is finished, the
operation will return to step 1.
7. Select the next program to be modified, or press [RTN] to
exit.
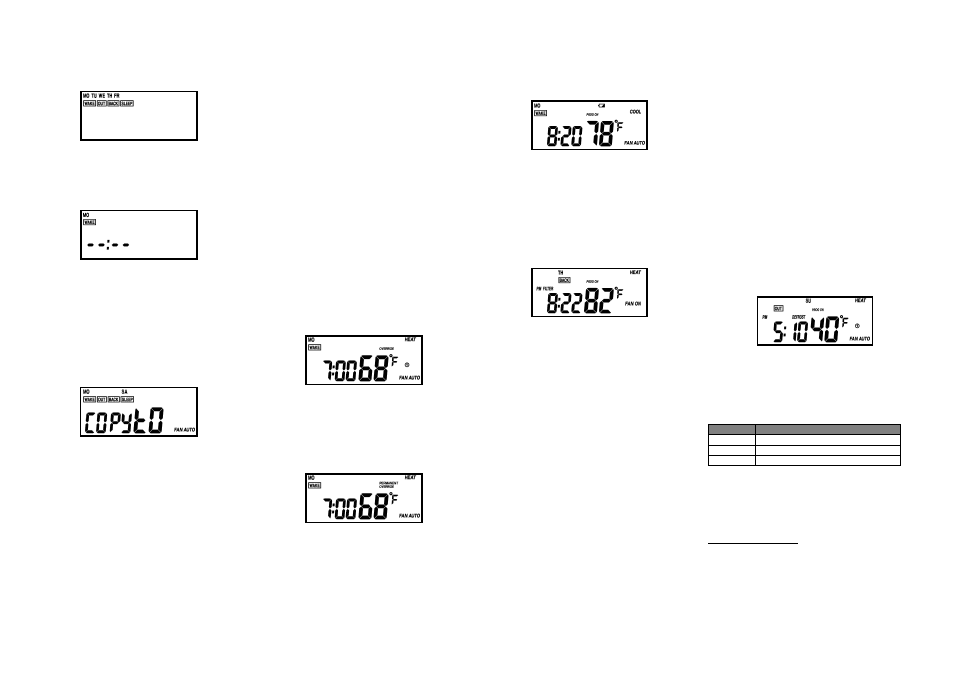
To copy a program
1. At normal mode, press [PRG], and all 4 event icons and the
day icon representing the program number start flashing,
indicating that is the program setting mode.
2. Use the [▲] / [▼] keys to select the program to be copied,
then press [USAGE].
3. The program number and all 4 event icons stay on. The
program number next to the program number to be copied
starts flashing. Time and temperature digits will show
“COPY tO”.
4. Use the [▲] / [▼] keys to select the program to be written
on, then press [USAGE]. The operation will resume to step
1 after the program is copied.
5. If the [USAGE] key is accidentally pressed during
programming, press [PRG] to go back to program setting
mode.
Reading the Setting Temperature
1.
At normal mode, when the system slide switch is at the
Heat position, press [TEMP] to display the heat setting
temperature for 10 seconds. All system icons will
momentarily turn off, except the “HEAT” icon turns on.
After 10 seconds, the display will resume to show room
temperature.
2. If the system slide switch is at the cool position, press
[TEMP] to display the cool setting temperature instead.
All system icons will momentarily turn off, except the
“COOL” icon turns on.
Temporary Program Override
1. When program is on, the program set-point can be
temporarily overridden by pressing [▲] / [▼]. The
“OVERRIDE” icon will turn on. If the system slide
switch is at heat position, the heat set-point and “HEAT”
icon will start flashing; while if the system slide switch is
at cool, the cool set-point and “COOL” icon will start
flashing. There is no reaction if System switch is at OFF
mode.
2. Use the [▲] / [▼] keys to adjust. Press [RTN] to
confirm.
3. Temporary
program
override
will
be
cancelled
automatically when the next event’s time is met; or it can
be manually released by pressing [PRG] normal mode.
Permanent Override
1. When program is on, press and hold [PRG] for 2 seconds to
permanently override the program. The “PERMANENT
OVERRIDE” icon will show on the display. “PROG
ON” icon turns off.
2. To adjust the override set-point, press the [▲] / [▼] keys.
The Heat set-point and “HEAT” icon will start flashing if
the system slide switch is at heat position; cool set-point
and “COOL” icon will start flashing if system slide switch
is at cool position. There is no reaction if the System
switch is at Off mode.
3. Use the [▲] / [▼] keys to adjust; press [RTN] to confirm.
4. To switch back to program mode, press and hold [PRG] for
2 seconds. The “PERMANENT OVERRIDE” icon will
disappear and “PROG ON” icon will switch on.
Low Battery Indicator
When the battery power is running low, the warning icon is
shown on display. Insert fresh batteries and press [RST]
button on the front plate. Be sure main switch is at the middle
(OFF) position and fan switch is at the (FAN AUTO) position.
Filter and System Usage Indicator
1. The thermostat can record the filter usage and system usage
hours.
2. When the number of filter usage hours reaches the set
interval time, the “FILTER” icon will show; while for
system usage hours, the “USAGE” icon will show.
3. Filter usage counts when the fan is on; System usage
counts when either heating or cooling is on.
4. To read the usage hours, press [USAGE], the “FILTER”
icon is shown on the display, and the number of filter usage
hours is shown on the time digits.
5. Press [USAGE], the “USAGE” icon is shown on the display,
while the number of system usage hours is shown on the
time digits.
6. After 10 seconds, the operation will resume to display the
time.
Adjusting the Filter and System Usage Interval Time
1. Press and hold [USAGE] for 2 seconds, the “FILTER” icon
and the filter usage interval time (default: 700 hours) will
flash on the screen.
2. Use the [▲] / [▼] keys to modify the interval time. The
interval time is set in step of 100 hours, ranging from
0-5000 hours.
3. Press [USAGE] to continue, the “USAGE” icon and system
usage interval time (default: 2000 hours) will flash on the
screen.
4. Use the [▲] / [▼] keys to modify the interval time. The
interval time is set in steps of 100 hours, ranging from
0-5000 hours.
5. Press [USAGE] to loop back to filter usage setting; press
[RTN] to confirm setting and resume to normal operation.
6. Filter and system usage function can be disabled by setting
the interval time to 0 hour.
To Clear the Filter and System Usage counter
1. To read the usage hours, press [USAGE], and the
“FILTER” icon is shown on the display, while the number
of filter usage hours is shown on the time digits.
2. Press and hold [▲] and [▼] for 2 seconds; the filter usage
counter will be cleared.
3. When the “USAGE” icon is shown on the display, the
number of System Usage hours is shown on the time digits.
4. Press and hold [▲] and [▼] for 2 seconds, so the system
usage counter will be cleared.
Temperature Control
LCD displays “LO” when room temperature is below 32 °F /
0 °C.
LCD displays “HI” when room temperature is above 99 °F /
40 °C.
First stage activation is indicated by “HEAT
” icon or
“COOL
” icon.
Defrost Function
When the room temperature falls to 40°F / 5°C or below,
heater will be on, regardless of the set-point. The
“DEFROST” icon will be shown on the display.
Adjusting Temperature Control Span
1. Press and hold [TEMP] for 2 seconds, “P1” (default) is
flashing at the time digits.
2. Use the [▲] / [▼] keys to select .
3. Press [RTN] to confirm new control span.
Setting
Description
P1
Span 2°F
P2
Span 4°F
P3
Span 6°F
Reset Program Memory
Reset the all program to default setting.
1. Press and Hold [▲] & [▼]; press the [RST].
2. Hold [▲] & [▼] key until the normal mode is displayed.
Operating Specifications
Temperature measure range: 32 – 99 °F / 0 – 40 °C
Setting Temperature range:
40-95 °F / 5-35 °C
Temperature Resolution:
1 °F / 0.5 °C
Battery:
2 x AA alkaline battery
Relay Contact Voltage:
24 VAC 50/60 Hz
Relay Contact Current:
1A Max. (inductive)
Temperature Accuracy:
+/- 1 °F
Operating Temperature:
32 – 104 °F / 0 – 40 °C
Storage Temperature:
32 – 122 °F / 0 – 50 °C
Operating Humidity:
5-95%RH non-condensing