Trouble shooting guide – Amerex 14425 User Manual
Page 7
6
8.
Depress the operating lever and fill extinguisher with the amount of agent specified on the nameplate
USING ONLY CLEAN, UNCONTAMINATED HALOTRON I AGENT. (See detailed instructions on your
recharging system).
CAUTION: AVOID LIQUID HALOTRON I CONTACT WITH EXTINGUISHER CYLINDER. WIPE DRY
IMMEDIATELY WITH A CLEAN CLOTH.
9.
Pressurize to the extinguisher operating pressure with ARGON only. Repeatedly rock the extinguisher
to thoroughly mix the ARGON pressurizing gas until proper pressure is reached. Add additional
ARGON as necessary until the pressure stabilizes.
10.
Check for leaks at the gauge, valve outlet and valve/cylinder connection using a halogen type leak
detector or leak detection fluid. DO NOT USE SOAPY WATER! Thoroughly remove all leak detection
fluid residue from the valve assembly and cylinder. Remove recharge adapter.
CAUTION: IF YOU USE A HALOGEN TYPE LEAK DETECTOR A RESIDUAL AMOUNT OF
HALOTRON I WILL REMAIN IN THE VALVE BODY UNTIL THE LIQUID EVAPORATES. TO
PROPERLY LEAK TEST USING THE HALOGEN LEAK DETECTOR IT IS RECOMMENDED THAT
THE EXTINGUISHER BE SET ASIDE A MINIMUM OF 24 HOURS AFTER RECHARGING, THEN
LEAK TESTING.
11.
Place nozzle or hose and nozzle on scale with extinguisher. Weigh and confirm that the total weight is
within the allowable tolerances indicated in the maintenance section of the extinguisher nameplate.
12.
Install nozzle or hose and nozzle assembly.
13.
Install ring pin with ring facing front of the extinguisher. Install new tamper seal. Record recharge
date and attached new recharge tag.
TROUBLE SHOOTING GUIDE
WARNING: DETERMINE THE SOURCE OF A LEAK BEFORE THE EXTINGUISHER IS
DEPRESSURIZED. THE EXTINGUISHER MUST BE COMPLETELY DEPRESSURIZED BEFORE ANY
ATTEMPT IS MADE TO REMOVE THE VALVE ASSEMBLY AND CORRECT THE LEAKAGE PROBLEM.
SEE INSTRUCTIONS PACKAGE WITH THE AMEREX HALOTRON I RECHARGE KIT P/N 14538 OR
GETZ HALOTRON RECOVERY SYSTEM FOR THE PROPER METHOD OF DEPRESSURIZING THE
EXTINGUISHER TO AVOID UNNECESSARY DISCHARGE AND MINIMUM AGENT LOSS.
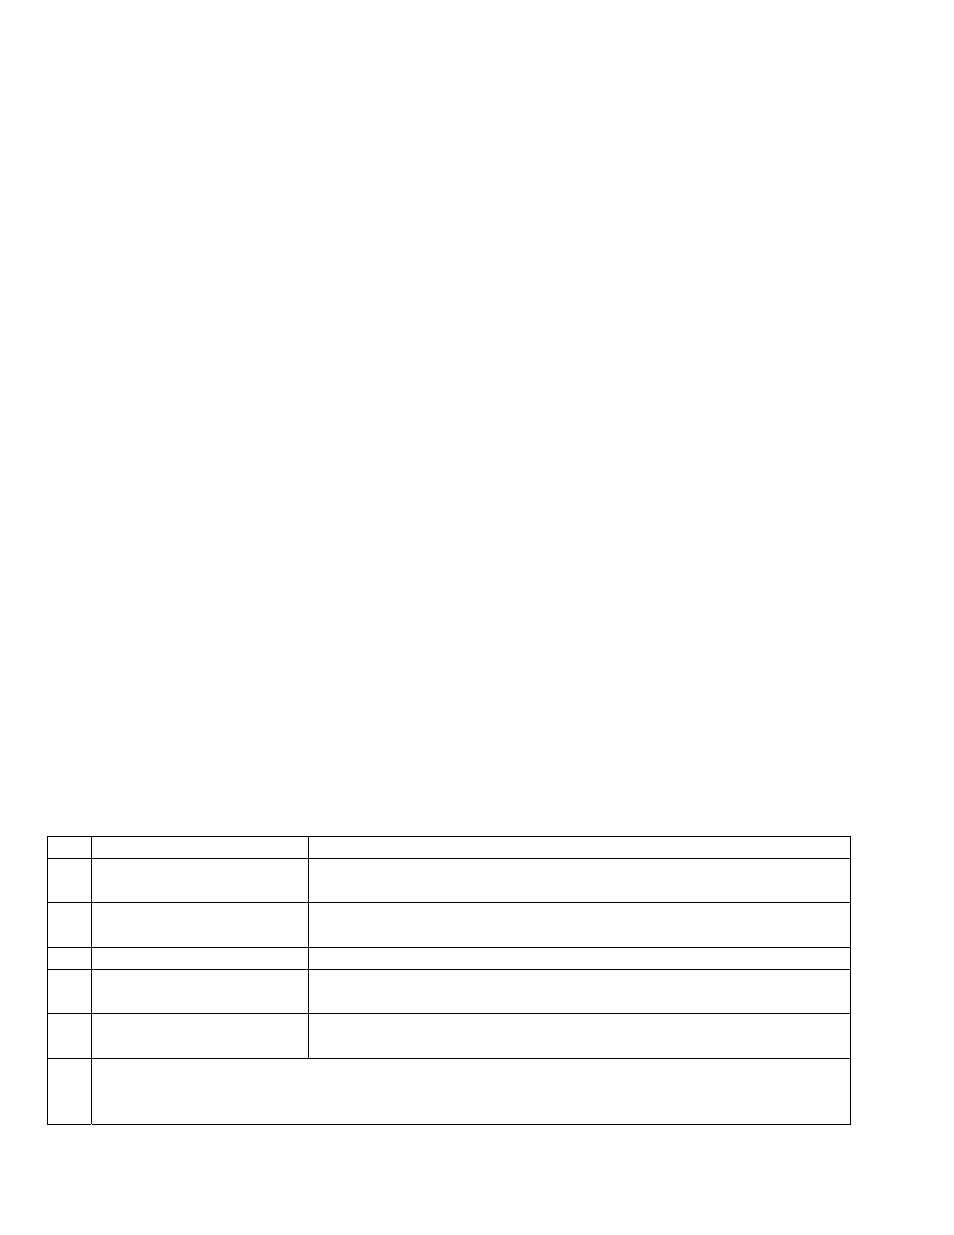
PROBLEM
CORRECTIVE
ACTION
1.
Leak at collar o-ring
Remove valve assembly, clean collar thoroughly and install new ring.
(Optional)
2.
Leak through valve
Install new valve stem assembly. Check valve seat for scratches or
foreign matter
3.
Leak around gauge threads Remove gauge* and reinstall using Teflon tape on the gauge threads
4.
Defective gauge
Remove defective gauge* and install a new gauge using Teflon tape on
the gauge threads.
6.
Leak in cylinder
Contact Amerex if under warranty, otherwise mark “REJECTED” and
return to owner.
*
Pressure gauge threads are coated with a special epoxy at the factory. For easy removal soak the
valve assembly in hot water (180° F/82°C) for two to four minutes. Remove gauge with a 7/16” open
end wrench.