KROHNE CAPAFLUX IFM 5080 K Datasheet EN User Manual
Page 4

Measuring ranges and error limits
Meter size
1)
Electrical conductivity
Error limits
2)
Full-scale range Q
100%
0.05-0.2 µS/cm > 0.2 µS/cm
in m
3
/h
in US gal/min
mm
inches
(water
(water
v > 1 m/s
v
≤ 1 m/s
v = 0.3 m/s
v = 1 m/s
v = 12 m/s
v = 1 ft/s
v = 40 ft/s
1-2.5 µS/cm)
> 2.5 µS/cm)
> 3 ft/s
≤ 3 ft/s
(minimum)
(maximum)
(minimum)
(maximum)
DN 25
1
0.5302
1.767
21.20
2.334
93.34
DN 40
1
1
/
2
1.358
4.524
54.28
5.979
239.0
DN 50
2
2.121
7.069
84.82
9.339
373.5
DN 80
3
5.429
18.10
217.1
23.900
955.6
DN100
4
8.483
28.27
339.2
37.350
1493.0
Calibrated on EN 17025 accredited calibration rigs
Reference conditions similar to EN 29104
by direct comparison of volumes
Product
water at 10 – 30°C / 50 – 86°F
Electrical conductivity
> 300 µS/cm
Power supply (rated voltage)
U
N
(± 2%)
Ambient temperature
20 – 22°C / 68 – 71.6°F
Warm-up time
60 min
Inlet/outlet runs
10 x DN / 2 x DN (DN = meter size)
Primary head
properly grounded and centered
Current output
same error limits as above, additionally ± 10 µA
Reproducibility or repeatability
0.1 % of MV, minimum 1 mm/s / 0.04 inches/s at constant flow, measuring time > 100 s
External influences
typical values
maximum values
Ambient temperature
Pulse output
0.003% of MV (3)
0.01% of MV (3)
Current output
0.01% of MV (3)
0.025% of MV (3)
}
at 1 K /1.8°F variation
Power supply
<0.02% of MV
0.05% of MV at 10 % variation
Load
<0.01% of MV
0.02% of MV at max. permissible load, see pages 5 and 6
(3) All KROHNE signal converters undergo burn-in tests, duration minimum 20 hours at varying ambient temperatures
– 20 to + 60 °C / – 4 to + 140 °F. The tests are controlled by computers.
CAPAFLUX
CAPAFLUX
4
1) Where low electrical conductivities are concerned,
the meter size should be such that flow velocity
v < 1 m/s (< 3 ft/s).
2) Error limits for display,
pulse output, digital values
< ± 0.5 %
of measured
value
< ± 5 mm/s
< ± 0.20
inches/s
depending on
product and
application
condition, please
consult your local
KROHNE office
for all
applications
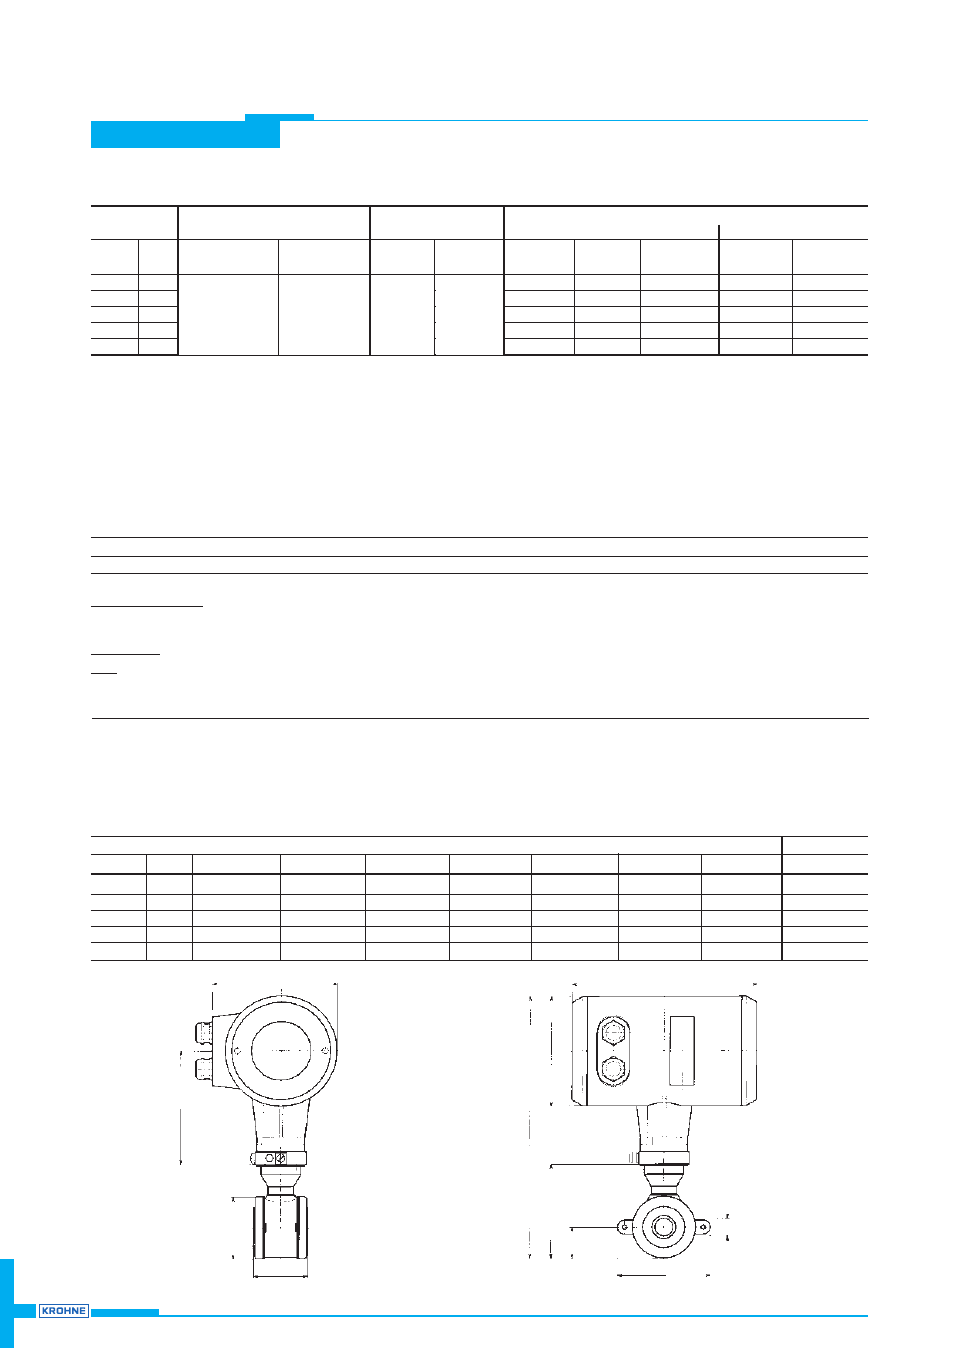
Dimensions and weights
●
all dimensions in mm and (inches)
●
without grounding rings: Dimension a incl. gaskets between primary head and pipe flanges
●
with groundings rings:
Dimension a + 10 mm or a + 0.4’’, incl. 2 gaskets between measuring tube and grounding rings and
2 between grounding rings and pipe flanges
Meter size
Dimensions in mm and (inches)
approx. weight
DN mm
inches a
b
c
d
e
Ø f
Ø di
in kg
(lb)
25
1
58
(2.28)
302 (11.89) 113 (4.45)
34
(1.34)
102 (4.02)
68 (2.68)
20
(0.79)
3.9
(8.6)
40
1
1
/
2
83
(3.27)
318 (12.52) 129 (5.08)
42
(1.65)
117 (4.61)
83 (3.27)
30
(1.18)
4.7 (10.4)
50
2
103
(4.06)
336 (13.23) 147 (5.79)
51
(2.01)
135 (5.31)
101 (3.98)
40
(1.57)
5.2 (11.5)
80
3
153
(6.02)
368 (14.49) 179 (7.05)
67
(2.64)
167 (6.57)
133 (5.24)
60
(2.36)
7.7 (17.0)
100
4
203
(7.99)
392 (15.43) 203 (7.99)
79
(3.11)
192 (7.56)
158 (6.22)
80
(3.15)
11.1 (24.5)
136 (5.35’’)
128 (5.04’
’)
dia.
f
d
c
b
dia.
di
dia.
122 (4.80’
’)
208 (8.19’’)
e
a
