Styles, Principles of operation, Models – DeFelsko PosiTector 6000 v.3.0 User Manual
Page 2: Power-up / power-down, How to take a measurement, Golden rule, Menu operation, Calibration
The
6000
hand-held, electronic Gage non-destructively
measures the thickness of coatings on metals, quickly and
accurately.
While all
6000
Gages look the same and behave in a
similar fashion, each model has specific abilities or features
as denoted by the model number (e.g. 6000 FNS3). The
model number is engraved on the back and is displayed
when the Gage is turned on.
Styles
Built-In Probe Gages have a permanent, built-in probe for
easy, one-hand operation.
Separate Probe Gages have the probe mounted at the end
of a cable and have an “S” suffix in the model number.
They allow greater accessibility onto small parts or into
hard-to-reach areas. These separate probes retain their
own unique calibration information and are completely
interchangeable. On power-up the
6000
automatically
determines what type of probe is attached, then self-
calibrates.
Principles of Operation
F models use the magnetic principle to measure the
thickness of non-magnetic coatings on ferrous metals.
N models use the eddy current principle to measure the
thickness of non-conductive coatings on non-ferrous
metals.
FN models combine the full abilities of both the “F” and
“N” models.
Models
1 BASIC- mils/microns, FLIPLCD and RESET features.
2 STANDARD- all BASIC features plus average, standard
deviation and user adjustable HiLo limits.
3 MEMORY- all STANDARD features plus storage &
printer/computer downloading for 5000 measurements
Power-up / Power-down
The
6000
powers-up when any button is depressed and
displays the last measurement. Gages with a Built-In probe
turn on automatically when the probe touches the surface.
To preserve battery life, the Gage powers-down after 60
seconds of no activity. There is no OFF button. All settings
are retained during power-down including the last
measurement. Always allow the Gage to power down
automatically before changing the batteries.
How To Take A Measurement
1. On Built-In probe models, slide the probe cover open
FULLY. It acts as a second "foot" to steady the Gage
when required.
2. Press any button to turn the Gage on. Built-In probe
models turn on automatically when the probe is placed
on a surface.
3. Place the probe FLAT on the surface to be measured
and HOLD STEADY. When a valid coating thickness
measurement is calculated, the Gage BEEPS and
BLINKS twice and displays the measurement.
Lift probe AT LEAST 2 INCHES (50 mm) from surface
between measurements - OR - leave probe in the same
location for continuous measurements every 5 seconds.
When finished, slide the Built-In probe cover FULLY shut to
prevent Gage from accidentally turning on and draining the
battery. Keep Separate probes away from metal so they
can power down automatically.
Golden Rule
Measure your uncoated part first! This quick zero-check
determines if any adjustment is needed for your particular
substrate. Zeroing compensates for deviations in shape,
diameter, composition, roughness, etc.
Menu Operation
Gage functions are menu controlled. To access this menu,
turn the Gage on and press
∅⊕ simultaneously to display
the first menu choice.
To answer "YES" press
⊕ and the current choice will be
selected.
To answer "NO" press
∅ and the next option will be
displayed.
After the last MENU option, the Gage re-displays the last
measurement.
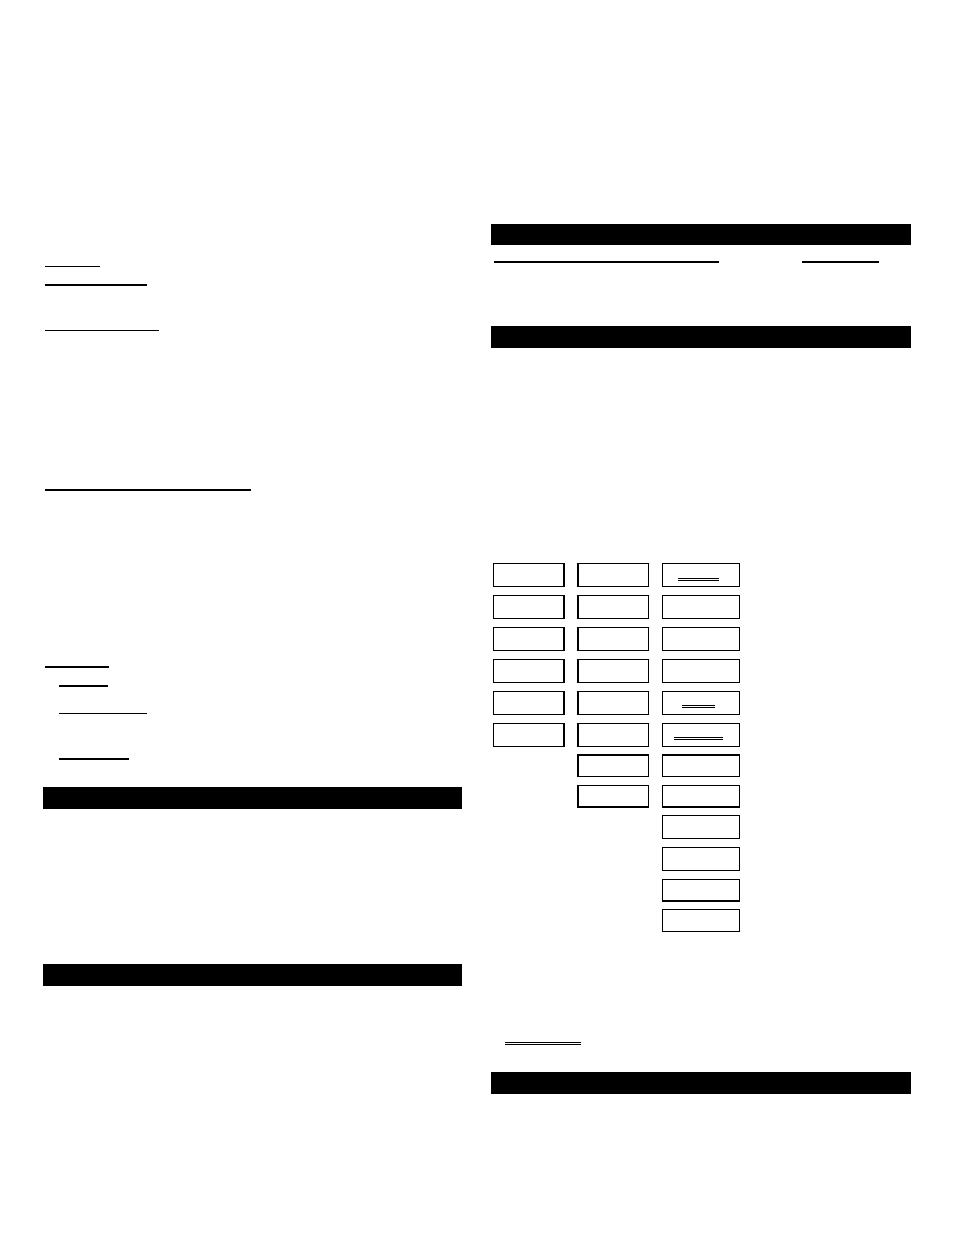
BASIC (1)
Models
STANDARD(2)
Models
MEMORY(3)
Models
ZERO?
STAT
ON?
STAT OFF?
B MARK?
↓
↓
↓
[ 2ND PNT? ]
HiLo
ON?
HiLo OFF?
MEM
ON?
MEM OFF?
↓
↓
↓
N LOCK?
FN AUTO?
ZERO?
STAT ON?
STAT OFF?
↓
↓
↓
MICRONS?
MILS?
[ 2ND PNT? ]
HiLo ON?
HiLo OFF?
↓
↓
↓
FLIPLCD?
N
LOCK?
FN AUTO?
PRINT?
↓
↓
↓
RESET?
MICRONS?
MILS?
CLR MEM?
↓
↓
FLIPLCD?
ZERO?
↓
↓
RESET?
[ 2ND PNT? ]
↓
N LOCK?
FN AUTO?
↓
MICRONS?
MILS?
↓
FLIPLCD?
↓
RESET?
◊ N LOCK/FN AUTO for FN models.
◊ [Bracketed options] appear only on FA & FHS Gages and
microprobes.
◊ ZERO? and 2ND PNT? do not appear in MEMORY,
STATS or HiLo modes.
◊ Underlined options appear only if readings are stored in
memory
Calibration
Calibration is instant and automatic. The 6000 uses
stored N.I.S.T. (National Institute of Standards and
Technology) calibration data and no further calibration is
required. Just ZERO on your uncoated substrate then
measure.