Step 7, Step 8 – Catskill Craftsmen 51576 User Manual
Page 9
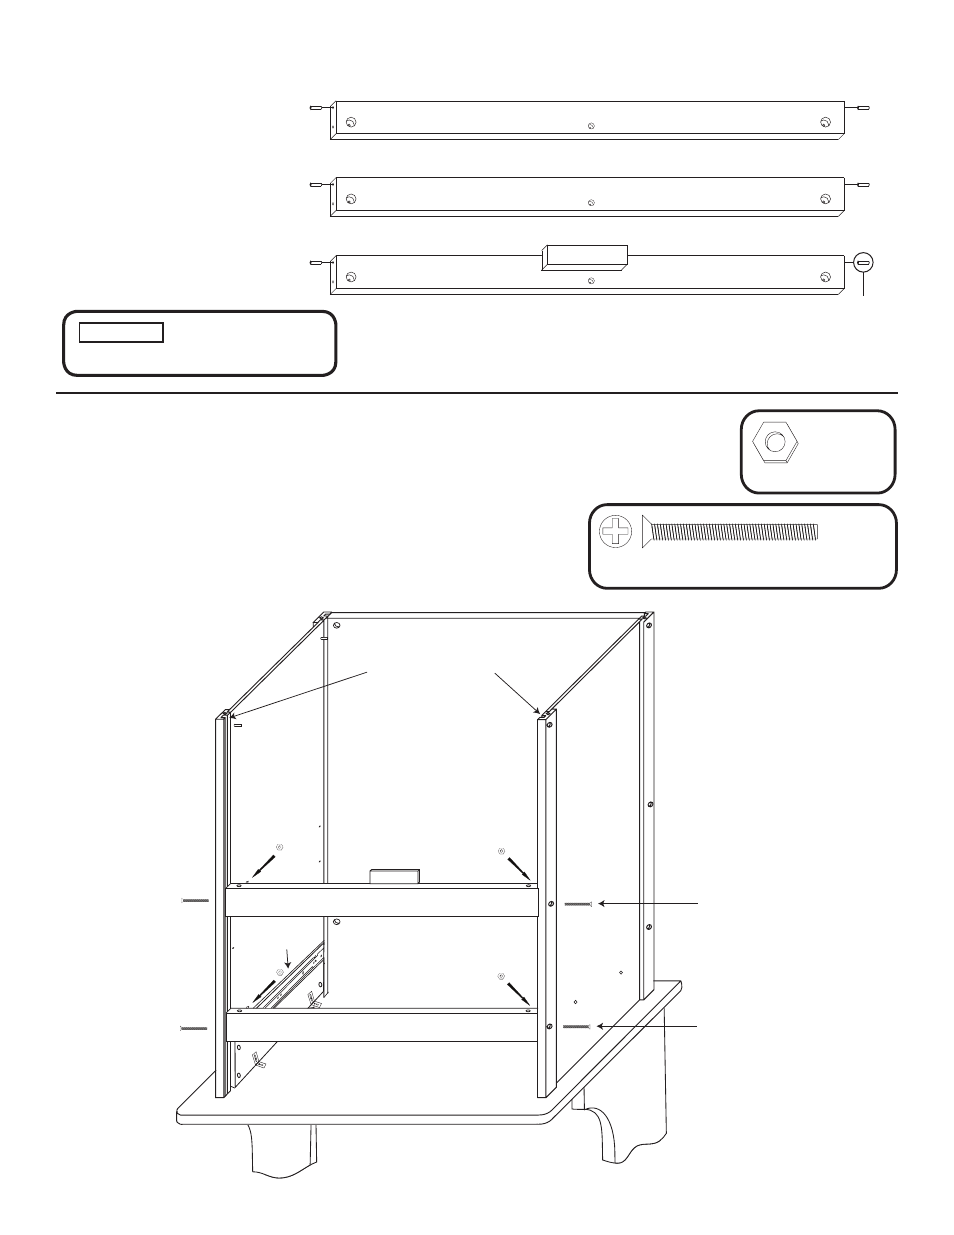
STEP 7
Take the 2 front braces
and tap/insert one 3/4”
steel pin into each end of
both braces until seated.
About 3/8” will stick out
when seated. Ok if loose.
6 used in this step
3/4” Long 3/16” DIA. Steel Pin
4 used in
this step
1 3/4” Phillips Flat Head Bolt
4 used
in this step
10-24 Hex Nut
STEP 8
A. Take the top front brace, insert the pins in the brace ends
into the slots on the inside of the front legs and slide down
until the brace aligns with the bolt hoes as illustrated. The
pin holes for the door pins will be up. Secure with 1 3/4”
bolts/nuts. Repeat with the middle front brace.
Magnet block and pin holes will be facing up.
3/4” Pin
Install 3/4” pins in brace ends
1 3/4” #8 Bolts
Insert Brace Pins Here
Glide Support
Assembly
1 3/4” #8 Bolts
See also other documents in the category Catskill Craftsmen Furniture:
- 1426 (13 pages)
- 1447 (5 pages)
- 1429 (14 pages)
- 1481 (16 pages)
- 1533 (12 pages)
- 1521 (16 pages)
- 1448 (14 pages)
- 1536 (12 pages)
- 1537 (13 pages)
- 1538 (14 pages)
- 1544 (14 pages)
- 1563 (12 pages)
- 1569 (12 pages)
- 1575 (13 pages)
- 1576 (14 pages)
- 1580 (14 pages)
- 1582 (17 pages)
- 1622 (7 pages)
- 1842 (18 pages)
- 1925 (6 pages)
- 2005 (11 pages)
- 2007 (11 pages)
- 2008 (11 pages)
- 1531 (13 pages)
- 1529 (14 pages)
- 1527 (12 pages)
- 1526 (13 pages)
- 1480DOR (17 pages)
- 1476 (13 pages)
- 1470 (12 pages)
- 1461 (8 pages)
- 1428 (15 pages)
- 3314 (6 pages)
- 3310 (6 pages)
- 7237 (12 pages)
- 14485 (14 pages)
- 15445 (14 pages)
- 43017 (13 pages)
- 51524 (12 pages)
- 51526 (13 pages)
- 51527 (11 pages)
- 51531 (12 pages)
- 51533 (11 pages)
- 51536 (11 pages)
- 51537 (12 pages)