Step 6, Step 7 – Catskill Craftsmen 54220 User Manual
Page 8
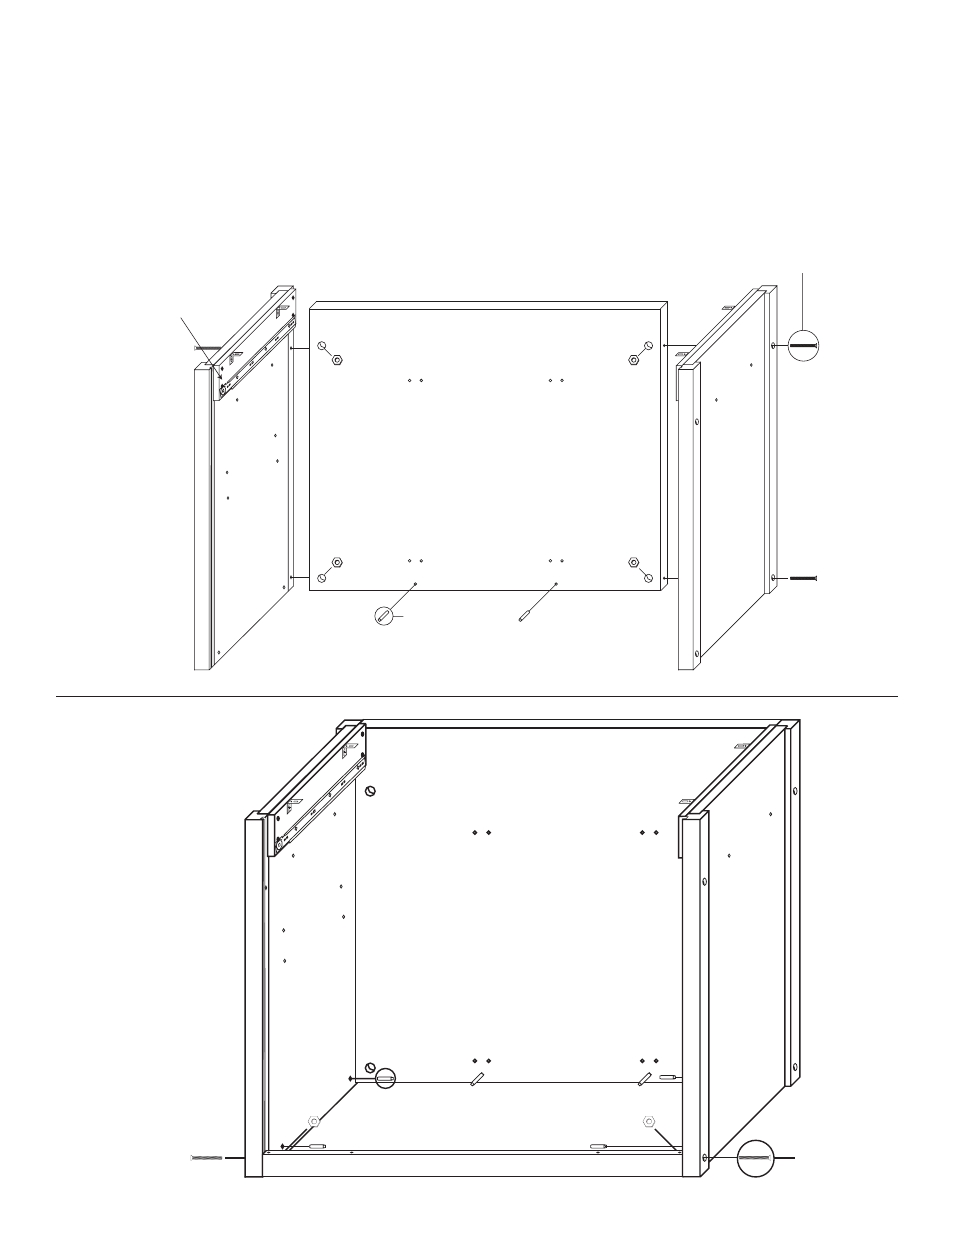
STEP 6
A. Lay Back Panel flat on a smooth surface with holes up.
B. Attach Side Panels with 1 3/4” machine screws (bolts) and hex nuts. After inserting bolts(s) thru the
holes in the Side Panels, thru the holes in the long edges of the Back Panel, place a hex nut on the
tip of your finger, align nut with bolt and tighten.
C. Look ahead to step 7 which shows side panels attached to back panel.
E. Insert 1” pins into back panel as shown.
1 3/4” Bolts
1” Pin
1 3/4” Bolts
1” Pin
Nut
Nut
STEP 7
Bottom Brace
Assembly
A. Secure bottom
brace with 1 3/4”
bolts/nuts as shown.
B. Insert 1” pins into
the side panel as
shown.
1 3/4” Bolts
1” Pin
1 3/4” Bolts
1” Pin
Nut
Nut
Note: Wheel on glide is
to the front of the unit
See also other documents in the category Catskill Craftsmen Furniture:
- 1426 (13 pages)
- 1447 (5 pages)
- 1429 (14 pages)
- 1481 (16 pages)
- 1533 (12 pages)
- 1521 (16 pages)
- 1448 (14 pages)
- 1536 (12 pages)
- 1537 (13 pages)
- 1538 (14 pages)
- 1544 (14 pages)
- 1563 (12 pages)
- 1569 (12 pages)
- 1575 (13 pages)
- 1576 (14 pages)
- 1580 (14 pages)
- 1582 (17 pages)
- 1622 (7 pages)
- 1842 (18 pages)
- 1925 (6 pages)
- 2005 (11 pages)
- 2007 (11 pages)
- 2008 (11 pages)
- 1531 (13 pages)
- 1529 (14 pages)
- 1527 (12 pages)
- 1526 (13 pages)
- 1480DOR (17 pages)
- 1476 (13 pages)
- 1470 (12 pages)
- 1461 (8 pages)
- 1428 (15 pages)
- 3314 (6 pages)
- 3310 (6 pages)
- 7237 (12 pages)
- 14485 (14 pages)
- 15445 (14 pages)
- 43017 (13 pages)
- 51524 (12 pages)
- 51526 (13 pages)
- 51527 (11 pages)
- 51531 (12 pages)
- 51533 (11 pages)
- 51536 (11 pages)
- 51537 (12 pages)