Optional accessories, Optional lower shelf – Tennsco Industrial Workbench with Wood Top User Manual
Page 3
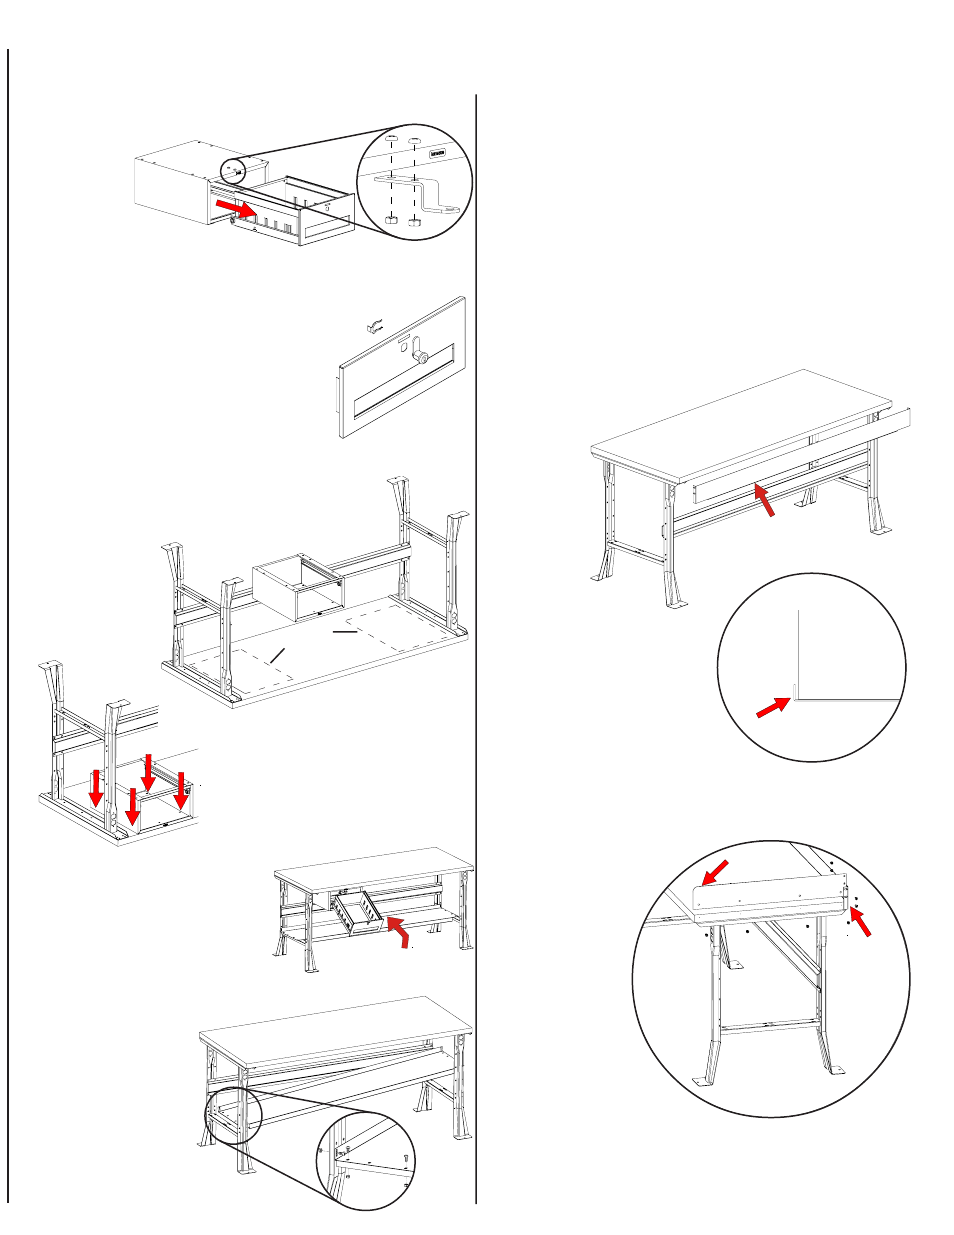
Back Rail
1.
If you are installing the optional side and back
rails, and are also installing an optional riser, the
riser must be in position first. NOTE: The riser
and rails share some of the same screws. To
avoid having to re-do parts of the installation,
please refer to the riser instructions as you
install the side and back rails.
OPTIONAL ACCESSORIES
Optional Workbench Drawer
Optional Riser or Electronic Riser
Optional Side and Back Rails
For assembly and installation of a riser or
electronic riser, please refer to the instructions
which came with the riser kit.
1.
Remove the drawer (Ref. No. 5)
from the
drawer
housing
(Ref. No. 6).
2.
If using a padlock, place the
lock hasp (Ref. No. 7) onto the two bolts which
extend down from the drawer housing (see above).
Attach using two
1
/
4
"-20 nuts. Remove the
rectangular knock-out panel from
drawer front.
6.
With the workbench upright,
slide drawer back into its
housing by tilting downward
to let the drawer rollers
move past each other.
3.
To install optional cam lock (Ref.
No. 10), punch out the round
knock-out panel in the drawer
front. Then insert the cam lock
through the hole, and secure with forked clip.
1.
Place the shelf
(Ref. No. 11) on
the brace of each
leg. Attach with
three
1
/
4
"-20 x
5
/
8
"
bolts and nuts
on each end of
the shelf as shown.
2.
Attach the back rail
(Ref. No. 12)
by holding
it against
the bench
with the
flange tight
against the
bottom of
the workbench top.
Using a
1
/
8
" drill bit, drill
pilot holes into the bench
top through the existing
holes in the back rail,
drilling no deeper than
1
/
2
" into the top.
(IMPORTANT: Make sure
you have allowed space on
BOTH ends of the bench for the side rails to
slip underneath the back rail.) Attach with
eight #14 x
3
/
4
" slotted wood screws.
3.
Attach one side rail (Ref.
No. 13) by slipping
it between the
flange of the
back rail and
the bench top.
Secure with
two
1
/
4
"-20 x
5
/
8
"
bolts and nuts.
With the side
rail now held in
place by the bolts,
use a
1
/
8
" drill bit to
drill four pilot holes into the
bench top through the existing holes in the side
rail. Attach with four #14 x
3
/
4
" slotted wood
screws. Repeat this procedure to attach the
second side rail.
4.
Place the drawer in its desired position.
This can be anywhere on the bench, but it
is most common to mount the drawer
either to the
far left or far
right of the
workbench,
along the
front of the
bench top.
5.
Using the holes in the drawer
housing as a guide, drill four
pilot holes into the bench. (We
recommend using a
1
/
8
" drill bit,
and drilling no deeper than
1
/
2
".)
Secure with four #14 x
3
/
4
"
slotted wood screws.
Three
bolts and
nuts on
each end.
Optional Lower Shelf
Flange at bottom of back rail
fits tight against the under-
side of bench top.
Rounded edge
toward front
Side
rail
slips
beneath
the
flange
of
the
back
rail.
Com
mon
positio
ning
Bench
Top
Leave
an
equal
gap
on
EACH
SIDE
for
side
rails.
View From
Above