Assembly of industrial workbench – Tennsco Industrial Workbench with Wood Top User Manual
Page 2
ASSEMBLY OF INDUSTRIAL WORKBENCH
Tools Needed: A phillips-head screwdriver and a
7
/
16
" wrench or nut driver.
Approximate assembly time for basic bench: 15 to 25 minutes.
Four bolts, nuts,
and lockwashers
on each end of
stringer.
2.
Lay the top (Ref. No. 1) face
down on two sawhorses
or a protected flat
surface.
(NOTE: If attaching an
optional drawer, you may
want to leave the bench in
the upside-down position.)
6.
If you purchased only the basic workbench, your
bench is now complete. The remaining instructions
show assembly of optional accessories (such as the
workbench drawer, the lower shelf, side and back
rails, or risers).
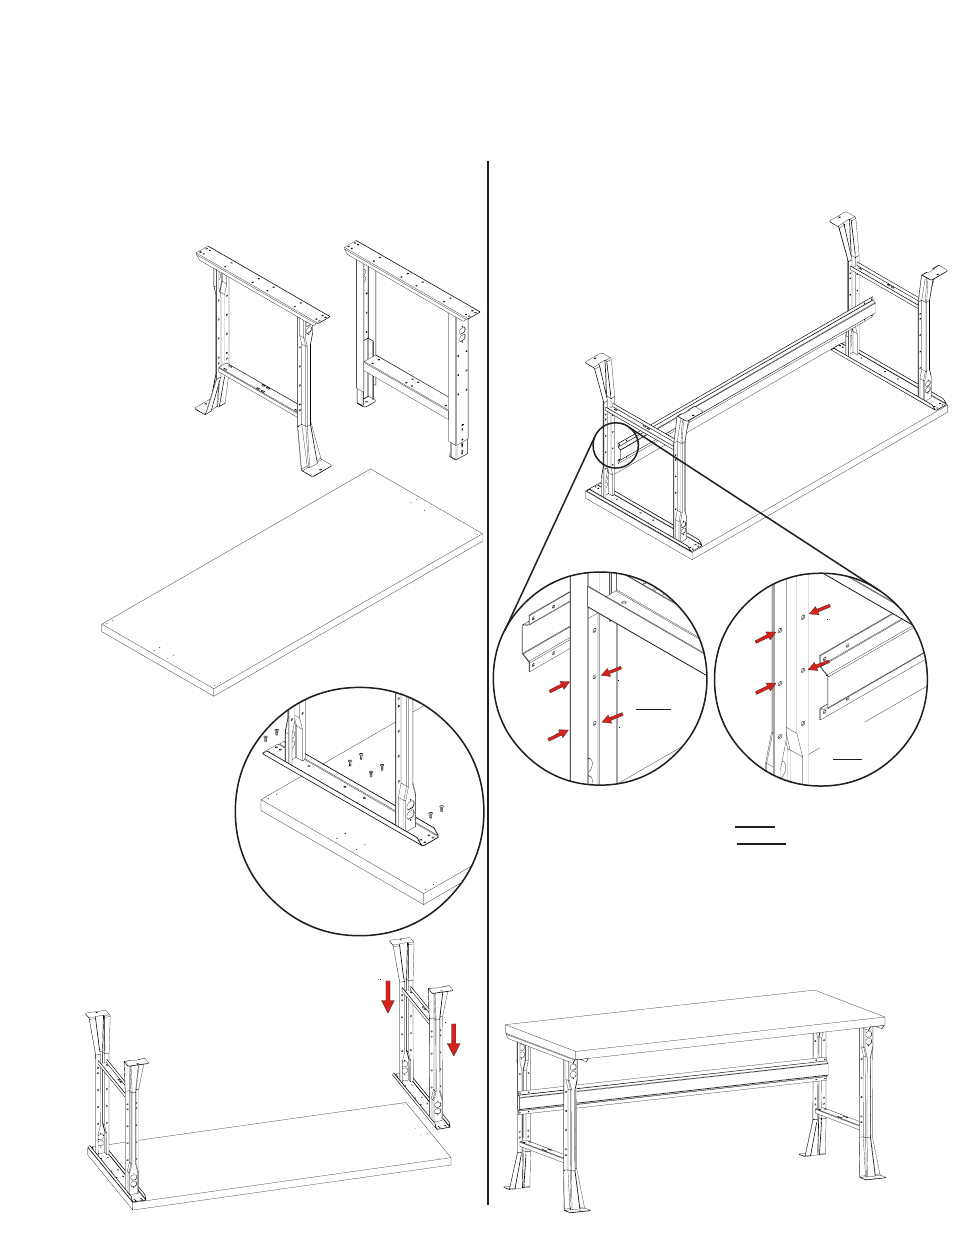
NOTE: The stringer attaches to the flat area of the leg.
For flared legs, this will be on the inside of each leg; for
adjustable legs, this will be on the outside of each leg
(see the illustrations at right).
5.
Attach the stringer (Ref. No. 3) to the rear legs,
legs, skipping the top two holes and using the
next four holes from the top of each
leg. (The legs are symetrical, so the
front and rear of the bench will be
determined by where you place the
stringer.) Attach with eight
1
/
4
"-20 x
5
/
8
bolts,
nuts, and lockwashers (Ref. Nos. 18,
19, and 20)
Adjustable Leg:
stringer attaches
to outside of leg
4.
Place the other workbench
leg on the opposite end of
the bench top, using the
same procedure used in
step 3.
3.
Place a workbench leg
(Ref. No. 2) on one
end of the top, align-
ing with the eight
pre-drilled pilot
holes. Attach with
eight #14 x
3
/
4
" hex
head slotted wood
screws (Ref. No. 17)
NOTE: No wood screws
are necessary where there
are no pre-drilled pilot holes.
1.
Two different legs are available for Tennsco
workbenches: the flared leg or the adjustable leg
(see drawings below). Please note that your
bench will have only one of these leg styles. For
purposes of
clarity, the
remainder of this
instruction sheet
will show the
flared leg only.
However, both
legs install with
identical steps.
Flared Leg:
stringer attaches
to inside of leg
Adjustable
Leg
Flared
Leg