Rhino Shelter Dog Kennel 7.5W X 7.5L X 4H User Manual
Page 4
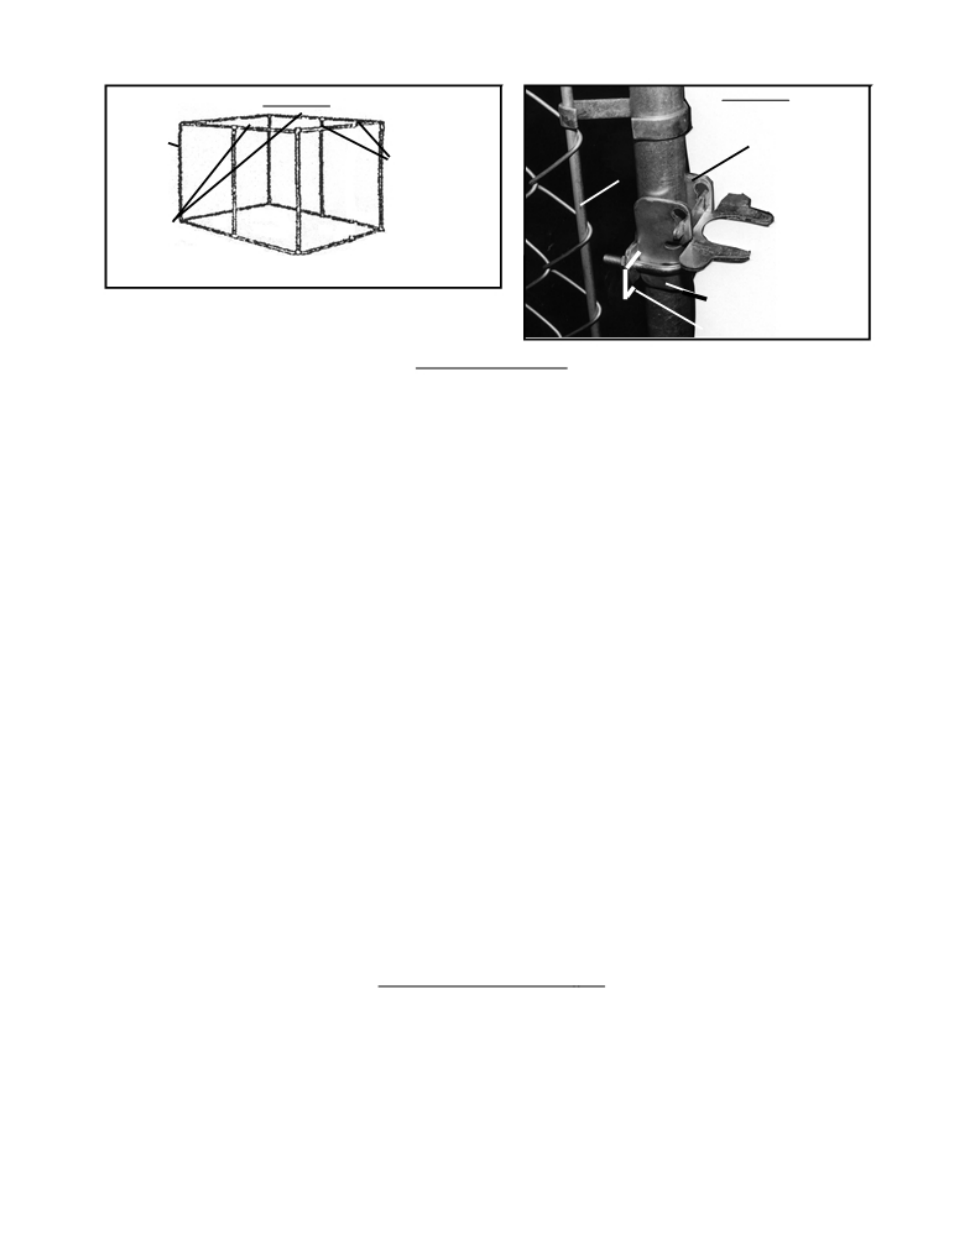
Figure 3
Upright
Pipe (6)
Straight
Frame Rail (4)
Figure 4
Clip (9)
Mounting Bracket and
Gate Latch (10)
Corner
Frame Rail (3)
Tension Bar (5)
Back Plate (11)
Installing the Door
“U” Bolt (12)
1.
Determine the location for the Door (1). The Door (1) must be set directly onto one Frame
Rail. Do not have the Door (1) span two Frame Rails. Measure 22-1/2” from an existing
Upright Pipe (6) and install the remaining Upright Pipe (6), using two Pipe Clamps (8) to hold
it to the upper and lower frame as in Step 4. The Door (1) will be set between these two
Upright Pipes (6).
2.
Determine which one of the Upright Pipes (6) to attach to the Door. Place one Parallel Pipe
Clamp (13) ten inches up from the bottom of that Upright Pipe (6). The center Small Carriage
Bolt (15) and Nut (17) will need to be removed and the outside Small Carriage Bolt (15) and
Nut (17) will need to be loosened in order to install the Parallel Pipe Clamp (13). Separate
the Parallel Pipe Clamp halves and one end over the Upright Pipe and then slightly tighten
the outside Small Carriage Bolt (15) and Nut (17). Make certain that the outside Small
Carriage Bolt (15) and Nut (17) are on the outside of the Upright Pipe (6). Install a second
Parallel Pipe Clamp (13) ten inches down from the top of the same Upright Pipe (6) in the
same way as the first one. Slightly pry open the bottom Parallel Pipe Clamp (13) and slide
the lower portion of the door into it. Do the same for the top end of the Parallel Pipe
Clamp (13) and the upper portion of the Door (1). Install both center Small Carriage
Bolts (15) and Nuts (17).
3.
To mount the gate locking mechanism, locate the Mounting Bracket and Gate Latch (10), the
Back Plate (11), and the “U” Bolt (12). Locate two Little Hex Nuts (16). Set the Mounting
Bracket and Gate Latch (10) onto the Door (1) at the desired height. Slide the “U” Bolt
around the front of the Mounting Bracket and Gate Latch (10) and through the Back
Plate (11)-see Figure 4. Thread on both Small Hex Nuts (16) to secure all hardware in place.
4.
Check that the Door (1) opens and closes, and that the Mounting Bracket and Gate
Latch (10) secure and lock the Door (1).
Installing the Chain Roll (2)
1.
Insert the Tension Bar (5) into the Chain Roll links at the start of the Chain Roll (2).
2.
Connect the Chain Roll (2) and Tension Bar (5) to the Upright Pipe (6) with a Clip (9). The
Tension Bar (5) and Clip (9) will be attached to the Upright Pipe (6) in the same way as
shown in Figure 4. Wrap the wide end of the Clip (9) around the Upright Pipe (6). Pull the
Chain Roll (2) taut and insert the Tension Bar (5) into the Clip (9). Repeat with three more
Clips (9) to tightly secure the end of the Chain Roll (2) against the Upright Pipe (6).
DK75754JJ/DK751306JJ
Please DO NOT return unit to store or dealer. For all questions or shortages please contact Page 4
Customer Service at: 800-447-7079 or 203-877-7070