Features, Parts list, Installation and use – Nature Power BAYPORT Solar Post Lamp (23106) User Manual
Page 3
Page 3
FEATURES
Ø
Rechargeable battery included
Ø
Powered by high quality crystalline solar cells
Ø
Aluminum construction makes it rust free
Ø
4 Natural White LED’s
Ø
Waterproof design provides longer life in all weather conditions
Ø
Light automatically turns on at dusk
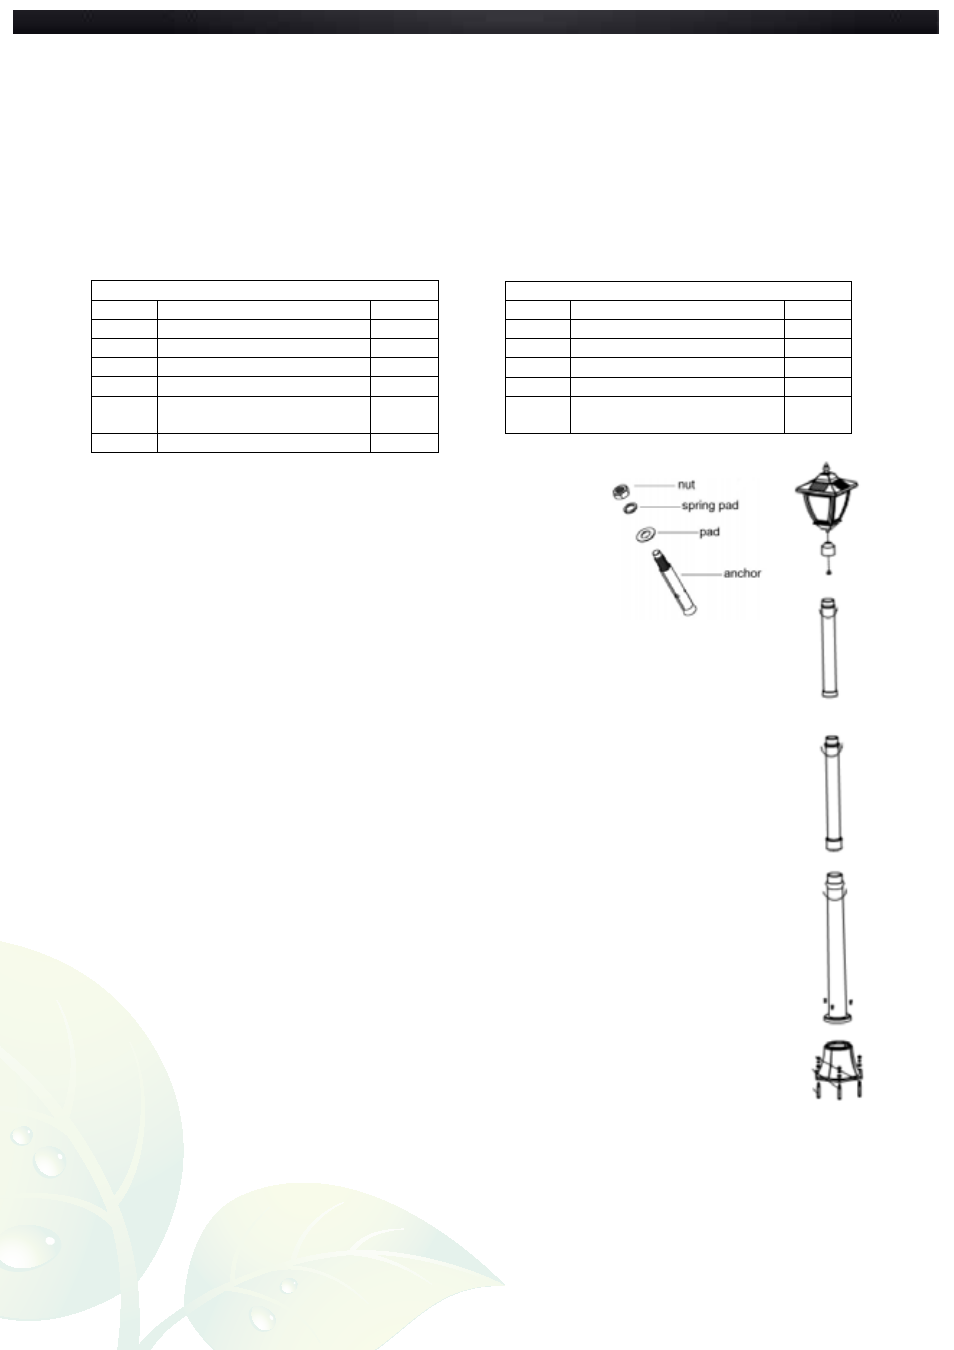
PARTS LIST
#23106
Part #
Description
Qty.
1
Lamp Head
1
2
Lamp Pole
3
3
Lamp Base
1
4
Screws
3
5
Anchor (with pad, spring pad,
and nut)
3
6
Lamp Head Adapter
1
INSTALLATION AND USE
Post Lamp Mounting:
1)
Carefully remove the solar light and all the fittings out of the box.
2)
Find a suitable place to install the lamp. There are several ways to secure the
post lamp. You may wish to set the anchor bolts in cement, or secure the lamp
base to a heavy object. Be sure the area is flat so the lamp will stand straight.
3)
Mark the three holes from the lamp base on the ground or mount surface.
4)
Using an electric drill, drill holes in the mount surface where the marks were
made.
5)
Place the anchor in the holes with the threaded ends out. Release the nut, spring pad, and pad from the
anchor and put the lamp ground base onto the anchor, the anchor should be through the holes. Reinstall the
pad, spring pad and then the nut. Tighten with a wrench.
6)
Make sure the lamp base is stable before installing the lamp poles.
7)
Install the lamp pole onto the lamp base by supplied 3 screws and L shape wrench.
8)
Install the rest of lamp poles according to size by twisting clockwise.
9)
Attach lamp head to lamp head adapter.
10)
Fix the lamp on to the pole by twisting in a clockwise direction.
Lamp Wall Mounting:
1)
Use an electric drill to make two holes in the wall.
2)
Place provided anchors into holes with the threaded ends out.
3)
Place wall mount in line with the holes and secure it with the pad, spring pad, and nut. Tighten with a wrench.
4)
Make sure the wall mount is stable before installing the lamp head.
5)
Screw lamp head onto wall mount.
Lamp Pillar Mounting:
1)
Use an electric drill to make two holes into desired surface.
2)
Place provided anchors into holes with the threaded ends out.
3)
Place pillar mount in line with the holes and secure it with the pad, spring pad, and nut. Tighten with a wrench.
6)
Make sure the pillar mount is stable before installing the lamp head.
4)
Insert the screw from the underneath of the lamp head into the pillar mount and fasten with supplied nut.
Lamp Post Mounting:
1)
Insert the screw from the underneath of the lamp head into the post mount and fasten with supplied nut.
2)
Place the post mount onto an existing 3” post using the 3 screws provided.
Diagrams continued on next page.
#23206
Part #
Description
Qty.
1
Lamp Head
1
2
Mounts (Wall, Pillar, Post)
3
3
Nut
1
4
Screws (with Post Mount)
3
5
Anchor (with pad, spring pad,
and nut)
2